Before we start use it, you'd better import it to an empty project, following the ReadMe to learn this framework step by step.
Let's see the folder structure :
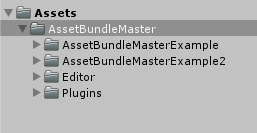
It has 4 folders in the AssetBundleMaster folder:
[AssetBundleMasterExample] is Demo for leaning basical APIs, It include load assets, load scenes, and how to do unload.
[AssetBundleMasterExample2] is Demo for testing how Built-In Shader multi compiled and how AssetBundleMaster to optimize it.
[Editor] is editor scripts.
[Plugins] is runtime scripts, asset load is basic logic for a project, so we put it in Plugins.
Let's try to run API Demo scenes in Editor Mode, open AssetBundleMaster Window first :

window shows :
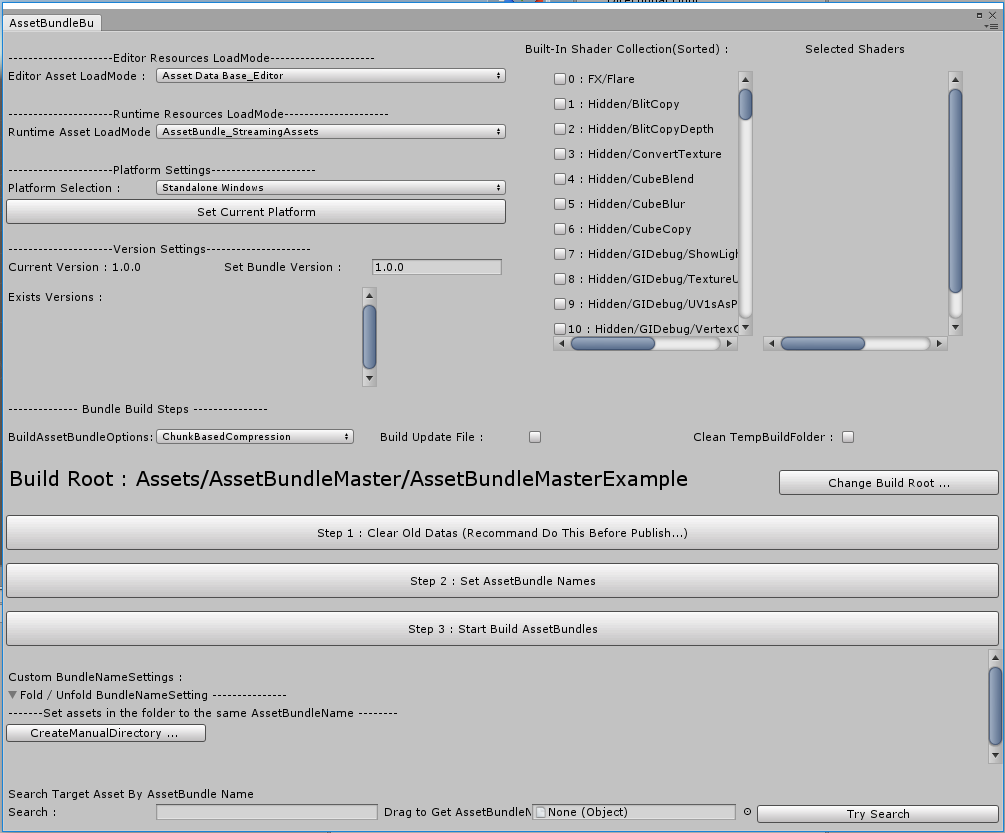
We need to set only 2 variables can make it run in Editor, developer friendly, ignor other options now :
1. Editor Asset LoadMode : load mode in Editor, select AssetDataBase_Editor, it means load asset directly.
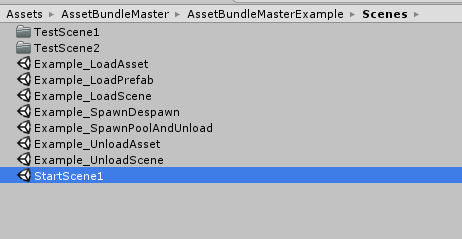
2. Build Root : It is the root folder for loading assets, click [Change Build Root...] to change the folder, set to AssetBundleMasterExample so that we can run API Demo scenes. The entry scene is StartScene1, you can find it in AssetBundleMasterExample/Scenes folder:
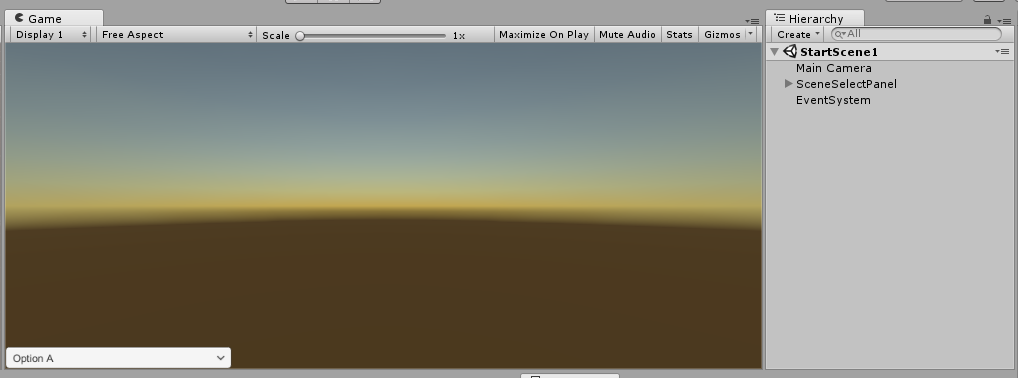
Run StartScene1, the bottom-left shows a dropdown for selecting demo scenes :
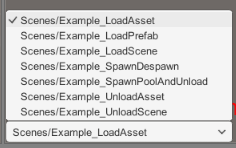
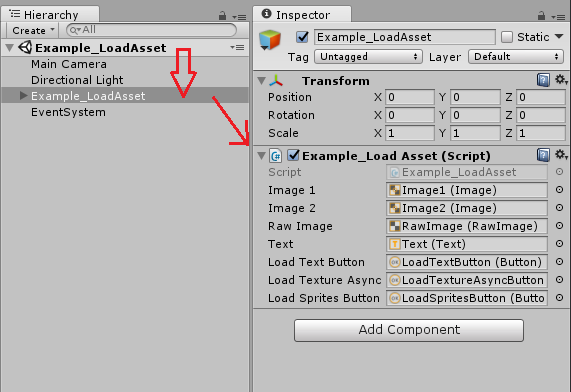
These are all the API demo scenes, select any scene, you can see the hierarchy that a GameObject has the same name with the scene, and the same named script attached on it, check it.
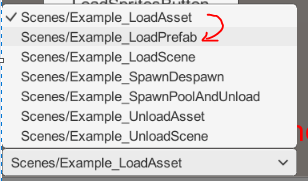
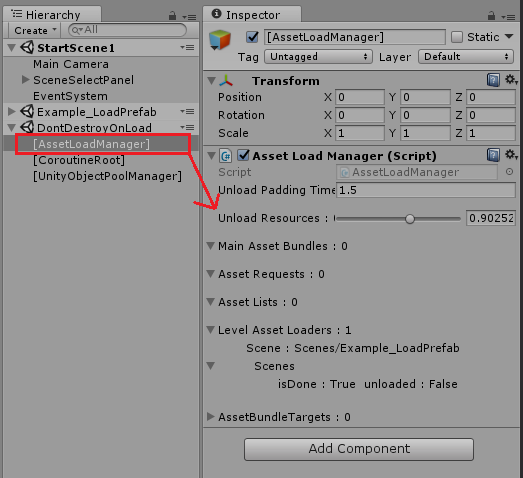
We must explain how the scene load proccess working, when we select any scene it will unload all assets loaded before, so that any asset will be loaded in the new scene will be new loaded, this is convenient for testing asset load and unload, you can open Profiler window to check all the time. The unload proccess has a padding time such as you changed the scene, it will trigger unload. You can see Hierarchy select [AssetLoadManager] GameObject and the inspector will shows it :
Change the scene, then you can see [AssetLoadManager] Inspector has a count down Slider:
If you use Profiler : Memory > Detailed > Take Sample to check assets in memory, check after the unload proccess done.
Let's see every demo scene and how to use APIs, we set the Build Root path, so all the asset load paths are relative path from it, the assets in this folder are called main assets that commonly are the assets should be load by your script, like Scenes, and assets not in this folder called referenced assets like Meshes will not be load by your code, so you don't need to put all assets into the Build Root. keep this in mind.
PS : when using AssetDataBase_Editor mode, it has no asynchronous loading, all asset loading will be sync load because we use AssetDataBase.LoadAssetAtPath as Editor load function.
You can check what kinds of assets we have in the AssetBundleMasterExample folder.
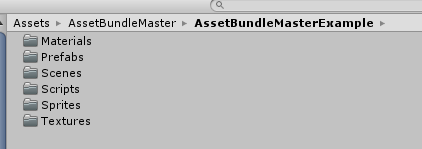
After all the setting was done for Editor load, not so much things to learn, if you want it work for your project, only to set Build Root to your asset folder.
Now you can see AssetBundleMaster generated a file in your Resources Folder, this is the basic setting of AssetBundleMaster, you just upload it for other teammates can use it :

Let's start learn how to use API by Demo scenes. How to create AssetBundle written at the end.
1. Example_LoadAsset (Script : Example_LoadAsset.cs)
This Demo shows how to load common assets, loading with ResourceLoadManager .
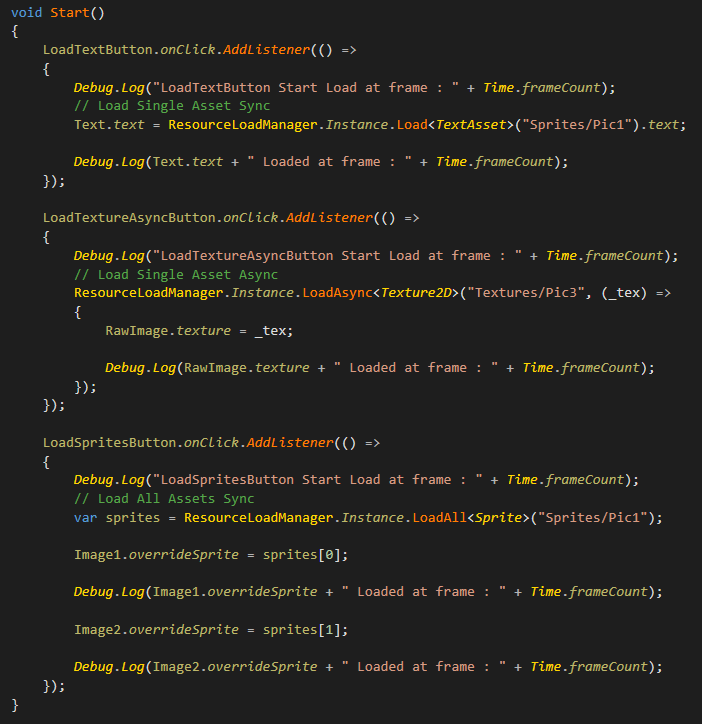
API (namespace AssetBundleMaster.ResourceLoad):
ResourceLoadManager.Instance.Load<T>(string loadPath)
ResourceLoadManager.Instance.LoadAsync<T>(string loadPath, System.Action<T> loaded)
ResourceLoadManager.Instance.LoadAll<T>(string loadPath)
It load assets in Sprite and Texture folder, the path "Sprites/Pic1" is kind of special, let's see :


It contains 3 assets have the same asset name Pic1.jpg / Pic1.png / Pic1.txt, in this situation our asset load API use no ext name path to load assets, so these 3 assets have the same load path, the API can load asset by limit its type, for example ResourceLoadManager.Instance.Load<TextAsset>("Sprites/Pic1").text; loaded the first TextAsset in the path, and ResourceLoadManager.Instance.LoadAll<Sprite>("Sprites/Pic1"); load all Sprites from this path, if you change "Sprites/Pic1" to "Sprites" that targeting the folder, it will also load asset, the logic is the same as UnityEngine.Resources load API. This feather solved the case when in Android load from StreamingAssets that has no way to load assets from target folder.
Tips for AssetBunlde load mode : if you are requesting asset async, and the assetbundle is still loading, if a sync requst happened, the Console will pop an error message, but the function still work. see below :
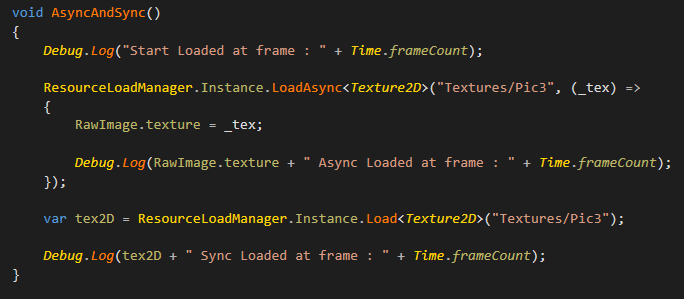

This is because Unity has no provide any API for stop a AssetBundle async load, and load sync while async is loading will pop error, the AssetBundleMaster Low-Level API handles it to ensure all call backs and returns was work correctly. you don't need to worry about it.
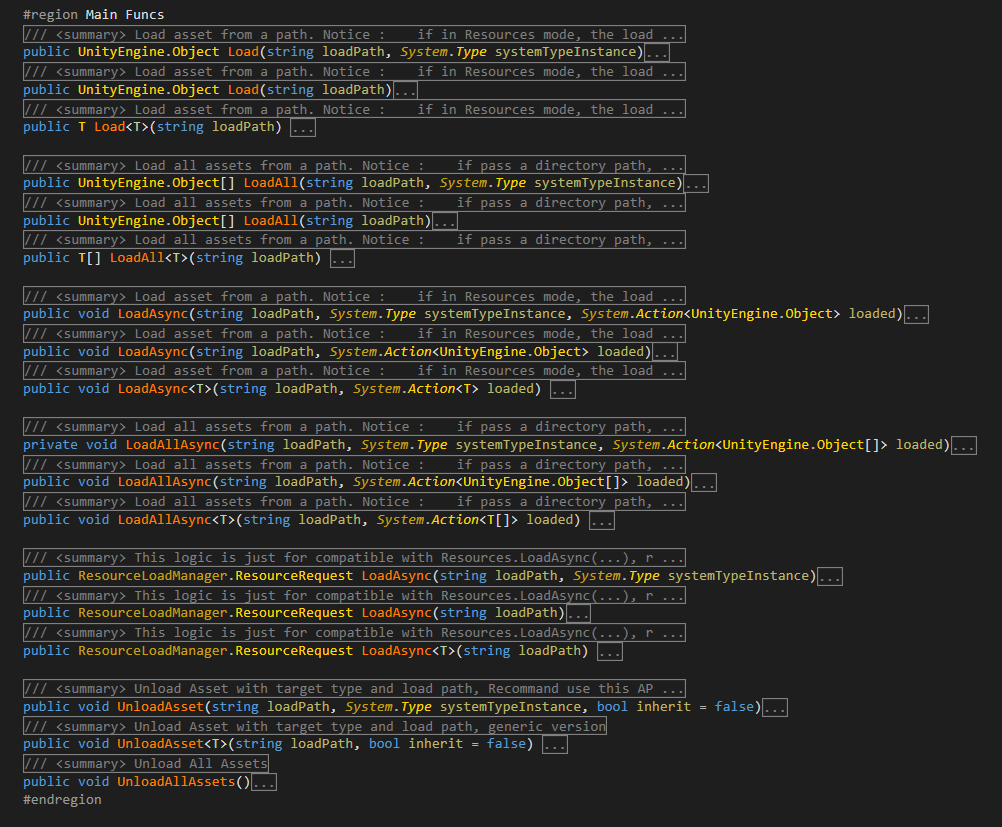
Other APIs can be check in ResourceLoadManager.cs, include Generic and Non-Generic version, convenient for users using lua script.
2. Example_LoadPrefab (Script : Example_LoadPrefab.cs)
This demo shows how to load and Instantiate GameObjects. load with PrefabLoadManager.
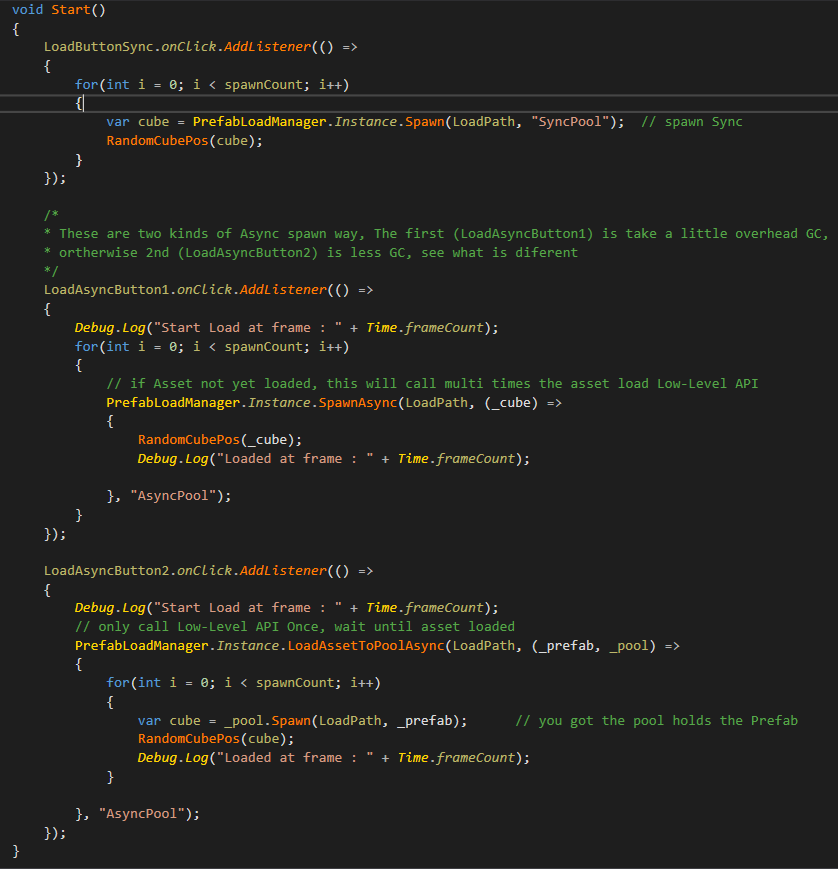
API (namespace AssetBundleMaster.ResourceLoad):
PrefabLoadManager.Instance.Spawn(string loadPath, string poolName = null, bool active = true)
Spawn is to load and Instantiate GameObject.
PrefabLoadManager.Instance.SpawnAsync(string loadPath, System.Action<GameObject> loaded = null, string poolName = null, bool active = true)
SpawnAsync is to load Async and Instantiate GameObject.
PrefabLoadManager.Instance.LoadAssetToPoolAsync(string loadPath, System.Action<GameObject, GameObjectPool> loaded = null, string poolName = null)
LoadAssetToPoolAsync is to load prefab asset Async to target pool.
PrefabLoadManger using objectpool to control the instantiated GameObjecs. you can check PrefabLoadManager.cs, the asset load is based on ResourceLoadManager.
You should always load and instantiate GameObject with this API(UI, Particle Effect, Weapon...etc), with PrefabLoadManger you are not only get benefit from ObjectPool, but also get auto resources control.
3. Example_LoadScene (Script : Example_LoadScene.cs)
This demo shows how to load scenes, be aware all the scenes should not be added to Build Settings, developer friendly.

Don't add any scene to Build Settings, the scene load is like load asset using relative load path.
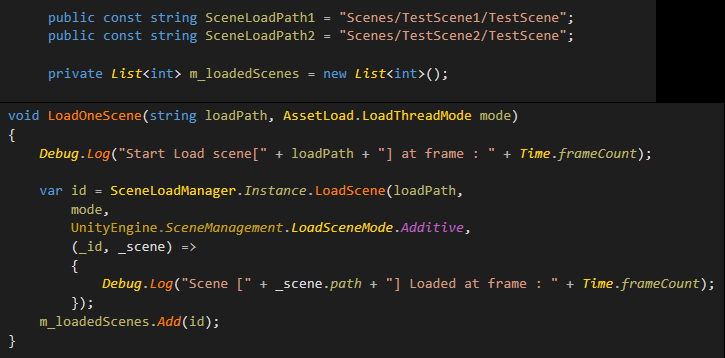

API (namespace AssetBundleMaster.ResourceLoad):
SceneLoadManager.Instance.LoadScene(string sceneLoadPath,
AssetBundleMaster.AssetLoad.LoadThreadMode loadMode = AssetBundleMaster.AssetLoad.LoadThreadMode.Asynchronous,
UnityEngine.SceneManagement.LoadSceneMode loadSceneMode = LoadSceneMode.Single,
System.Action<int, Scene> loaded = null )
It do load scene like an asset using its relative load path, can load with async/sync mode and LoadSceneMode. Please notice it that load scene must wait for the call back UnityEngine.SceneManagement.SceneManager.sceneLoaded that means no matter load scene Sync or Async, you'd better wait for loaded call back.
It return a hashcode as handler of this scene.
4. Example_SpawnDespawn (Script : Example_SpawnDespawn.cs)
This demo shows how the objectpool do spawn and despawn GameObject.
API (namespace AssetBundleMaster.ResourceLoad):
PrefabLoadManager.Instance.Spawn(string loadPath, string poolName = null, bool active = true);
PrefabLoadManager.Instance.Despawn(GameObject go, string poolName = null);
We do auto load and Instantiate prefab, and set active when spawn a GameObject, with the set poolName you must despawn GameObject to the same pool where it spawn from. The GameObject will be set active false while despawn to pool, if you have spacial needs, rewrite the code at AssetBundleMaster.ObjectPool.GameObjectPool.Despawn.
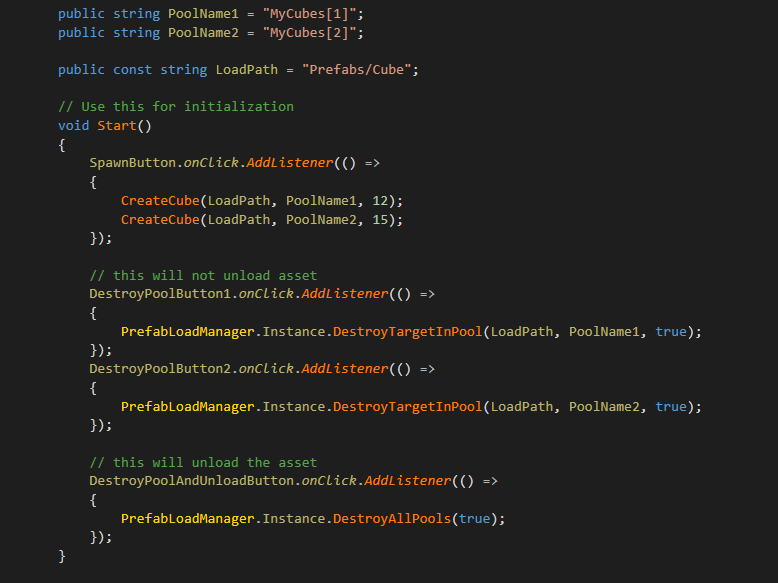
5. Example_SpawnPoolAndUnload (Script : Example_SpawnPoolAndUnload.cs)
This deom shows how to destroy GameObject and how's the auto unload working.
API (namespace AssetBundleMaster.ResourceLoad):
PrefabLoadManager.Instance.DestroyTargetInPool(string loadPath, string poolName = null, bool tryUnloadAsset = true);
This API is to destroy a target all spawned GameObject from target Pool, the mark of the asset is the load path, and with target poolName. if tryUnloadAsset is true, PrefabLoadManager will do check referenced assets, if all pools do not reference to the prefab asset, it will do unload asset proccess.
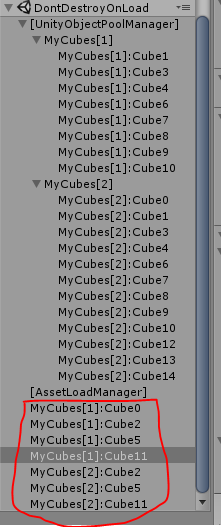
PS : click [Spawn Cubes] button in scene, there are 2 pools was created, and every pool create some Cubes, see Hierarchy there are some Cubes was set no parent, it just for telling you that the connection of spawned GameObject with pool, GameObject still controlled by pool even not child of the pool in Hierarchy.
click [DestroyCubesInPool:MyCubes[1]] button, the MyCubes[1] pool will destroy all Cubes controlled by it, we can see pool is alive but spawned cubes was destroied.
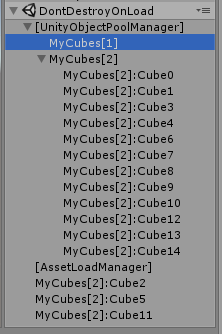
The asset(prefab) is still referenced by MyCubes[2] pool, so it will not trigger the unload asset proccess, click [DestroyCubesInPool:MyCubes[2]] button, now all GameObject was destroied, see [AssetLoadManager] inspector, unload asset was triggered.
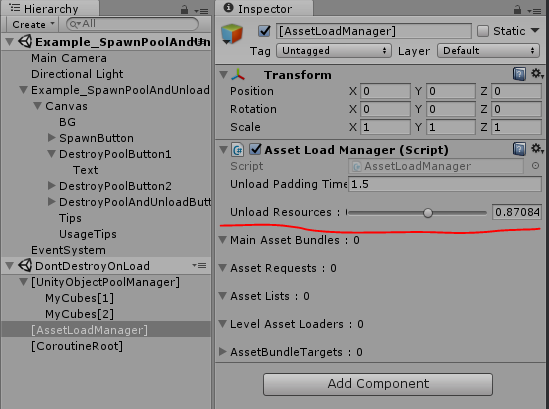
So that PrefabLoadManager can auto control the resources.
6. Example_UnloadAsset (Script : Example_UnloadAsset.cs)
This deom shows common asset unload proccess. the API is to unload asset :

API (namespace AssetBundleMaster.ResourceLoad):
ResourceLoadManager.Instance.UnloadAsset(string loadPath, System.Type systemTypeInstance, bool inherit = false);
ResourceLoadManager.Instance.UnloadAsset<T>(string loadPath, bool inherit = false);
Unload asset is not like UnityEngine.Resources.UnloadAsset , the parameter is not the asset, but the load path + load type, this is because to load the same asset it may have diferent load types, for example a pic can be load as Texture2D or Object, so the unload logic is also the same. The unload type can be inherit, like the picture shows above, ResourceLoadManager.Instance.UnloadAsset<Object>("Sprites/Pic1", true); means to unload all type inherit from Object that load from path "Sprites/Pic1", and the ResourceLoadManager.Instance.UnloadAsset<Sprite>("Sprites/Pic2", false); means only to unload Sprite type load from "Sprites/Pic2". this API is more accurate than the UnityEngine.Resources.UnloadAsset.
This API is privide a flexible asset unload logic that it do reduce the reference count of assets, if any asset reference count was set to 0, the unload proccess will be triggered. if you set all references of assets to null, the assets will be unloaded, but if not, the ResourceLoadManager holds weakreference to the assets too, and someone request the same asset next time, ResourceLoadManager will return the weakreferenced target and no need to reload asset, this is the core logic to make sure asset will not duplicated in memory.
Unload procccess based on Resources.UnloadUnusedAssets(); we are not sure it will spike your runtime or not, in middle-class project it is unnoticeable, if it works smooth, all project members will not need to do overhead jobs to do resource control. Just load and unload by your need, no mess on resource control.
If it do spike your project, you can adjust the unload padding time and unload assets at appropriate time, you can still get benefit from no duplicated assets.
Adjust padding time : AssetBundleMaster.AssetLoad.AssetLoadManager.Instance.unloadPaddingTime
7. Example_UnloadScene (Script : Example_UnloadScene.cs)
This demo shows unload scene features, scene loading can have both async and sync proccess, the scene loaded is triggered by SceneManager.sceneLoaded, so to unload scene is a little complex :

API (namespace AssetBundleMaster.ResourceLoad, AssetBundleMaster.AssetLoad):
AssetLoadManager.Instance.UnloadLevelAssets(int hashCode);
This is a Low-Level API to clear scene assets, it only works in AssetBundle mode, and only can clear AssetBundle serializedfile which scene referenced, if you don't load scene again while this scene exists, and the serializedfile was eat up your memory, you can call it but we recommand don't call it, it may cause asset duplicated. This example is to show if you call it, do not unload then scene and load scene again, the assets in memory duplicated.
SceneLoadManager.Instance.UnloadScene(int id, System.Action<Scene> unloaded = null);
The scene load API ( SceneLoadManager.Instance.LoadScene ) retuen a HashCode, UnloadScene is use this HashCode. and the unload asset proccess will triggered if any scene asset can be unload. it is also auto resource control. The scene load has async proccess, the unload flow chart is like below(if not AssetBundle mode, no AssetBundle step) :
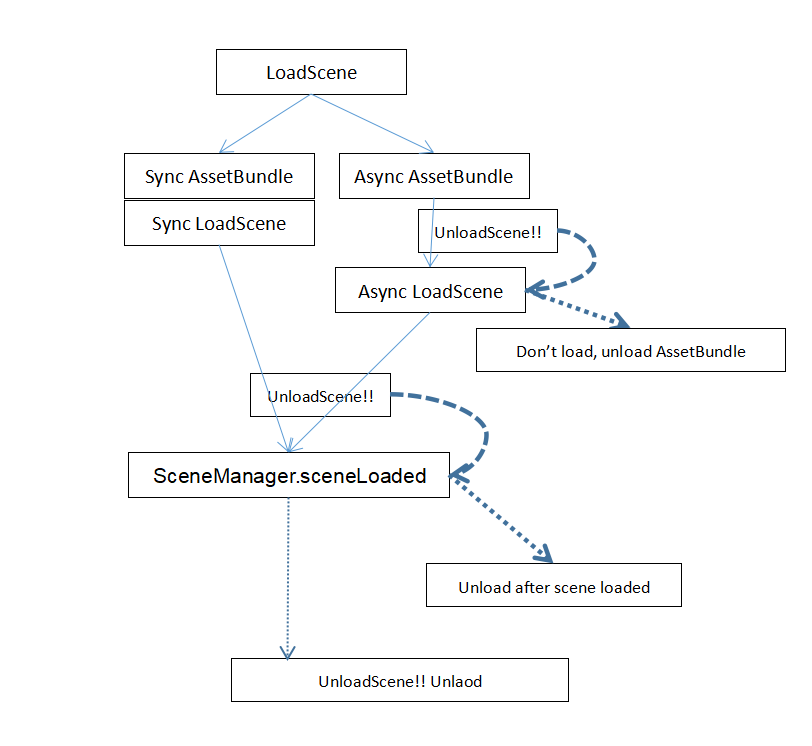
The Async loading may be :
1. Async load AssetBundle
2. Async load Scene
3. Wait SceneManager.sceneLoaded called no matter load scene Async/Sync
So the UnloadScene function wrapped all situations to make sure unload request work at any loading step.

This is to test UnloadScene function, it do load scene Aync and unload after Wait Frames, change to 1,2,3...etc, can see in all step it works.
Thats all the Asset load, GameObject load, Scene load and unload logic, controlled by only 3 managers:
1. ResourceLoadManager
2. PrefabLoadManager
3. SceneLoadManager
if you run in editor mode, some tests may not work as well such as Async load and asset duplicate. Let's start build AssetBundle, and runs it in Editor and published app.
--------------------------------------- Build AssetBundles -----------------------------------------
Open the AssetBundleMaster Window

We have 5 load modes, and have 3 published asset load modes.
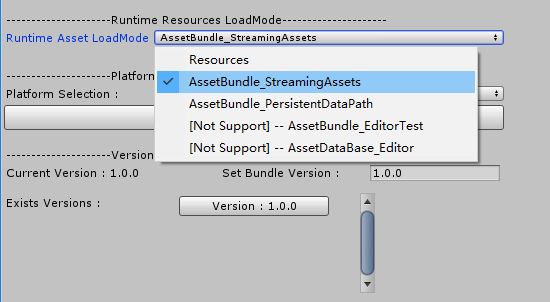
1. Resoueces mode: used as default Resources load mode, meaningless for us.
2. AssetBundle_StreamingAssets mode: load AssetBundle from StreamingAssets.
3. AssetBundle_PersistentDataPath mode : updatable resource mode, load from PersistentDataPath, if no asset in PersistentDataPath, load from StreamingAssets.
4. AssetBundle_EditorTest mode: load from temp AssetBundle folder, build AssetBundle will build to temp folde (Editor Only).
5. AssetDataBase_Editor mode: no need to build AssetBundle, load asset directly (Editor Only).
Let's check all the settings on AssetBundleMaster Window :
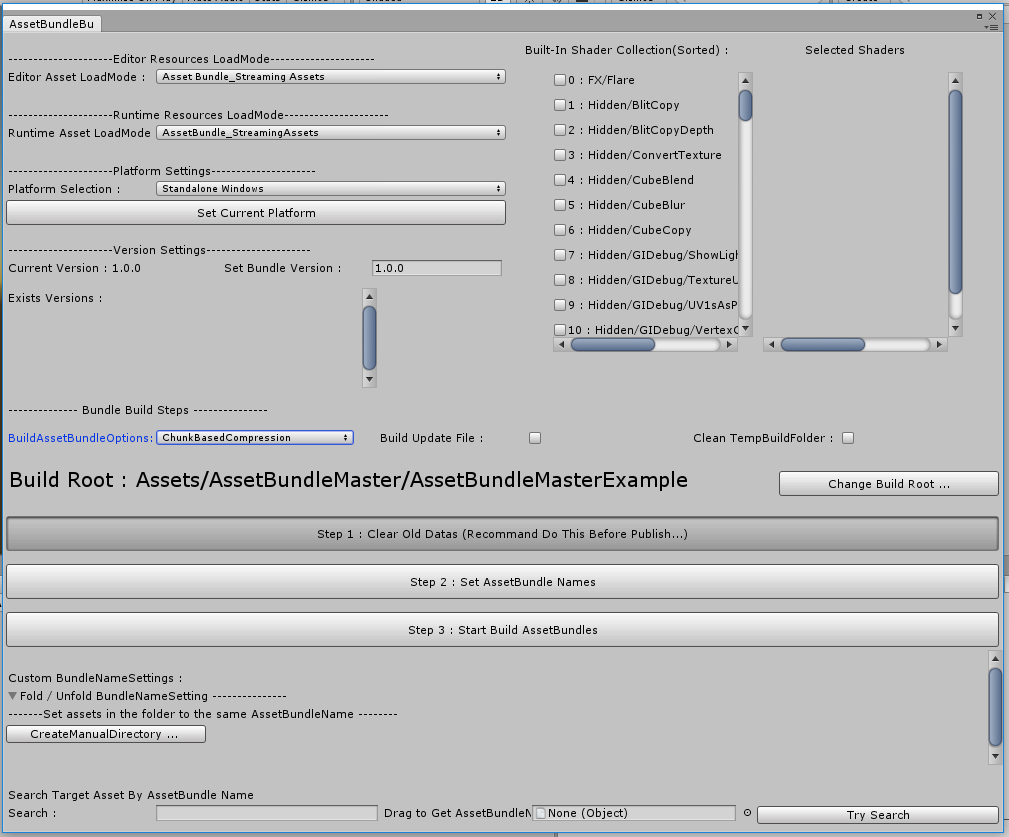
1. Editor Asset LoadMode (EnumPop) : Asset load mode in Editor.
2. Runtime Asset LoadMode (EnumPop) : Asset load mode in Published.
3. Platform Selection (EnumPop) : AssetBundle target platform, click [Set Current Platform] can set to current platform.
4. Set Bundle Version (Text) : The version of AssetBundle.
5. BuildAssetBundleOptions (EnumFlagPop) : BuildAssetBundleOptions.
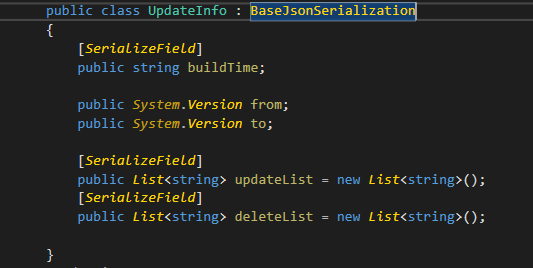
6. Build Update File (CheckBox) : Create Patch between versions, Patch file is Josn, serialized from AssetBundleMaster.AssetLoad.LocalVersion.UpdateInfo.
7. Clean TempBuildFolder (CheckBox) : Clear any file in temp folder not in this build.
8. Built-In Shader Collection (Scroll View CheckBox) : Deal with Built-In Shader, no multi compiled.
9. Build Root (Label, Button) : Root folder, asset in this folder can be load.
10. Step1 Clear Old Datas (Button) : Clear all AssetImporter.AssetBundleName.
11. Step 2 Set AssetBundle Names (Button) : Auto set AssetBundleNames, some asset auto proccess. see appendix.
12. Step 3 Start Build AssetBundles (Button) : Start Build AssetBundles.
13. Custom BundleNameSettings (Scroll View) : Custom force set all files in target folder to a same AssetBundleName.
14. Search Target Asset By AssetBundle Name : Search AssetBundleName files, Debug.
That's all settings. Let's set editor load mode and runtime load mode to AssetBundle_StreamingAssets, this is the most simple publish mode. and click :
Step1...
Step2...
Step3...
It will auto build AssetBundle for you. every step shows tips :

Step1

Step2
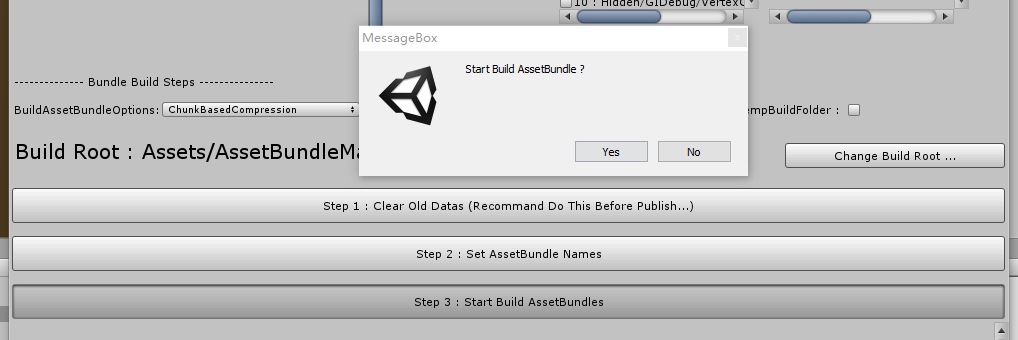
Step3
When build finished, It will ask you to transfor built AssetBundles from temp folder to StreamingAssets? Yes.

You can see StreamingAssets got built AssetBundles :
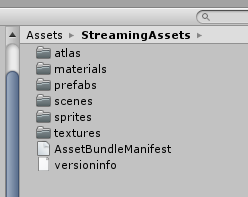
So the AssetBundle build successed, if you run in Editor, just open the StartScene1, repeat the tutorial again. This time the Async load is working.
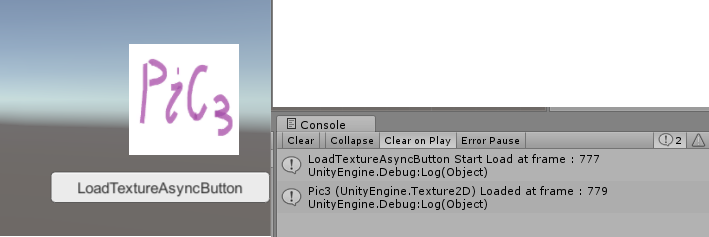
And the [AssetLoadManager] shows different if you noticed :
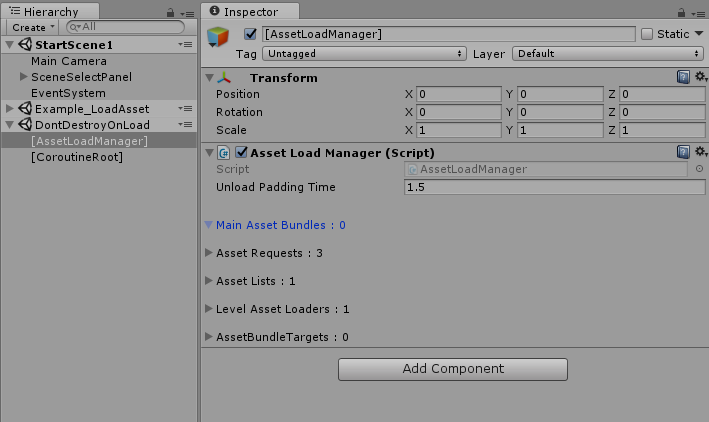
AssetDataBase_Editor no AssetBundle load
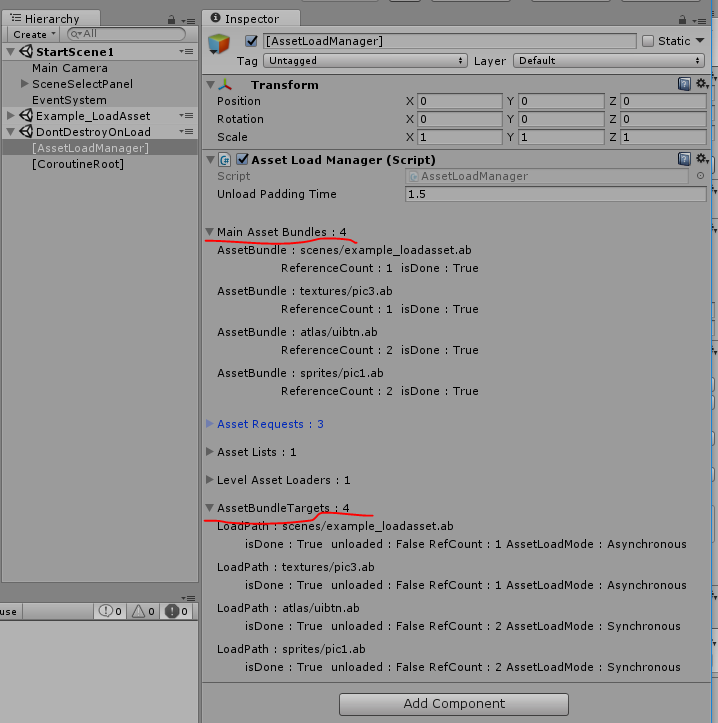
AssetBundle_StreamingAssets loaded AssetBundle
We did successed building AssetBundles and load AssetBundle in Editor, if we want to publish it, make sure your Platform Selection correct, the next one is very important, scene and the Build Settings :
When you pubilsh your project, there is no need to add any scene to build Settings, because the scenes in Build Root folder will be built to AssetBundle, and any scnen added to Build Settings will be packed to Resources too, it will duplicate the scene in build. So how to publish the app and load the StartScene1 as default scene?
We can use the [UnityEngine.RuntimeInitializeOnLoadMethod] attribute to load the entry scene.

You should add this code to any script yourself. This is pretty good to avoid scene build duplicated.
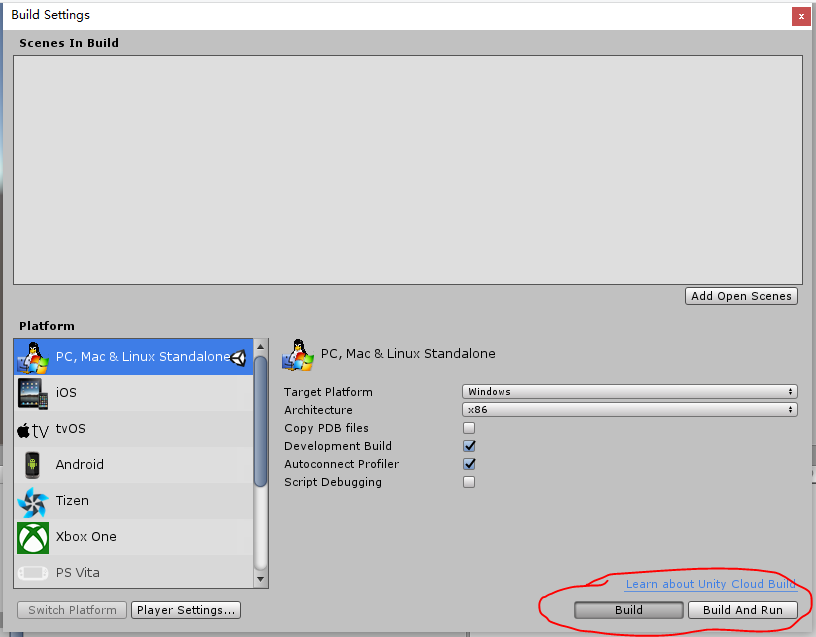
No need to add any scene, just build it and run. it is quite simple to build AssetBundle and App.
Now let' me explain the function 8. Built-In Shader Collection, change the Build Root to AssetBundleMasterExample2 :

And chagne the version to 2.0.0, We Built 1.0.0 before, so Exists Versions shows 1.0.0 Exists, check the Build Update File, we can see Patch file will be generated later. Build Root is AssetBundleMasterExample2, let's see what is in this folder :

There are 44 materials were used in the Example_ShaderCollection scene, they all used the Standard Shader :

These materials may cause the issue. We need to change the entry scene to StartScene2, it will load Example_ShaderCollection, now change the load scene path :

Do build AssetBundle Steps again,
Step1...
Step2...
Step3...
This time the Step3 shows new tips :
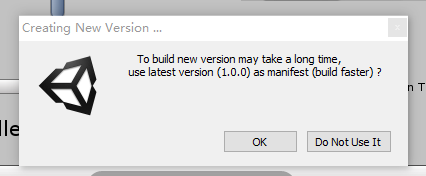
This is because we built 1.0.0 version bundles already, and if we create 2.0.0 version it can be a incremental build, it will be faster than build a totally new version. But this build is to build AssetBundleMasterExample2, is totally diferent with AssetBundleMasterExample, no shared assets, so whatever you choose, it will build a totally new version.
So the function 7. Clean TempBuildFolder (CheckBox) is used for it, if checked, the temp folder will do clean files that not in this version.
After the build AssetBunlde finished, we build app to check what happened to the runtime. don't forget to select the [Development Build] and [Autoconnect Profiler] in Build Settings. My platform is macro soft windows 10.

The task manager shows the app runtime memory : 219.7MB

Profiler

Profiler : ShaderLab 62.9MB
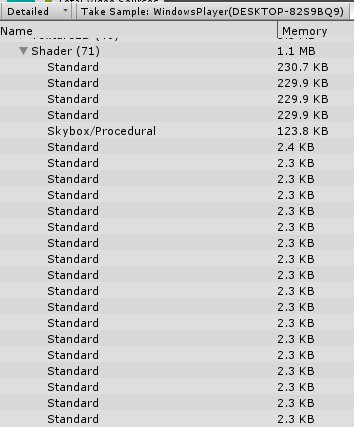
Profiler : Shader > Standard was compiled many times
This issue happend on Standard Shader, let's use the Shader Collection to collect Standard Shader, and build a 3.0.0 version, the shader changes will not cause the changes of referencing assets, so we must select the ForeRebuildAssetBundle on BuildAssetBundleOption, or we will lost the reference of materials :
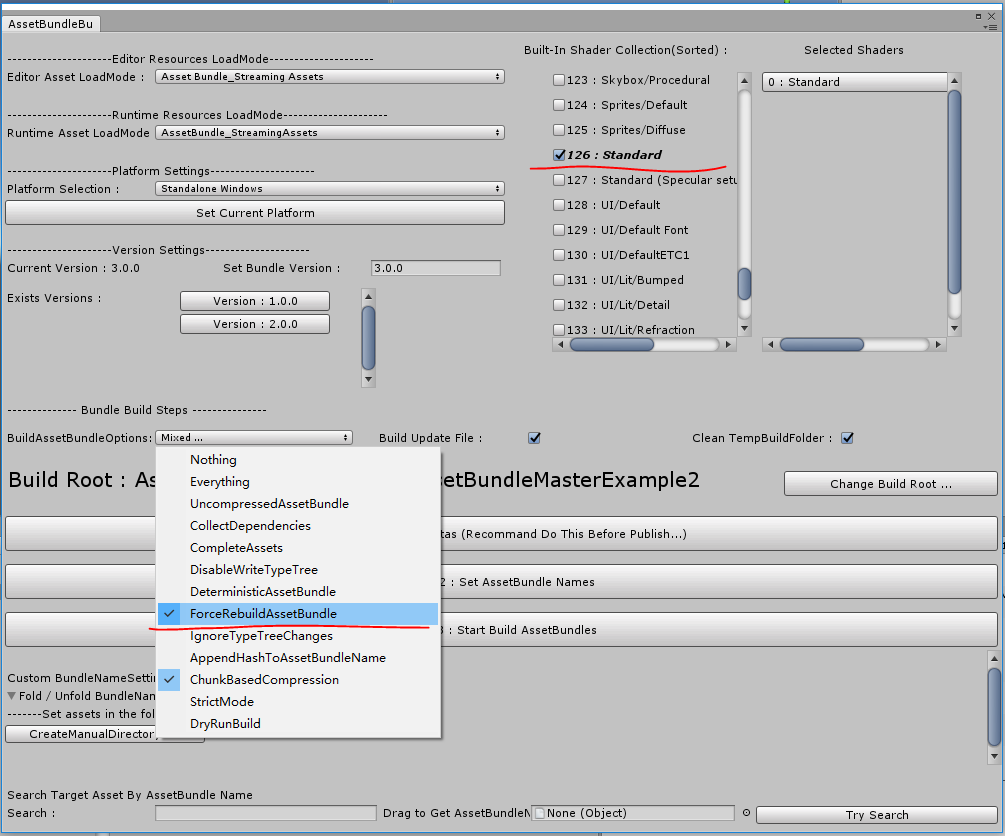
PS : the default setting of BuildAssetBundleOption is ChunkBasedCompression, it is for building AssetBundle faster, you can change the settings by your need, and the setting serialized files is in the editor folder shows below, you can upload to SVN share to your teammate :

Do build AssetBundle Steps again,
Step1...
Step2...
Step3...
And build app to run :

Task manager shows runtime memory 81.6MB VS 219.7MB

Profiler

Profiler : ShaderLab 4.8M VS 62.9MB
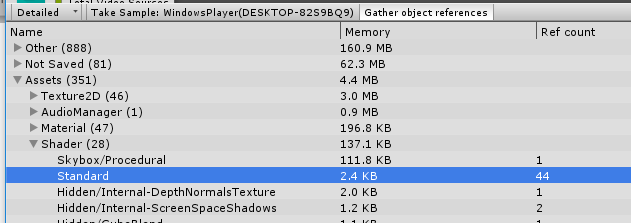
Profiler : Shader > Standard compiled once only.
You can see the big different between 2.0.0 and 3.0.0, this issue mainly caused by Built-In Shader, so the shader collectoin is used for Built-In Shader.
Let's take a look at AssetBundle temp folder, it is at the same layer as the Assets folder, in the AssetBundles folder :
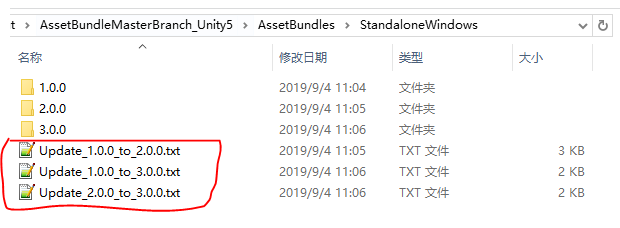
The patch file was generated between versions, it is a update list, serialized from AssetBundleMaster.AssetLoad.LocalVersion.UpdateInfo, json format.
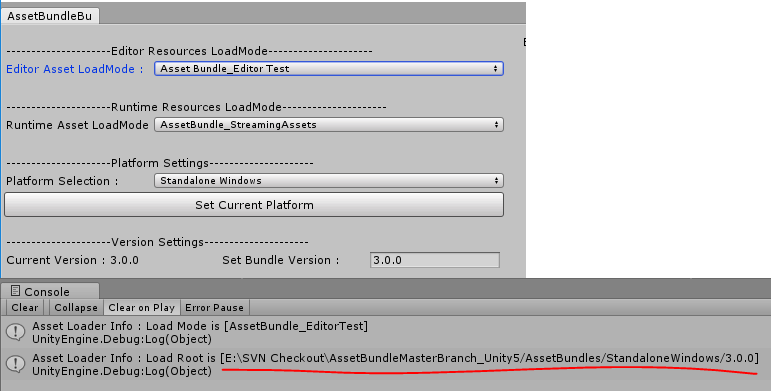
If you are using AssetBundle_EditorTest mode, you can switch load between built versions easily, just change the [Platform Selection] and [Set Bundle Version] :
Other function in the Tools Bar:
1. Copy built AssetBundle from temp folder to StreamingAssetsfolder :

This is the same function as to the AssetBundle build finished tips.
2. Clear AssetBundleMaster serialized datas :

It will clear the generated settings files said before, AssetBundleMaster can not run without these files.
以上就是AssetBundleMaster的全部说明, 它就像介绍说的, 是一个自动打包以及资源读取的整合解决方案, 提供了开发者很友好的开发流程, 并实现了大部分的资源自动管理逻辑, 甚至提供了一些资源自动处理方案以及对资源更新的友好支持. 还是那句话: 我们建议在任何情况下都不应该人为地手动去设置AssetBundle分包, 或不设置任由其自动分包, 即使你基于游戏更新或其它方面的考虑, 大部分情况下都与引擎特性不符.
附录
资源自动处理, 编辑器代码在AssetBundleBuildWindow.cs 文件中, 其中资源处理有几个部分:
1. SpriteAtlas, 在Unity5中无法自己创建SpriteAtlas, 在Unity2017之后可以创建, 代码在AssetBundleBuildWindow::1759行 CreateSpriteAtlasAssets 函数内, 通过把所有相同Packing Tag的Sprite资源设置到同一个AssetBundle包内, 规避了SpriteAtlas可能被重复打包的问题. 这里使用了Packing Tag作为分包的依据, 可是在Unity2019中检视面板没有显示Packing Tag 不过它仍然存在于序列化数据之中, AssetBundleMaster提供了一个重载的检视面板, 添加了Packing Tag设置, 编辑器代码为TextureImporterCustomEditor.cs:

Unity5
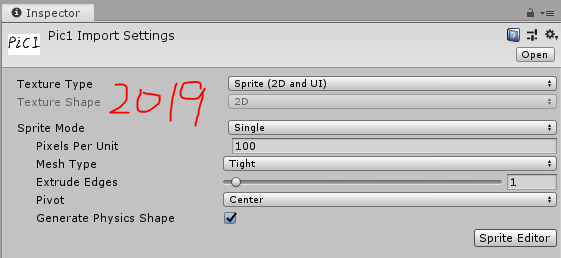
Unity2019
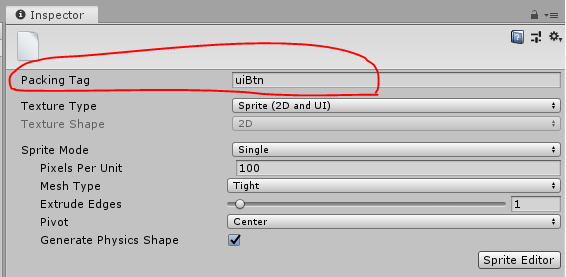
AssetBundleMaster重载了Unity2019检视面板
注意图集如果因为一些原因导致Include in Build的信息丢失(比如资源更新等), ResourceLoadManager通过对UnityEngine.U2D.SpriteAtlasManager.atlasRequested 添加了回调, 对这种情况作了补偿操作, 最大限度保证读取的正确性, 用户如果碰到此问题请到这里进行调试(Unity2017以及之后的版本才有).

SpriteAtlas中的设定(Unity2017以及之后的版本).
2. EditorConfigSettings, 自动调整一些编辑器下的设置, 用户可以根据自己的工程修改此处代码. 代码在AssetBundleBuildWindow::1676行 EditorConfigSettings 函数内, 它首先修改了UnityEditor.EditorSettings.spritePackerMode以方便创建SpriteAtlas, 并修改了GraphicsSettings的相关变量, 通过此修改能解决打包后场景中物体LightMap信息被错误剥离的错误. 见图:

3. TerrainData, 它使用的贴图需要设置isReadable属性, 如果不设置在编辑器下不会报错, 直到打包运行之后才会报错. 将自动把被引用到的贴图设置isReadable.
4. Shader Collection, 因为內建Shader会因为打包引用造成多次编译, 整合材质可以减少重复编译.
- 还没有人评论,欢迎说说您的想法!


 客服
客服


