
简介
有限状态机是unity游戏开发中经常用到的一个概念,能制作敌人AI,玩家控制器等。
有限状态机允许对象在内部状态发生改变时改变它的行为,对象看起来好像修改了它的类
实现:将一个个具体的状态类抽象出来
经典案例:玩家行动器
案例中玩家行动包括:待机、移动、跳跃、冲刺、爬墙等
而这么多状态我们再进一步将其分为:
【在墙上的状态】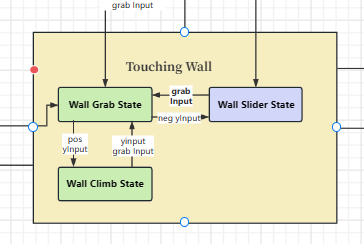
【在地面的状态】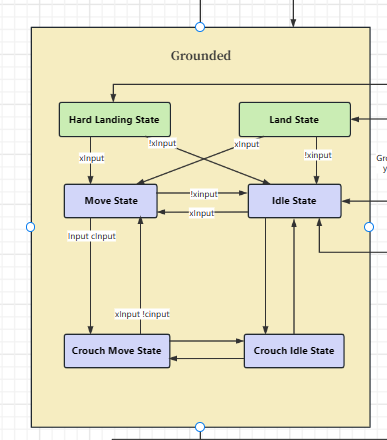
【玩家能力状态】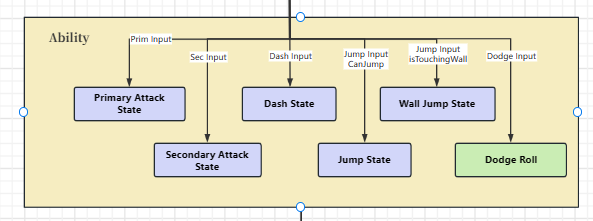
比较特殊的是玩家在空中的状态,我们需要做很多判断,所以不将其抽象,同样的还有冲刺状态。
前期准备
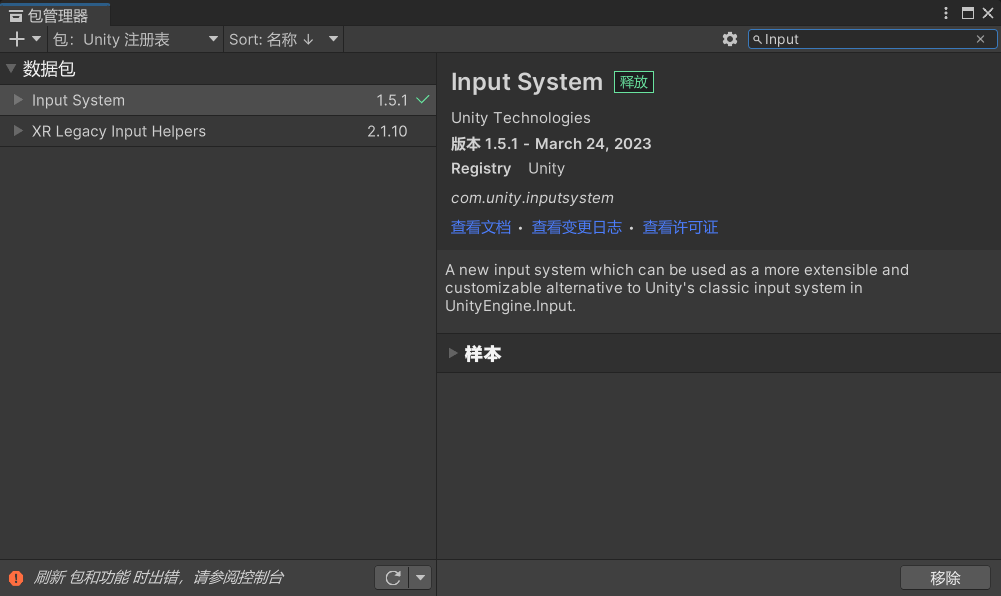
新的输入系统(Input System)
在开始制作状态机前,我们需要将输入系统也更新一下:在包管理器中找到Input System 然后引入
然后在创建中找到 Input Actions 将其命名为Player
双击进入编辑窗口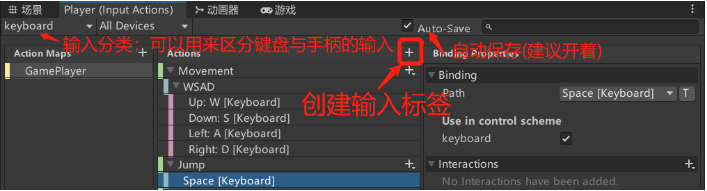
设置Movement的输入

录入键盘时点击Listen然后再按你想监听的键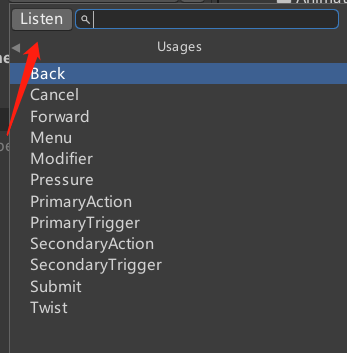
记得设置你的方向
然后在玩家对象上创建Player Input组件,将刚刚创建好的Input System文件挂载上去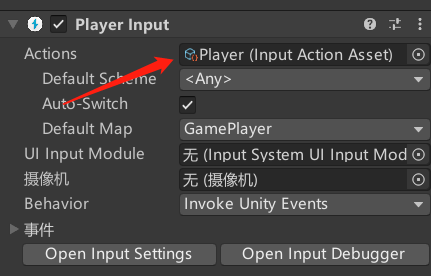
创建C# 脚本 PlayerInputManage
public class PlayerInputManage : MonoBehaviour
{
    //新输入系统文件
    private PlayerInput playerInput;

    //初始移动输入
    public Vector2 RawMovementInput { get; private set; }

    //X:横轴输入值 Y:纵轴输入值
    public int NormInputX { get; private set; }
    public int NormInputY { get; private set; }

    private void Start()
    {
        playerInput = GetComponent<PlayerInput>();
    }

    public void OnMoveInput(InputAction.CallbackContext context)
    {
        RawMovementInput = context.ReadValue<Vector2>();

        NormInputX = Mathf.Abs(RawMovementInput.x) > 0.5f ? (int)(RawMovementInput * Vector2.right).normalized.x : 0;
        NormInputY = Mathf.Abs(RawMovementInput.y) > 0.5f ? (int)(RawMovementInput * Vector2.up).normalized.y : 0;
    }
}
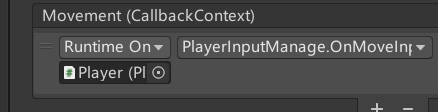
创建好后回到我们的Player Input文件,点开GamePlayer
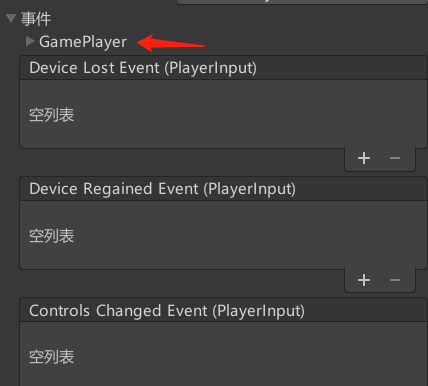
将Player脚本挂载上去
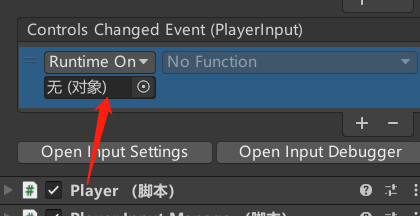
然后在PlayerInputManage中找到刚刚写好的OnMoveInput方法
玩家数据设计
[CreateAssetMenu(fileName ="newPlayerData",menuName ="Data/Player Data/Base Data")]
public class PlayerData : ScriptableObject
{
    [Header("移动相关")]//移动速度
    public float movementVelocity = 10f;
}
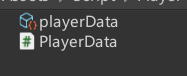
创建完PlayerData脚本后,我们右键 -> 数据 ->
玩家状态设计
public class PlayerState
{
    protected Player player;
    protected PlayerStateMachine stateMachine;
    protected PlayerData playerData;

    protected float startTime;//通用计时器

    protected bool isAnimtionFinished;//动画是否完成
    protected bool isExitingState;//是否已经切换完状态

    private string animBoolName;//动画器条件切换

    //初始化
    public PlayerState(Player player, PlayerStateMachine stateMachine, PlayerData playerData,string animBoolName)
    {
        this.player = player;
        this.stateMachine = stateMachine;
        this.playerData = playerData;
        this.animBoolName = animBoolName;
    }

    // 状态开始
    public virtual void Enter()
    {
        Dochecks();
        player.Anim.SetBool(animBoolName,true);
        startTime = Time.time;
        Debug.Log(animBoolName);
        isAnimtionFinished = false;
        isExitingState = false;
    }

    // 状态结束
    public virtual void Exit()
    {
        player.Anim.SetBool(animBoolName,false);
        isExitingState = true;
    }

    // 逻辑更新
    public virtual void LogicUpdate(){ }

    // 物理更新
    public virtual void PhysicsUpdate() => Dochecks();

    // 图层检测
    public virtual void Dochecks() { }

    // 开始动画触发
    public virtual void AnimationTrigger() { }

    // 结束动画触发
    public virtual void AnimtionFinishTrigger() => isAnimtionFinished = true;
}
玩家实体设计
public class Player : MonoBehaviour
{
    //状态变量
    public PlayerStateMachine StateMachine{ get; private set;}//状态管理器

    public PlayerIdleState IdleState { get; private set; }//待机
    public PlayerMoveState MoveState { get; private set; }//移动

    //玩家数据
    [SerializeField]
    private PlayerData playerData;

    //组件变量
    public Animator Anim { get; private set;}//动画器
    public PlayerInputManage InputManage{ get; private set;}//玩家输入管理
    pubilc Rigidbody2D RB { get; private set;}//刚体

    public Vector2 CurrentVelocity { get; private set; }//当前速度
    public int FacingDirection { get; private set; }//面朝方向

    private Vector2 workspace;//工作空间

    private void Awake()
    {
        //AWake在Start前执行,且只执行一次。可用来初始化玩家状态控制器,以及玩家状态
        StateMachine = new PlayerStateMachine();

        IdleState = new PlayerIdleState(this,StateMachine,playerData,"idle");
        MoveState = new PlayerMOveState(this,StateMachine,playerData,"move");
    }

    private void Start()
    {
        //Start也只执行一次,但在AWake之后。通常是为组件赋值以及执行初始化方法
        Anim = GetComponent<Animator>();
        InputManage = GetComponent<PlayerInputManage>();
        RB = GetComponent<Rigidbody2D>();

        FacingDirection = 1;

        StateMachine.Initialize(IdleState);
    }

    private void Update()
    {
        //在每一帧执行:确定当前速度,执行当前状态的任务方法
        CurrentVelocity = RB.velocity;
        StateMachine.CurrentState.LogicUpdate();
    }

    private void FixedUpdate()
    {
        //在Update后执行但并不是每一帧都执行:常用于物理检测
        StateMachine.CurrentState.PhysicsUpdate();
    }
}
玩家状态管理类
public class PlayerStateMachine
{
    //当前状态
    public PlayerState CurrentState { get; private set; }

    //初始化状态
    public void Initialize(PlayerState startingState)
    {
        CurrentState = startingState;
        CurrentState.Enter();
    }

    //切换状态
    public void ChangesState(PlayerState newState)
    {
        CurrentState.Exit();
        CurrentState = newState;
        CurrentState.Enter();
    }
}
玩家待机/移动
当准备好 Player(实体类)、PlayerState(状态父类)、PlayerStateMachine(状态管理类)后,就可以开始写第一个状态类来体验有限状态机的魅力。
通过设计书发现还有3个超级类:
Grounded(在地面)、TouchingWall(在墙上)、Ability(玩家能力) 它们继承于玩家状态类。
public class PlayerGroundedState : PlayerState
{
    protected int xInput;
    protected int yInput;

    public PlayerGroundedState(Player player, PlayerStateMachine stateMachine, PlayerData playerData, string animBoolName) : base(player, stateMachine, playerData, animBoolName)
    {
    }

    public override void Dochecks()
    {
        base.Dochecks();
    }

    public override void Enter()
    {
        base.Enter();
    }

    public override void Exit()
    {
        base.Exit();
    }

    public override void LogicUpdate()
    {
        base.LogicUpdate();

        xInput = player.InputManage.NormInputX;
        yInput = player.InputManage.NormInputY;
    }

    public override void PhysicsUpdate()
    {
        base.PhysicsUpdate();
    }
}
因为玩家执行待机以及移动状态时是在地上的,所以需要继承 PlayerGroundedState 这个状态。我们可以先思考一下:在待机状态需要检测什么,以及如何从待机状态切换出去?你可能会想做一个随机的待机动作,也只需要在LogicUpdate中创建随机数,然后根据随机数切换待机动画。
在视觉上我们想要玩家从移动到待机灵敏一点,也就是放开移动,玩家就立马进入待机状态。
回到Player文件中,需要设置一下玩家在X轴上的速度
public class Player : MonoBehaviour
{
    //设置X轴的速度
    public void SetVelocityX(float velocity)
    {
        workspace.Set(velocity, CurrentVelocity.y);
        RB.velocity = workspace;
        CurrentVelocity = workspace;
    }
}
这样就可以在待机状态开始时设置玩家在X轴上的速度,你可以注释掉该行代码试一下两者的手感
因为在待机状态我们并不需要做更多物理检测,所以只需要注重逻辑执行就好。
public class PlayerIdleState : PlayerGroundedState
{
    public PlayerIdleState(Player player, PlayerStateMachine stateMachine, PlayerData playerData, string animBoolName) : base(player, stateMachine, playerData, animBoolName)
    {
    }

    public override void Dochecks()
    {
        base.Dochecks();
    }

    public override void Enter()
    {
        base.Enter();
        //在状态开始时设置玩家的移动速度为0;
        player.SetVelocityX(0f);
    }

    public override void Exit()
    {
        base.Exit();
    }

    public override void LogicUpdate()
    {
        base.LogicUpdate();
        if(!isExitingState)
        {//没有结束状态
            if (xInput != 0)
            {//且有X轴上的输入
                stateMachine.ChangesState(player.MoveState);
            }
            else if(yInput == -1)
           {//或有Y轴上的向下的输入
                //TODO:切换到下蹲状态
           }
        }
    }

    public override void PhysicsUpdate()
    {
        base.PhysicsUpdate();
    }
}
接着写玩家的移动状态,由于要写的是2D项目,所以需要检测玩家做左右移动旋转玩家方向,回到Playe实体类中
public class Player : MonoBehaviour
{
    /// <summary>
    /// 检测是否转向
    /// </summary>
    /// <param name="xInput">玩家x轴的输入</param>
    public void CheckIfShouldFilp(int xInput)
    {
        if (xInput != 0 && xInput != FacingDirection)
        {//当玩家输入时,输入值(1,-1)与当前面朝方向不一致时,执行转向
            Filp();
        }
    }

    private void Filp()
    {
        FacingDirection *= -1;//设置面朝方向
        RB.transform.Rotate(0.0f, 180.0f, 0.0f);
    }
}
然后继续写MoveState,同样的移动我们是在地面上,所以要继承PlayerGroundedState
public class PlayerMoveState : PlayerGroundedState
{
    public PlayerMoveState(Player player, PlayerStateMachine stateMachine, PlayerData playerData, string animBoolName) : base(player, stateMachine, playerData, animBoolName)
    {
    }

    public override void Dochecks()
    {
        base.Dochecks();
    }

    public override void Enter()
    {
        base.Enter();
    }

    public override void Exit()
    {
        base.Exit();
    }

    public override void LogicUpdate()
    {
        base.LogicUpdate();

        player.CheckIfShouldFilp(xInput);
        player.SetVelocityX(playerData.movementVelocity * xInput);

        if (!isExitingState)
        {
            if (xInput == 0)
            {
                stateMachine.ChangesState(player.IdleState);
            }
            else if (yInput == -1)
            {
                //TODO:切换到下蹲移动状态
            }
        }
    }

    public override void PhysicsUpdate()
    {
        base.PhysicsUpdate();
    }
}
做完这些就可以在动画器中创建idle、move的动画了
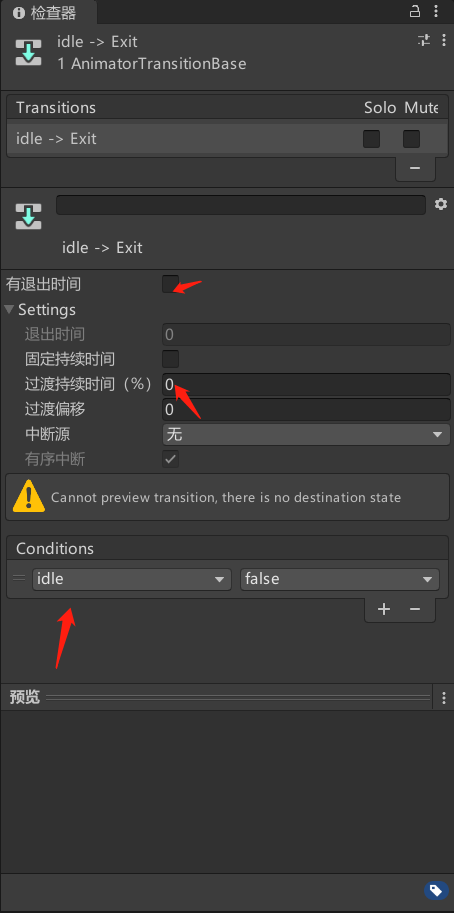
除了xVelocity、yVelocity是单独设置,其他的均为Bool在角色进入状态时执行,可以查看上面 PlayerStateMachine 中的代码
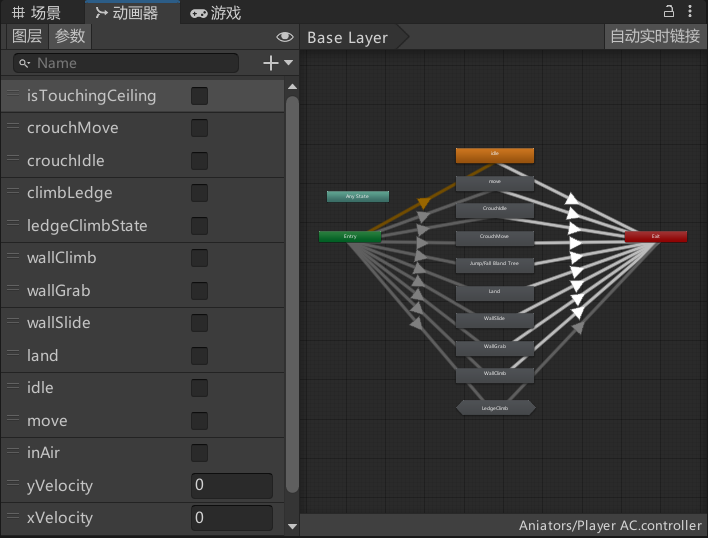
动画退出条件为animBoolName == false ,退出时间与过度时间为0是为了让状态动画间的切换更加丝滑
玩家下蹲
通过查看状态机设计图:下蹲状态又分为下蹲时移动,下蹲时待机,它们与玩家的待机和移动状态可以互相切换
首先玩家下蹲,需要控制它的碰撞体与他的图片相等,可以在动画中更改,但那样并不好用。还可以在代码中控制
PlayerData 脚本中定义下蹲后的碰撞器大小,这个根据自己的图片大小决定
public class PlayerData:ScriptableObject
{
    [Header("蹲下相关")]
    public float crouchMovementVelocity = 5f;               //下蹲速度
    public float crouchColliderHeight = 0.125f;             //下蹲时碰撞器高度
    public float standColliderHeight = 0.25f;               //站立时碰撞器高度
}
Player 实体类中定义改变碰撞体大小的方法,以及设置所有速度为0的方法,然后还要有一个头顶检测,防止玩家在下蹲进入狭窄空间时松开下蹲键后起立。
public class Player
{
    public PlayerCrouchIdleState CrouchIdleState { get; private set; }
    public PlayerCrouchMoveState CrouchMoveState { get; private set; }

    private void Awake()
    {
       CrouchIdleState = new PlayerCrouchIdleState(this,StateMachine,playerData,"crouchIdle");
        CrouchMoveState = new PlayerCrouchMoveState(this,StateMachine,playerData,"crouchMove");
    }

    //移动时碰撞器
    public BoxCollider2D MovementCollider { get; private set; }

    private void Start()
    {
         MovementCollider = GetComponent<BoxCollider2D>();
    }

    public void SetVelocityZero()
    {
        RB.velocity = Vector2.zero;
        CurrentVelocity = Vector2.zero;
    }

    public void SetColliderHeight(float height)
    {
        Vector2 center = MovementCollider.offset;
        workspace.Set(MovementCollider.size.x,height);

        center.y += (height - MovementCollider.size.y) / 2;

        MovementCollider.size = workspace;//设置碰撞器大小
        MovementCollider.offset = center;//设置碰撞器偏移量
    }

    //检测头顶是否有天花板
    public bool CheckForCeiling()
    {
        return Physics2D.OverlapCircle(ceilingCheck.position, playerData.groundCheckRadius, playerData.whatIsGround);
    }
}
别忘了在PlayerGroundedState中调用检测代码
public class PlayerGroundedState
{
    protected bool isTouchingCeiling;

    public override void Dochecks()
    {
        base.Dochecks();

        isTouchingCeiling = player.CheckForCeiling();
    }
}
然后开始写下蹲状态,还是先继承PlayerGroundedState
public class PlayerCrouchIdleState : PlayerGroundedState
{
    public PlayerCrouchIdleState(Player player, PlayerStateMachine stateMachine, PlayerData playerData, string animBoolName) : base(player, stateMachine, playerData, animBoolName)
    {
    }
    //开始时设置速度为0,设置碰撞体大小为下蹲后的碰撞体大小
    public override void Enter()
    {
        base.Enter();

        player.SetVelocityZero();
        player.SetColliderHeight(playerData.crouchColliderHeight);
    }

    //结束时,设置碰撞器大小为站立后的碰撞器大小
    public override void Exit()
    {
        base.Exit();
        player.SetColliderHeight(playerData.standColliderHeight);
    }

    public override void LogicUpdate()
    {
        base.LogicUpdate();

        if (!isExitingState)
        {
            if (xInput != 0)
            {//如果有X轴的输入,切换到下蹲移动状态
                stateMachine.ChangesState(player.CrouchMoveState);
            }
            else if (yInput != -1 && !isTouchingCeiling)
            {//如果没有Y轴的输入,且头顶没有天花板,切换到待机状态
                stateMachine.ChangesState(player.IdleState);
            }
        }
    }
}
下蹲移动状态与下蹲状态差不多
public class PlayerCrouchMoveState : PlayerGroundedState
{
    public PlayerCrouchMoveState(Player player, PlayerStateMachine stateMachine, PlayerData playerData, string animBoolName) : base(player, stateMachine, playerData, animBoolName)
    {
    }

    //开始时,设置碰撞体大小为下蹲后的碰撞体大小
    public override void Enter()
    {
        base.Enter();
        player.SetColliderHeight(playerData.crouchColliderHeight);
    }

    //结束时,设置碰撞体大小为站立后的碰撞体大小
    public override void Exit()
    {
        base.Exit();
        player.SetColliderHeight(playerData.standColliderHeight);
    }

    //在执行过程中,设置X轴速度为玩家下蹲速度,并判断是否需要转向
    public override void LogicUpdate()
    {
        base.LogicUpdate();

        if (!isExitingState)
        {
            player.SetVelocityX(playerData.crouchMovementVelocity * player.FacingDirection);
            player.CheckIfShouldFilp(xInput);

            if (xInput == 0)
            {   //如果没有X轴输入,切换到下蹲待机状态
                stateMachine.ChangesState(player.CrouchIdleState);
            }
            else if (yInput != -1 && !isTouchingCeiling)
            {   //如果没有Y轴输入,且头顶没有天花板,切换到移动状态
                stateMachine.ChangesState(player.MoveState);
            }
        }
    }
}
写完这些后,还记得上面的Idle和Move状态中,还有两个切换状态的TODO,现在由你们自己添加上。
玩家跳跃
跳跃永远是2D平台设计的一个难点,也是有限状态机中最多判断条件的状态
跳跃分三个阶段:起跳、在空中、落地
所以需要有三个状态:JumpState,InAirState,LandState
在这之前要先在Player、PlayerInputManage中做些准备
来到Player Input文件中,创建跳跃键的监听。像之前写移动监听一样

在InputManage中,写上OnJump()方法
public class PlayerInputManage : MonoBehaviour
{
    //监听Jump输入
    public bool JumpInput { get; private set; }
    public bool JumpInputStop { get; private set; }

    //按下跳跃键的时间
    private float jumpInputStartTime;

    public void OnJumpInput(InputAction.CallbackContext context)
    {
        if (context.started)
        {
            JumpInput = true;
            JumpInputStop = false;
            jumpInputStartTime = Time.time;
        }

        if (context.canceled)
        {
            JumpInputStop = true;
        }
    }

     //实现跳跃完美手感的关键
     public void UseJumpInput() => JumpInput = false;
}
这里解释一下:因为按键监听是放在Update()中每帧调用,而跳跃的任务代码是检测的跳跃输入后在FixedUpdate()中在Update()后调用但频率大约为30帧/次。这大概就是你按了跳跃,但是输入值已经判断过了,会出现跳跃判断不及时的情况。
我们要做的就在跳跃状态里手动的将JumpInput判定改为false。然后玩家需要在地面上才能起跳,所以还要检测一下玩家是否在地面
public class Player
{
    public PlayerJumpState JumpState { get; private set; }

    private void Awake()
    {
        JumpState = new PlayerJumpState(this, StateMachine, playerData, "inAir");
    }

    // 检测是否在地面
    public bool CheckIfGrounded()
    {
        return Physics2D.OverlapCircle(groundCheck.position,playerData.groundCheckRadius,playerData.whatIsGround);
    }

}
然后给玩家一个跳跃的速度,待会还要做多段跳,所以还有记录玩家可跳跃的次数
public class PlayerData:ScriptableObject
{
    [Header("跳跃相关")]
    public float jumpVelocity = 15f;                        //跳跃速度
    public int amountOfJumps = 1;                           //跳跃次数
}
好像还忘了玩家能力这个父类
//何为玩家的能力:比如跳跃、冲刺、攻击等在动画结束就完成一次的就叫玩家的能力
public class PlayerAbilityState : PlayerState
{
    //是否完成能力
    protected bool isAbilityDone;

    private bool isGrounded;
    public PlayerAbilityState(Player player, PlayerStateMachine stateMachine, PlayerData playerData, string animBoolName) : base(player, stateMachine, playerData, animBoolName)
    {
    }

    public override void Dochecks()
    {
        base.Dochecks();

        isGrounded = player.CheckIfGrounded();
    }

    public override void Enter()
    {
        base.Enter();

        isAbilityDone = false;
    }

    public override void Exit()
    {
        base.Exit();
    }

    public override void LogicUpdate()
    {
        base.LogicUpdate();

        if (isAbilityDone)
        {
            if (isGrounded && player.CurrentVelocity.y < 0.01f)
            {
                stateMachine.ChangesState(player.IdleState);
            }
            else
            {
                stateMachine.ChangesState(player.InAirState);
            }
        }
    }

    public override void PhysicsUpdate()
    {
        base.PhysicsUpdate();
    }
}
最后开始写跳跃状态,跳跃状态不属于在地面和墙上的状态,它更像是玩家的一种能力,所以继承PlayerAbilityState类
public class PlayerJumpState : PlayerAbilityState
{
    public PlayerJumpState(Player player, PlayerStateMachine stateMachine, PlayerData playerData, string animBoolName) : base(player, stateMachine, playerData, animBoolName)
    {}

    //1、手动更改JumpInput的值实现完美跳跃
    //2、设置玩家纵轴速度
    //3、能力完成
    //4、在空中状态中设置正在Jump中
    public override void Enter()
    {
        base.Enter();

        player.InputManage.UseJumpInput();
        player.SetVelocityY(playerData.jumpVelocity);
        isAbilityDone = true;
        player.InAirState.SetIsJumping();
    }
}
这样就完成了的起跳状态,现在完成比较特殊的在空中的状态。通过设计书可以看到,在空中状态有非常非常多的判断。

让我们来一一实现
public class PlayerInAirState:PlayerState
{
    //Input
    public int xInput;
    private bool jumpInput;
    private bool jumpInputStop;

    //Check
    private bool isGrounded

    //Other
    private bool isJumping;

    public PlayerInAirState(Player player, PlayerStateMachine stateMachine, PlayerData playerData, string animBoolName) : base(player, stateMachine, playerData, animBoolName)
    {
    }

    //地面检测
    public override void Dochecks()
    {
        base.Dochecks();

        isGrounded = player.CheckIfGrounded();
    }

    public override void Enter()
    {
        base.Enter();
    }

    public override void Exit()
    {
        base.Exit();
    }

    //X轴输入赋值,跳跃输入赋值
    public override void LogicUpdate()
    {
        base.LogicUpdate();

        xInput = player.InputManage.NormInputX;
        jumpInput = player.InputManage.JumpInput;
        jumpInputStop = player.InputManage.JumpInputStop;

        if (isGrounded && player.CurrentVelocity.y < 0.01f)
        {//空中 -> 落地
            stateMachine.ChangesState(player.LandState);
        }
        else
        {//空中默认设置
            player.CheckIfShouldFilp(xInput);
            player.SetVelocityX(playerData.movementVelocity * xInput);

            player.Anim.SetFloat("yVelocity",player.CurrentVelocity.y);
            player.Anim.SetFloat("xVelocity",Mathf.Abs(player.CurrentVelocity.x));
        }

    public override void PhysicsUpdate()
    {
        base.PhysicsUpdate();
    }

    public void SetIsJumping() => isJumping = true;
}
然后就是最后一个阶段的落地状态,也是比较简单。
public class PlayerLandState : PlayerGroundedState
{

    public PlayerLandState(Player player, PlayerStateMachine stateMachine, PlayerData playerData, string animBoolName) : base(player, stateMachine, playerData, animBoolName)
    {
    }

    public override void LogicUpdate()
    {
        base.LogicUpdate();

        if (!isExitingState)
        {
            if (xInput != 0)
            {
                stateMachine.ChangesState(player.MoveState);
            }
            else if (isAnimtionFinished)
            {
                stateMachine.ChangesState(player.IdleState);
            }
        }
    }
}
到这跳跃行为的三个阶段的状态我们就分别写出来了。接着我们来设置它的动画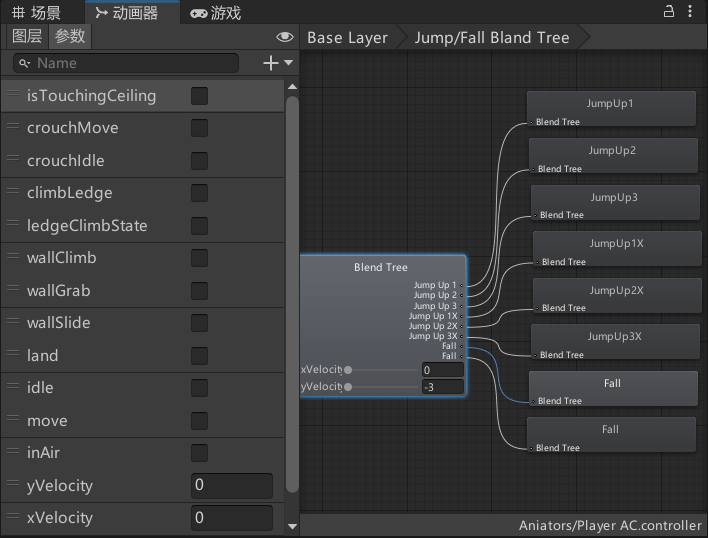
在动画器中右键创建从新混合树,我们需要分别准备:静止状态下的起跳动画JumpUp1、JumpUp2、JumpUp3。以及移动状态下的起跳动画,下落动画,通过下图中的数字组合起来。

子类都设计好了,我们还要在父状态中设计
public class PlayerGroundedState : PlayerState
{
    protected int xInput;
    protected int yInput;

    protected bool isTouchingCeiling;

    //键盘输入
    private bool JumpInput;

    public PlayerGroundedState(Player player, PlayerStateMachine stateMachine, PlayerData playerData, string animBoolName) : base(player, stateMachine, playerData, animBoolName)
    {
    }

    public override void Dochecks()
    {
        base.Dochecks();

        //地面检测
        isGrounded = player.CheckIfGrounded();
    }

    public override void Enter()
    {
        base.Enter();
    }

    public override void Exit()
    {
        base.Exit();
    }

    public override void LogicUpdate()
    {
        base.LogicUpdate();

        xInput = player.InputManage.NormInputX;
        yInput = player.InputManage.NormInputY;
        JumpInput = player.InputManage.JumpInput;

        if (JumpInput && player.JumpState.CanJump())
        {//如果玩家按下跳跃键,并且可以跳跃
            stateMachine.ChangesState(player.JumpState);
        }
        else if(!isGrounded)
        {//如果不在地面上
            stateMachine.ChangesState(player.InAirState);
        }
    }

    public override void PhysicsUpdate()
    {
        base.PhysicsUpdate();
    }
}
这样有限状态机的跳跃功能就写好了,当然我们的跳跃还有更大的优化空间。如果你觉得当前这样就足够了,可以开始看下一个功能的实现。
跳跃功能优化
很高兴你能打开这一“小段”优化代码,说明你是个为玩家感受着想的游戏开发者。
【二段跳】
早在上面PlayerData中我们预留了一个 amountOfJumps 也就是跳跃次数的变量。现在就可以用这个变量来为角色增加2连跳或者多连跳。
public class PlayerJumpState : PlayerAbilityState
{
   private int amountOfJumpsLeft;

   public PlayerJumpState(Player player, PlayerStateMachine stateMachine, PlayerData playerData, string animBoolName) : base(player, stateMachine, playerData, animBoolName)
    {
        amountOfJumpsLeft = playerData.amountOfJumps;
    }

    public override void Enter()
    {
        base.Enter();

        player.InputManage.UseJumpInput();
        player.SetVelocityY(playerData.jumpVelocity);
        isAbilityDone = true;
        DecreaseAmountOfJumpLeft();//跳跃次数-1
        player.InAirState.SetIsJumping();
    }

    //是否可以跳跃
    public bool CanJump()
    {
        return amountOfJumpsLeft > 0;
    }

    //重置跳跃次数
    public void ResetAmountOfJumpsLeft() => amountOfJumpsLeft = playerData.amountOfJumps;

    //减少跳跃次数
    public void DecreaseAmountOfJumpLeft() => amountOfJumpsLeft--;
}
因为二段跳或多段跳一般发生在空中,我们来到空中状态
public class PlayerInAirState:PlayerState
{
    public override void LogicUpdate()
    {
        base.LogicUpdate();

        xInput = player.InputManage.NormInputX;
        jumpInput = player.InputManage.JumpInput;
        jumpInputStop = player.InputManage.JumpInputStop;

        if (isGrounded && player.CurrentVelocity.y < 0.01f)
        {//空中 -> 落地
            stateMachine.ChangesState(player.LandState);
        }
        else if (jumpInput && player.JumpState.CanJump())
        {//空中 -> 跳跃(多段跳)
            stateMachine.ChangesState(player.JumpState);
        }
        else
        {//空中默认设置
            player.CheckIfShouldFilp(xInput);
            player.SetVelocityX(playerData.movementVelocity * xInput);

            player.Anim.SetFloat("yVelocity",player.CurrentVelocity.y);
             player.Anim.SetFloat("xVelocity",Mathf.Abs(player.CurrentVelocity.x));
        }
    }
}
【土狼时间】
指的是 人物在地面/平台 边缘即将掉落的时候 仍有机会进行跳跃动作
先在PlayerData中确认土狼时间的时长
[CreateAssetMenu(fileName = "newPlayerData", menuName = "Data/Player Data/Base Data")]
public class PlayerData : ScriptableObject
{
    [Header("空中相关")]
    public float coyoteTime = 0.2f;                //土狼时间
}
然后在PlayerInAirState中确定土狼时间的开始时长
public class PlayerInAirState : PlayerState
{
    private bool coyoteTime;

    public override void LogicUpdate()
    {
        CheckCoyoteTime();

        xInput = player.InputHandler.NormInputX;
        jumpInput = player.InputHandler.JumpInput;
        jumpInputStop = player.InputHandler.JumpInputStop;
    }

    private void CheckCoyoteTime()
    {
        if(coyoteTime && Time.time > startTime + playerData.coyoteTime)
        {
            coyoteTime = false;
            player.JumpState.DecreaseAmountOfJumpsLeft();
        }
    }

    public void StartCoyoteTime() => coyoteTime = true;
}
最后记得在PlayerGroundState中打开土狼时间计时器
public class PlayerGroundedState : PlayerState
{
    public override void LogicUpdate()
    {
        base.LogicUpdate();

        xInput = player.InputManage.NormInputX;
        yInput = player.InputManage.NormInputY;
        JumpInput = player.InputManage.JumpInput;

        if (JumpInput && player.JumpState.CanJump())
        {
            stateMachine.ChangesState(player.JumpState);
        }
        else if(!isGrounded)
        {//开启土狼时间计时器
            player.InAirState.StartCoyoteTime();
            stateMachine.ChangesState(player.InAirState);
        }
    }
}
【长按空格跳的更高】
在PlayerData中
[CreateAssetMenu(fileName = "newPlayerData", menuName = "Data/Player Data/Base Data")]
public class PlayerData : ScriptableObject
{
    [Header("空中相关")]
    public float variableJumpHeightMultiplier = 0.5f;//可变跳跃高度倍速
}
然后在PlayerInAirState中
public class PlayerInAirState : PlayerState
{
    public override void LogicUpdate()
    {
        base.LogicUpdate();

        CheckCoyoteTime();

        xInput = player.InputMachine.NormInputX;
        jumpInput = player.InputMachine.JumpInput;
        jumpInputStop = player.InputMachine.JumpInputStop;

        CheckJumpMultiplier();//检测跳跃倍速

        if (isGrounded && player.CurrentVelocity.y< 0.01f)
        {//空中 -> 落地
            stateMachine.ChangesState(player.LandState);
        }
        else if (jumpInput && player.JumpState.CanJump())
        {//空中 -> 跳跃(多段跳)
            stateMachine.ChangesState(player.JumpState);
        }
        else
        {//空中默认设置
            player.CheckIfShouldFilp(xInput);
            player.SetVelocityX(playerData.movementVelocity * xInput);

            player.Anim.SetFloat("yVelocity",player.CurrentVelocity.y);
            player.Anim.SetFloat("xVelocity",player.CurrentVelocity.x);

        }
    }

    private void CheckJumpMultiplier()
    {
        if (isJumping)
        {//如果当前在空中
            if (jumpInputStop)
            {//如果空格输入停止
                player.SetVelocityY(player.CurrentVelocity.y * playerData.variableJumpHeightMultiplier);
                //设置当前Y轴速度为:玩家当前Y轴速度的一半
                isJumping = false;
            }
            else if (player.CurrentVelocity.y <= 0f)
            {//如果玩家当前Y轴速度小于等于0,说明玩家已落地
                isJumping = false;
            }
        }
    }
}
你可以将该方法注释掉试一下效果
玩家冲刺
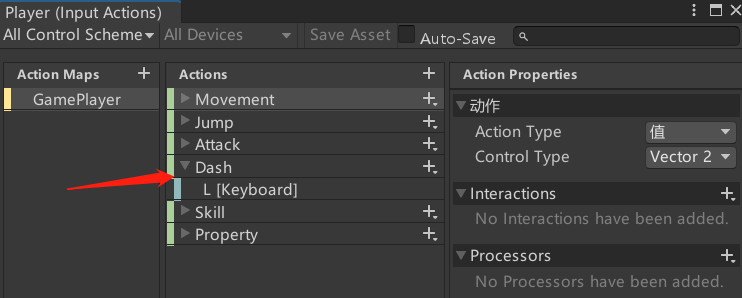
爬墙是个稍微复杂点的功能,我们先做简单些的冲刺功能。
首先在Player Input文件中定义好冲刺需要按下哪个键
玩家爬墙
文章来源: 博客园
- 还没有人评论,欢迎说说您的想法!


 客服
客服


