以前学校上C语言课程都是使用VC++6.0上课,这个学期为了复习一遍C语言,而且自己经常使用VSCode开发前端项目,所以为了方便。这里把需要的环境和插件配置在这里介绍一下。
Windows环境下安装C语言编译器
MinGW-W64 GCCC的下载地址为:https://sourceforge.net/projects/mingw-w64/
下载完之后进行环境配置
我的电脑->属性->高级系统设置->环境变量->系统变量->path->新建一个路径(比如:D:ProgramFilesgccmingw64bin)
在随后出现的”cmd.exe"窗口中,输入“gcc -v"命令,会出现gcc的版本号,说明安装配置成功。
下载VsCode插件
- Code Runner
- C/C++
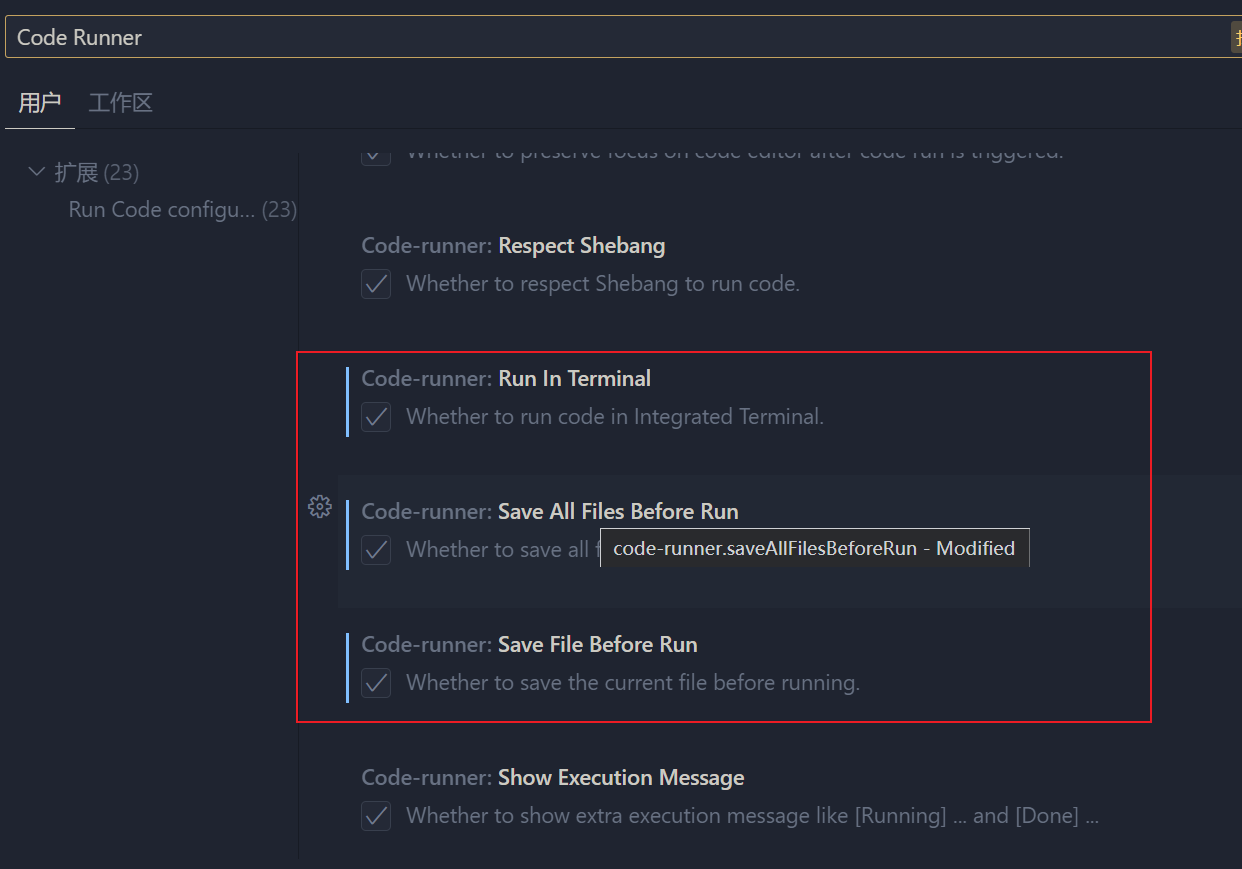
在随后的Settings页面中,将“Run Code Configuration”中的“Run In Terminal"、"Save File Before Run"前面的复选框选中。
配置插件环境
.vscode下的文件:
launch.json
{
    // 使用 IntelliSense 了解相关属性。
    // 悬停以查看现有属性的描述。
    // 欲了解更多信息,请访问: https://go.microsoft.com/fwlink/?linkid=830387
    "version": "0.2.0",
    "configurations": [
        {
            "name": "(gdb) Windows 上的 Bash 启动",
            "type": "cppdbg",
            "request": "launch",
            "program": "输入程序名称,例如 ${workspaceFolder}/a.exe",
            "args": [],
            "stopAtEntry": false,
            "cwd": "/mnt/${fileDirname}",
            "environment": [],
            "externalConsole": false,
            "pipeTransport": {
                "debuggerPath": "/usr/bin/gdb",
                "pipeProgram": "${env:windir}\system32\bash.exe",
                "pipeArgs": ["-c"],
                "pipeCwd": ""
            },
            "setupCommands": [
                {
                    "description": "为 gdb 启用整齐打印",
                    "text": "-enable-pretty-printing",
                    "ignoreFailures": true
                },
                {
                    "description": "将反汇编风格设置为 Intel",
                    "text": "-gdb-set disassembly-flavor intel",
                    "ignoreFailures": true
                }
            ]
        }

    ]
}
settings.json
{
    "C_Cpp.errorSquiggles": "disabled",
    "files.associations": {
        "windows.h": "c",
        "stdio.h": "c",
        "stdlib.h": "c"
    }
}
tasks.json
{
    "tasks": [
        {
            "type": "cppbuild",
            "label": "C/C++: gcc.exe 生成活动文件",
            "command": "D:\ProgramFiles\gcc\mingw64\bin\gcc.exe",
            "args": [
                "-fdiagnostics-color=always",
                "-g",
                "${file}",
                "-o",
                "${fileDirname}\${fileBasenameNoExtension}.exe"
            ],
            "options": {
                "cwd": "${fileDirname}"
            },
            "problemMatcher": [
                "$gcc"
            ],
            "group": {
                "kind": "build",
                "isDefault": true
            },
            "detail": "调试器生成的任务。"
        }
    ],
    "version": "2.0.0"
}
运行
我们编写一个C语言程序:
/**
 * 需求:
 *  (1)、将整数 5 的第 2 个二进制置1        解法:将0101 | 0010 => 0111(最终结果)
    (2)、将整数 7 的第 4 个二进制位取反      解法:已经0111(7),只要 ^(异或)上1000就可以得到:1111
    (3)、将整数 15 右移 2 位,再将第 2 个二进制位置 0  解法:先将1111(15)>>2,然后0011 & 1101 => 0001
    (4)、设变量 a 的二进制数是 10101101,若想通过运算 a^b 使得 a的中间 4 位取反,其余位不变,则 b 的值是多少 ?
       1    1    1    1    1    1    1    1
       128  64   32   16   8    4    2    1
       解法:
       10101101
       128+32+8+4+1=173
       ----
       00111100
       32+16+8+4=60
       ----
       10010001
       128+16+1=145
       ----
       注意位置:1010 第一个位置是0,第二个位置是1。
*/
#include <windows.h>
#include <stdio.h>
#include <stdlib.h>

int main(void)
{
    SetConsoleOutputCP(65001);
    int num1 = 5;
    int result1 = num1 | 2;
    printf("%dn",result1);
    int num2 = result1;
    int result2 = num2 ^ 8;
    printf("%dn",result2);
    int num3 = result2;
    int result3 = (num3 >> 2) & 13;
    printf("%dn",result3);
    int num4 = 173;
    int result4 = num4 ^ 60;
    printf("%dn",result4);
    getchar();
    return 0;
}
然后对文件右键点击Run Code就可以生成exe文件并运行了
调试
这个问题暂时未解决,等待未来的自己解决。
内容来源于网络如有侵权请私信删除
文章来源: 博客园
- 还没有人评论,欢迎说说您的想法!


 客服
客服


