
这一次咱们来探究一下怎么用纯代码写 WPF 模板。模板有个共同基类 FrameworkTemplate,数据模板、控件模板等是从此类派生的,因此,该类已定义了一些通用成员。
用代码构建模板,重要的成员是 VisualTree 属性,它的类型是 FrameworkElementFactory。可见,模板不是直接创建可视化对象,而是通过一个工厂类来实例化。毕竟用于模板的可视化树是在用到时才创建的。
这么看来,对于控件、常见元素,用 XAML 和用纯代码写差不多,而模板用代码写就复杂一些。所以,比较好的方法是把控件样式、模板都放到外部的 XAML 文件中,再在程序中加载(就像老周上一篇水文那样)。要改 UI 你直接改 XAML 文件就行了,程序不用重新编译。
说一下用法。
1、调用 FrameworkElementFactory 类的构造函数,可以直接用 XAML 文本初始化,也可以指定一个 Type,让工厂类自动实例化。
2、a:要设置某个属性的值,用 SetValue 方法;
b:要为某个属性设置数据绑定,请用 SetBinding 方法;
c:要引用资源中的东东,请用 SetResourceReference 方法。
3、调用 AppendChild 方法可以把另一个 FrameworkElementFactory 对象添加当前对象的子级。这种方法可以构建 N 个层次的逻辑树。
4、AddHandler、RemoveHandler 为对象添加或删除事件处理方法。
老周下面要用的这个例子,是一个控件库。在新建项目时,可以直接用 WPF 控件库模板。
<Project Sdk="Microsoft.NET.Sdk">

  <PropertyGroup>
    <TargetFramework>net7.0-windows</TargetFramework>
    <Nullable>enable</Nullable>
    <UseWPF>true</UseWPF>
  </PropertyGroup>

</Project>
我们这里不用 XAML 文件,所以,Themes 目录可以删除。然后就像写普通类库一样,定义控件类,从 Control 类派生。
 public class VVControl : Control
 {
       ……
 }
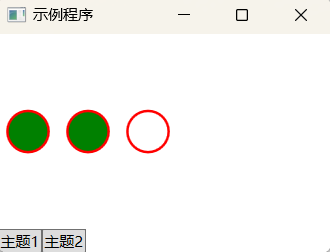
这个控件没什么实用价值,纯属娱乐。控件模板里面放一个 StackPanel,水平排列,然后排三个圆。鼠标点第一个圆时,只有第一个圆的背景色会变;点击第二个圆时,第一、二个圆的背景色都变;点击第三个圆时,三个圆的背景色都会变。
 // 根元素
 FrameworkElementFactory rootFac = new(typeof(StackPanel));
 // 设置方向
 rootFac.SetValue(StackPanel.OrientationProperty, Orientation.Horizontal);
这个是模板中的根元素,StackPanel 面板,方向水平。然后我们弄三个圆,圆可以用 Ellipse 类来做,宽度和高度相等就是正圆了。
// 圆的宽度和高度
const double ELL_SIZE = 35.0d;
const double ELL_MARGIN = 6.5d;
// 轮廓大小
const double ELL_STROKEW = 2.0d;

// 子元素是三个圈
FrameworkElementFactory ellip1 = new(typeof(Ellipse), "ellip1");
// 设置宽度和高度
ellip1.SetValue(Shape.WidthProperty, ELL_SIZE);
ellip1.SetValue(Shape.HeightProperty, ELL_SIZE);
// 边距
ellip1.SetValue(Shape.MarginProperty, new Thickness(ELL_MARGIN));
ellip1.SetValue(Shape.StrokeThicknessProperty, ELL_STROKEW);
// 这两个属性要绑定
ellip1.SetBinding(Shape.StrokeProperty, fgbind);
// 把子元素追加到树中
rootFac.AppendChild(ellip1);

FrameworkElementFactory ellip2 = new(typeof(Ellipse), "ellip2");
ellip2.SetValue(Shape.WidthProperty, ELL_SIZE);
ellip2.SetValue(Shape.HeightProperty, ELL_SIZE);
ellip2.SetValue(Shape.MarginProperty, new Thickness(ELL_MARGIN));
ellip2.SetBinding(Shape.StrokeProperty, fgbind);
ellip2.SetValue(Shape.StrokeThicknessProperty, ELL_STROKEW);
rootFac.AppendChild(ellip2);

FrameworkElementFactory ellip3 = new(typeof(Ellipse), "ellip3");
ellip3.SetValue(Shape.WidthProperty, ELL_SIZE);
ellip3.SetValue(Shape.HeightProperty, ELL_SIZE);
ellip3.SetValue(Shape.MarginProperty, new Thickness(ELL_MARGIN));
ellip3.SetBinding(Shape.StrokeProperty, fgbind);
ellip3.SetValue(Shape.StrokeThicknessProperty, ELL_STROKEW);
rootFac.AppendChild(ellip3);
这样,控件模板就构建好了,下面创建 ControlTemplate,并赋值给当前控件的 Template 属性。
 ControlTemplate temp = new(this.GetType());
 temp.VisualTree = rootFac;
 this.Template = temp;
模板中的三个圆都有命名的,比如
FrameworkElementFactory ellip2 = new(typeof(Ellipse), "ellip2");
FrameworkElementFactory 构造函数的第二个参数可以为元素分配一个 Name。后面咱们在控件的逻辑处理中要访问这三个圆,所以给它们命名。
定义一个 LoadExtXaml 方法,传入文件名,这样方便动态加载 XAML 文件。
 public void LoadExtXaml(string file)
 {
     using FileStream input = File.OpenRead(file);
     this.Resources = (ResourceDictionary)XamlReader.Load(input);
     // 从资源加获取画刷
     this.Background = (SolidColorBrush)Resources["background"];
     this.BorderBrush = (SolidColorBrush)Resources["bordercolor"];
 }
XAML 文件单独放到类库外,方便直接修改,不重新编译。
<ResourceDictionary xmlns="http://schemas.microsoft.com/winfx/2006/xaml/presentation"
                    xmlns:x="http://schemas.microsoft.com/winfx/2006/xaml">
    <SolidColorBrush x:Key="background" Color="Green"/>
    <SolidColorBrush x:Key="bordercolor" Color="Red"/>
</ResourceDictionary>
这主要是背景、前景色的画刷,常用的可能有字体啊、背景图片啊什么的,这些内空修改的概率大,全扔到外部 XAML 文件中。为了可以给控件”换皮肤“,咱们也可以再弄一个 XAML 文件,也是放到程序外。
<ResourceDictionary xmlns="http://schemas.microsoft.com/winfx/2006/xaml/presentation"
                    xmlns:x="http://schemas.microsoft.com/winfx/2006/xaml">
    <SolidColorBrush x:Key="background" Color="Blue"/>
    <SolidColorBrush x:Key="bordercolor" Color="DeepPink"/>
</ResourceDictionary>
如果你有 100 套皮肤,那就弄 100 个 XAML 文件就行了。最好建个文件夹,把 XAML 全放进去。XAML 文件可以用专门的命名方式。比如 myStyle-<主题名称>.xaml 这样,方便在代码中识别。你甚至可以写代码直接遍历这个目录下的 XAML 文件,然后在程序窗口上动态生成菜单,让用户选择皮肤,然后加载对应的 XAML 文件。岂不美哉!
好了,现在控件有了用纯代码搞的模板,又可加载外部资源了。接下来要重写 OnApplyTemplate 方法,当控件套用完模板后就会调用这个方法,我们在这个地方就可以读出模板里面命名的三个 Ellipse 对象了。
Ellipse _ep1, _ep2, _ep3;
// 透明画刷
SolidColorBrush _defaultBrush = new(Colors.Transparent);
……

public override void OnApplyTemplate()
{
    base.OnApplyTemplate();
    _ep1 = (Ellipse)GetTemplateChild("ellip1");
    _ep2 = (Ellipse)GetTemplateChild("ellip2");
    _ep3 = (Ellipse)GetTemplateChild("ellip3");
    _ep1.Fill = _ep2.Fill = _ep3.Fill = _defaultBrush;
    _ep1.MouseDown += OnEllipseMouseDown;
    _ep2.MouseDown += OnEllipseMouseDown;
    _ep3.MouseDown += OnEllipseMouseDown;
    // 双击恢复默认填充颜色
    this.MouseDoubleClick += (_, _) =>
    {
        _ep1.Fill = _ep2.Fill = _ep3.Fill = _defaultBrush;
    };
}
要将模板中的对象撸出来不要调用 FindName 方法,这个方法只查找当前对象的子级,不是包括模板里面的。而要用 GetTemplateChild 方法,这个才是搜索模板的。
下面就是处理 MouseDown 的方法。
private void OnEllipseMouseDown(object sender, MouseButtonEventArgs e)
{
    if(e.OriginalSource == _ep1)
    {
        _ep1.Fill = Background;
        _ep2.Fill = _ep3.Fill = _defaultBrush;
    }
    else if(e.OriginalSource == _ep2)
    {
        _ep1.Fill = _ep2.Fill = Background;
        _ep3.Fill = _defaultBrush;
    }
    else if(e.OriginalSource == _ep3)
    {
        _ep1.Fill = _ep2.Fill = _ep3.Fill = Background;
    }
    else
    {
        _ep1.Fill = _ep2.Fill = _ep3.Fill = _defaultBrush;
    }
}
控件库搞好了,然后咱们得用用,看正不正常。添加一个 WPF 应用程序项目。
<Project Sdk="Microsoft.NET.Sdk">

  <PropertyGroup>
    <OutputType>WinExe</OutputType>
    <TargetFramework>net7.0-windows</TargetFramework>
    <Nullable>enable</Nullable>
    <UseWPF>true</UseWPF>
  </PropertyGroup>

</Project>
你会发现,其实 WPF应用程序 和 WPF 控件库的项目文件差不多,区别是多了 OutputType 为 Winexe 的属性罢了。
引用咱们刚刚做好的控件库项目。
<ItemGroup>
  <ProjectReference Include="..CustControlCustControl.csproj" />
</ItemGroup>
写窗口类。
public class MyWindow : Window
{
    public MyWindow()
    {
        InitUI();
    }

    private void InitUI()
    {
        NameScope.SetNameScope(this, new NameScope());
        DockPanel root = new();
        root.LastChildFill = true;
        this.Content = root;
        // 有两个按钮,用来选择主题
        StackPanel btnPanel = new()
        {
            Orientation = Orientation.Horizontal
        };
        Button btnStyle1 = new Button
        {
            Content = "主题1"
        };
        Button btnStyle2 = new Button
        {
            Content = "主题2"
        };
        btnPanel.Children.Add(btnStyle1);
        btnPanel.Children.Add(btnStyle2);
        root.Children.Add(btnPanel);
        DockPanel.SetDock(btnPanel, Dock.Bottom);
        btnStyle1.Click += OnStyle1Click;
        btnStyle2.Click += OnStyle2Click;

        VVControl cust = new("mycc\style.a.xaml");
        RegisterName("myCust", cust);
        root.Children.Add(cust);
    }

    private void OnStyle2Click(object sender, RoutedEventArgs e)
    {
        VVControl? cc = FindName("myCust") as VVControl;
        if(cc != null)
        {
            cc.LoadExtXaml("mycc\style.b.xaml");
        }
    }

    private void OnStyle1Click(object sender, RoutedEventArgs e)
    {
        VVControl? c = FindName("myCust") as VVControl;
        if(c != null)
        {
            c.LoadExtXaml("mycc\style.a.xaml");
        }
    }
}
Main 入口点。
[STAThread]
static void Main(string[] args)
{
    Application app = new Application();
    MyWindow win = new MyWindow();
    win.Title = "示例程序";
    win.Width = 350;
    win.Height = 300;
    app.Run(win);
}
在生成的主程序的.exe 所在目录下创建 mycc 目录,把前面那两个 XAML 文件放进去,就完功了。
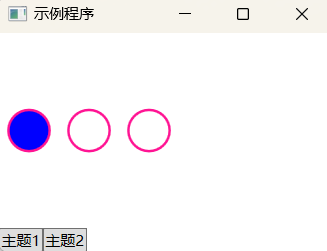
但你会发现,换主题时,圆的背景色不会自动换,要等单击事件后才变,而圆的轮廓是能及时换色的。这是因为 Fill 属性没有进行绑定,是在处理鼠标按下事件时用代码赋值的,所以不会自动更新。
至于 DataTemplate,和 ControlTemplate 一样的,也是通过 FrameworkElementFactory 类构建对象树。老周就不重复说了。数据模板和控件模板本来就是同一玩意儿,只是它们的角色不一样而已。
如果你的程序要通过代码来计算,动态得到 UI 相关属性的话,那用纯代码写较方便;如果不是的话,可以把一些资源放到程序外,这样你想改 的时候随便改,代码不用多次编译。
下面咱们弄个内外结合的方案。即控件库使用内置的XAML,但像边框、背景、字体等,放到外部的文件中。
新建 WPF 控件库项目,我们做个简单控件。
Themes/Generic.xaml:
<ResourceDictionary  xmlns="http://schemas.microsoft.com/winfx/2006/xaml/presentation"
       xmlns:x="http://schemas.microsoft.com/winfx/2006/xaml"
       xmlns:import="clr-namespace:GuaGuaControlLib">
    <Style TargetType="{x:Type import:MyControl}">
        <Setter Property="BorderBrush" Value="{DynamicResource bdColor}"/>
        <Setter Property="Foreground" Value="{DynamicResource fgColor}"/>
        <Setter Property="Background" Value="{DynamicResource bgColor}"/>
        <Setter Property="Margin" Value="4.5"/>
        <Setter Property="BorderThickness" Value="1,1.5"/>
        <Setter Property="FontSize" Value="{DynamicResource fontSize}"/>
        <Setter Property="FontFamily" Value="{DynamicResource fontFamily}"/>
        <Setter Property="HorizontalContentAlignment" Value="Center"/>
        <Setter Property="VerticalContentAlignment" Value="Center"/>
        <Setter Property="Template">
            <Setter.Value>
                <ControlTemplate TargetType="{x:Type import:MyControl}">
                    <Border Background="{TemplateBinding Background}"
                        BorderBrush="{TemplateBinding BorderBrush}"
                        BorderThickness="{TemplateBinding BorderThickness}">
                        <TextBlock FontFamily="{TemplateBinding FontFamily}"
                                   FontSize="{TemplateBinding FontSize}"
                                   Margin="{TemplateBinding Padding}"
                                   Foreground="{TemplateBinding Foreground}"
                                   HorizontalAlignment="{TemplateBinding HorizontalContentAlignment}"
                                   VerticalAlignment="{TemplateBinding VerticalContentAlignment}"
                               Text="{TemplateBinding Text}"/>
                    </Border>
                </ControlTemplate>
            </Setter.Value>
        </Setter>
    </Style>
</ResourceDictionary>
MyControl.cs
[assembly: ThemeInfo(ResourceDictionaryLocation.None, ResourceDictionaryLocation.SourceAssembly)]

namespace GuaGuaControlLib
{
    public class MyControl : Control
    {
        public static readonly DependencyProperty TextProperty;

        static MyControl()
        {
            // 重写样式键的依赖属性元数据
            DefaultStyleKeyProperty.OverrideMetadata(
                    typeof(MyControl),
                    new FrameworkPropertyMetadata(typeof(MyControl))
                );
            // 注册依赖属性
            TextProperty = DependencyProperty.Register("Text", typeof(string), typeof(MyControl), new FrameworkPropertyMetadata(string.Empty));
        }

        // 封装属性
        public string Text
        {
            get => (string)GetValue(TextProperty);
            set => SetValue(TextProperty, value);
        }

        public MyControl()
        {
        }

    }
}
有五个资源咱们放到项目外面,这里得用动态资源才能正确引用,用静态资源会报错,目前老周未找到解决方法。
下面这个 XAML 文件不包含在项目内,不会参与生成。
res/cust.xaml:
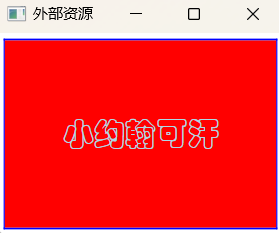
<ResourceDictionary xmlns="http://schemas.microsoft.com/winfx/2006/xaml/presentation"
                    xmlns:x="http://schemas.microsoft.com/winfx/2006/xaml"
                    xmlns:sys="clr-namespace:System;assembly=mscorlib">
    <SolidColorBrush x:Key="bdColor" Color="blue"/>
    <SolidColorBrush x:Key="bgColor" Color="red"/>
    <SolidColorBrush x:Key="fgColor" Color="LightBlue"/>
    <sys:Double x:Key="fontSize">25.0</sys:Double>
    <FontFamily x:Key="fontFamily">华文彩云</FontFamily>
</ResourceDictionary>
这五个 Key 对应被引用的五个资源项。
添加 WPF 应用程序项目,并引用 MyControl 所在项目。
<ItemGroup>
  <ProjectReference Include="..GuaGuaControlLibGuaGuaControlLib.csproj" />
</ItemGroup>
从 Window 类派生自定义窗口类。
 class MyWindow : Window
 {
     public MyWindow()
     {
         // 加载外部资源
         using var fs = File.OpenRead("res\cust.xaml");
         // 合并资源字典
         Resources.MergedDictionaries.Add((ResourceDictionary)XamlReader.Load(fs));
         MyControl cc = new();
         cc.Text = "小约翰可汗";
         Grid root = new();
         root.Children.Add(cc);
         Content = root;
     }
 }
class Program
{
    [STAThread]
    static void Main(string[] args)
    {
        Application myapp = new Application();

        MyWindow mainWin = new MyWindow();
        mainWin.Title = "外部资源";
        mainWin.Width = 242;
        mainWin.Height = 199;
        myapp.Run(mainWin);
    }
}
这里咱们采用合并资源字典的方式加载 XAML 文件。如果主资源中有定义的内部对象,用合并字典的方式可以保证主资源中的对象不会被覆盖。
运行看一下。
打开外部的 cust.xaml 文件,咱们改一下颜色和字体,并保存。
<ResourceDictionary xmlns="http://schemas.microsoft.com/winfx/2006/xaml/presentation"
                    xmlns:x="http://schemas.microsoft.com/winfx/2006/xaml"
                    xmlns:sys="clr-namespace:System;assembly=mscorlib">
    <SolidColorBrush x:Key="bdColor" Color="blue"/>
    <SolidColorBrush x:Key="bgColor" Color="darkblue"/>
    <SolidColorBrush x:Key="fgColor" Color="LightBlue"/>
    <sys:Double x:Key="fontSize">25.0</sys:Double>
    <FontFamily x:Key="fontFamily">华文行楷</FontFamily>
</ResourceDictionary>
不要重新生成项目,直接运行程序。
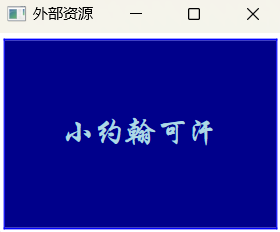
嗯,这样就方便很多了。
===================================================================================
关于纯代码写 WPF 以及加载外部 XAML 以方便改程序,老周一口气写完了这三篇水文。下面老周就做一个肤浅的总结吧。
先说说为什么会产生这一系列”奇葩“想法。主要有这两个因素:
1、对界面做一些参数的修改(如字体、颜色、背景图什么的)又要重新生成项目确实麻烦;
2、Qt 的 QSS 和 QML 既可以编译进资源中,也可以放在外部引用,也容易修改。所以我在想,WPF 项目也应该这样搞。
老周正在虐待的这个破项目比较杂,界面主窗口是 Qt 做的,一些左边栏,右边栏子窗口是 Win32 写的。操作员设置窗口是别人用 WPF 做的。exe 文件都好几个(以前写代码那货肯定东抄一块,西抄一块来的)。所以,用 Win32 API 写的和 WPF 写的程序,在入口函数时直接创建子进程,让它们运行,然后获取窗口的句柄,套在 Qt 的 Widget 中,再怼到主窗口上。目前没什么问题,运行之后,外行人看不出来是几个东东拼接出来的。忽悠过去就完事了,谁还管它 100 年呢。
文章来源: 博客园
- 还没有人评论,欢迎说说您的想法!


 客服
客服


