这是上一篇文章的续篇,关于自定义View。 多个View内部可以映射到同一个数据模型,也可以映射不同的数据结构;可以使用所有数据,也可以只使用部分数据。因为视图层与数据层的分离,操作相对比较灵活。
1. 实现一个自定义View
这里我们来实现一个自定义View,住要包含一下几个功能:
- 图案自定义:包含四个颜色不一的格子,大小小于整个窗口的1/4, 分别位于窗口的四个角落。
- 响应
鼠标点击:鼠标点击格子区域,绘制高亮的内方格,点击非格子区域无反应。 - 响应
右箭头(→)按键:点击选中格子后,按右箭头按键移动到下一个格子,并选中。
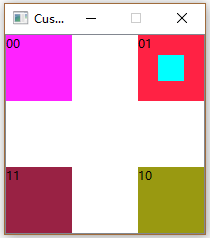
嗯,大概就是下面设计图的样子,并且我们把左上角、右上角、右下角和左下角的数据分别约定为QModelIndex(0,0)、QModelIndex(0,1)、QModelIndex(1,0)和QModelIndex(11)。

1.1 选择合适的视图类继承
与Model子类化一样,编写自定义视图的时候也有两种选择:继承QAbstractItemView、继承Qt提供的标准View。相对来说,继承抽象基类QAbstractItemView需要花较多的功夫,继承标准View类则比较快。当自己要使用的视图类与某个标准View相近的时候,继承这个View并且重写自己需要的功能函数是最方便的。
Qt提供了一下几个标准View(与标准Model相对应):
- QListView。
- QTableView。
- QTreeView。
- QColumnView。
- QHeaderView:用来提供表头视图给其他View使用。
其中QColumnView比较特殊,它是一个多列视图,每一列是一个QListView,点击前一列的某项会触发下一列的内容内变:

这里我们选择抽象基类,仅仅。。。。。出于随意(-_-, 嘿嘿)。
1.2 继承虚基类2步走
通过继承虚基类来实现自定义View主要有两步:实现纯虚函数、重载需要的虚函数。
1.2.1 实现QAbstractItemView的纯虚函数
自定义基类,第一步是要让你的View运行起来,我们需要实现所有的纯虚函数。因此我们需要实现以下函数:
//  pure virtuals
virtual QRect visualRect(const QModelIndex &index) const;
virtual void scrollTo(const QModelIndex &index, ScrollHint hint = EnsureVisible);
virtual QModelIndex indexAt(const QPoint &point) const;
virtual QModelIndex moveCursor(CursorAction cursorAction, Qt::KeyboardModifiers modifiers);
virtual int horizontalOffset() const;
virtual int verticalOffset() const;
virtual bool isIndexHidden(const QModelIndex &index) const;
virtual void setSelection(const QRect &rect, QItemSelectionModel::SelectionFlags command);
virtual QRegion visualRegionForSelection(const QItemSelection &selection) const;visualRect()函数返回模型下标代表的项占据的视图范围,如果该项包含多个区域,则返回主区域范围。该函数将数据模型与视图范围相关联。基本上,View的作用就是为了渲染Model数据显示,既然涉及到渲染,那渲染的范围必然是非常重要的。下面是我自定义View的现实部分(以防万一还进行了无效下标的检测,并返回无效范围):
QRect CustomeView::visualRect(const QModelIndex &index) const
{
    if (!index.isValid())   return QRect();

    int row = index.row();
    int column = index.column();
    if (row == 0) {
        if (column == 0)    return m_leftTopSquare;
        if (column == 1)    return m_rightTopSquare;
    }
    if (row == 1) {
        if (column == 0)    return m_rightBottomSquare;
        if (column == 1)    return m_leftBottomSquare;
    }

    return QRect();
}indexAt(),当用户鼠标点击的时候,我们需要判断它涉及那部分数据,这个函数就是用来处理这方面的逻辑的。这里我简单判断了点是否包含在四个格子里,是的话返回相应的数据下标;否则返回无效下标:
//  used when users clicks at the client area
QModelIndex CustomeView::indexAt(const QPoint &point) const
{
    Q_ASSERT(this->model() != nullptr);

    if (m_leftTopSquare.contains(point))    return this->model()->index(0, 0);
    if (m_rightTopSquare.contains(point))   return this->model()->index(0, 1);
    if (m_rightBottomSquare.contains(point))return this->model()->index(1, 0);
    if (m_leftBottomSquare.contains(point)) return this->model()->index(1, 1);

    return QModelIndex();
}moveCursor(),虽然这个函数名是Cursor,但好像跟光标没有关系,只设计键盘的操作,我们的按键功能就在这里实现。简而言之,这个函数处理键盘上的移动按键(多个箭头按键、Home键、End键等),返回下一个选中项。我们只处理右箭头:
QModelIndex CustomeView::moveCursor(QAbstractItemView::CursorAction cursorAction, Qt::KeyboardModifiers modifiers)
{
    Q_ASSERT(this->model() != nullptr);

    if (cursorAction != QAbstractItemView::MoveRight ||
        !m_currentModelIndex.isValid())
        return QModelIndex();
    else {
        auto row = m_currentModelIndex.row();
        auto column = m_currentModelIndex.column();
        if (row == 0) {
            if (column == 0)    return this->model()->index(0, 1);
            if (column == 1)    return this->model()->index(1, 0);
        }
        if (row == 1) {
            if (column == 0)    return this->model()->index(1, 1);
            if (column == 1)    return this->model()->index(0, 0);
        }
    }
}setSelection()也处理选中项的问题,但是函数传入的是一个范围Rect和一个选中命令(选中、取消选中等)。用户点击时,也会调用这个函数。跟你想的不一样,这时候传入的不是一个点,也是一个范围。鼠标点击时,或多或少也会有移动,这就形成了一个小型的矩形范围(□)。 通过判断这个Rect是否包含在某个格子里面,我们做出相应的选中操作(或什么都不做),完成鼠标点击选中功能:
void CustomeView::setSelection(const QRect &rect, QItemSelectionModel::SelectionFlags command)
{
    if (m_leftTopSquare.contains(rect))
        m_currentModelIndex = this->model()->index(0, 0);
    else if (m_rightTopSquare.contains(rect))
        m_currentModelIndex = this->model()->index(0, 1);
    else if (m_rightBottomSquare.contains(rect))
        m_currentModelIndex = this->model()->index(1, 0);
    else if (m_leftBottomSquare.contains(rect))
        m_currentModelIndex = this->model()->index(1, 1);

    if (m_currentModelIndex.isValid())
        this->selectionModel()->select(m_currentModelIndex, command);
}
其他纯虚函数我们不关心,直接返回了一个随意值。
1.2.2 重载功能需要的虚函数
到这里我们只剩自定义的图案还没有画,显而易见,我们在painrEvent()里面实现。需要注意的是,我们实际上是在viewport上画图,而不是在QAbstractItemView上,所以我们要把viewport指针传给QPainter:
void CustomeView::paintEvent(QPaintEvent *event)
{
    QPainter painter(this->viewport());

    if (this->model() != nullptr) {
        updateOneRect(painter, m_leftTopSquare, 0xff22ff, this->model()->index(0, 0));
        updateOneRect(painter, m_rightTopSquare, 0xff2244, this->model()->index(0, 1));
        updateOneRect(painter, m_rightBottomSquare, 0x999911, this->model()->index(1, 0));
        updateOneRect(painter, m_leftBottomSquare, 0x992244, this->model()->index(1, 1));
    }
    if (this->selectionMode()) {
        auto selectedIndexes = this->selectionModel()->selectedIndexes();
        for (auto index : selectedIndexes) {
            if (index == this->model()->index(0, 0))
                painter.fillRect(m_leftTopSquare.adjusted(20, 20, -20, -20), Qt::cyan);
            if (index == this->model()->index(0, 1))
                painter.fillRect(m_rightTopSquare.adjusted(20, 20, -20, -20), Qt::cyan);
            if (index == this->model()->index(1, 0))
                painter.fillRect(m_rightBottomSquare.adjusted(20, 20, -20, -20), Qt::cyan);
            if (index == this->model()->index(1, 1))
                painter.fillRect(m_leftBottomSquare.adjusted(20, 20, -20, -20), Qt::cyan);
        }

    }

    QAbstractItemView::paintEvent(event);
}
运行结果

完整代码见此处。
- 还没有人评论,欢迎说说您的想法!


 客服
客服


