
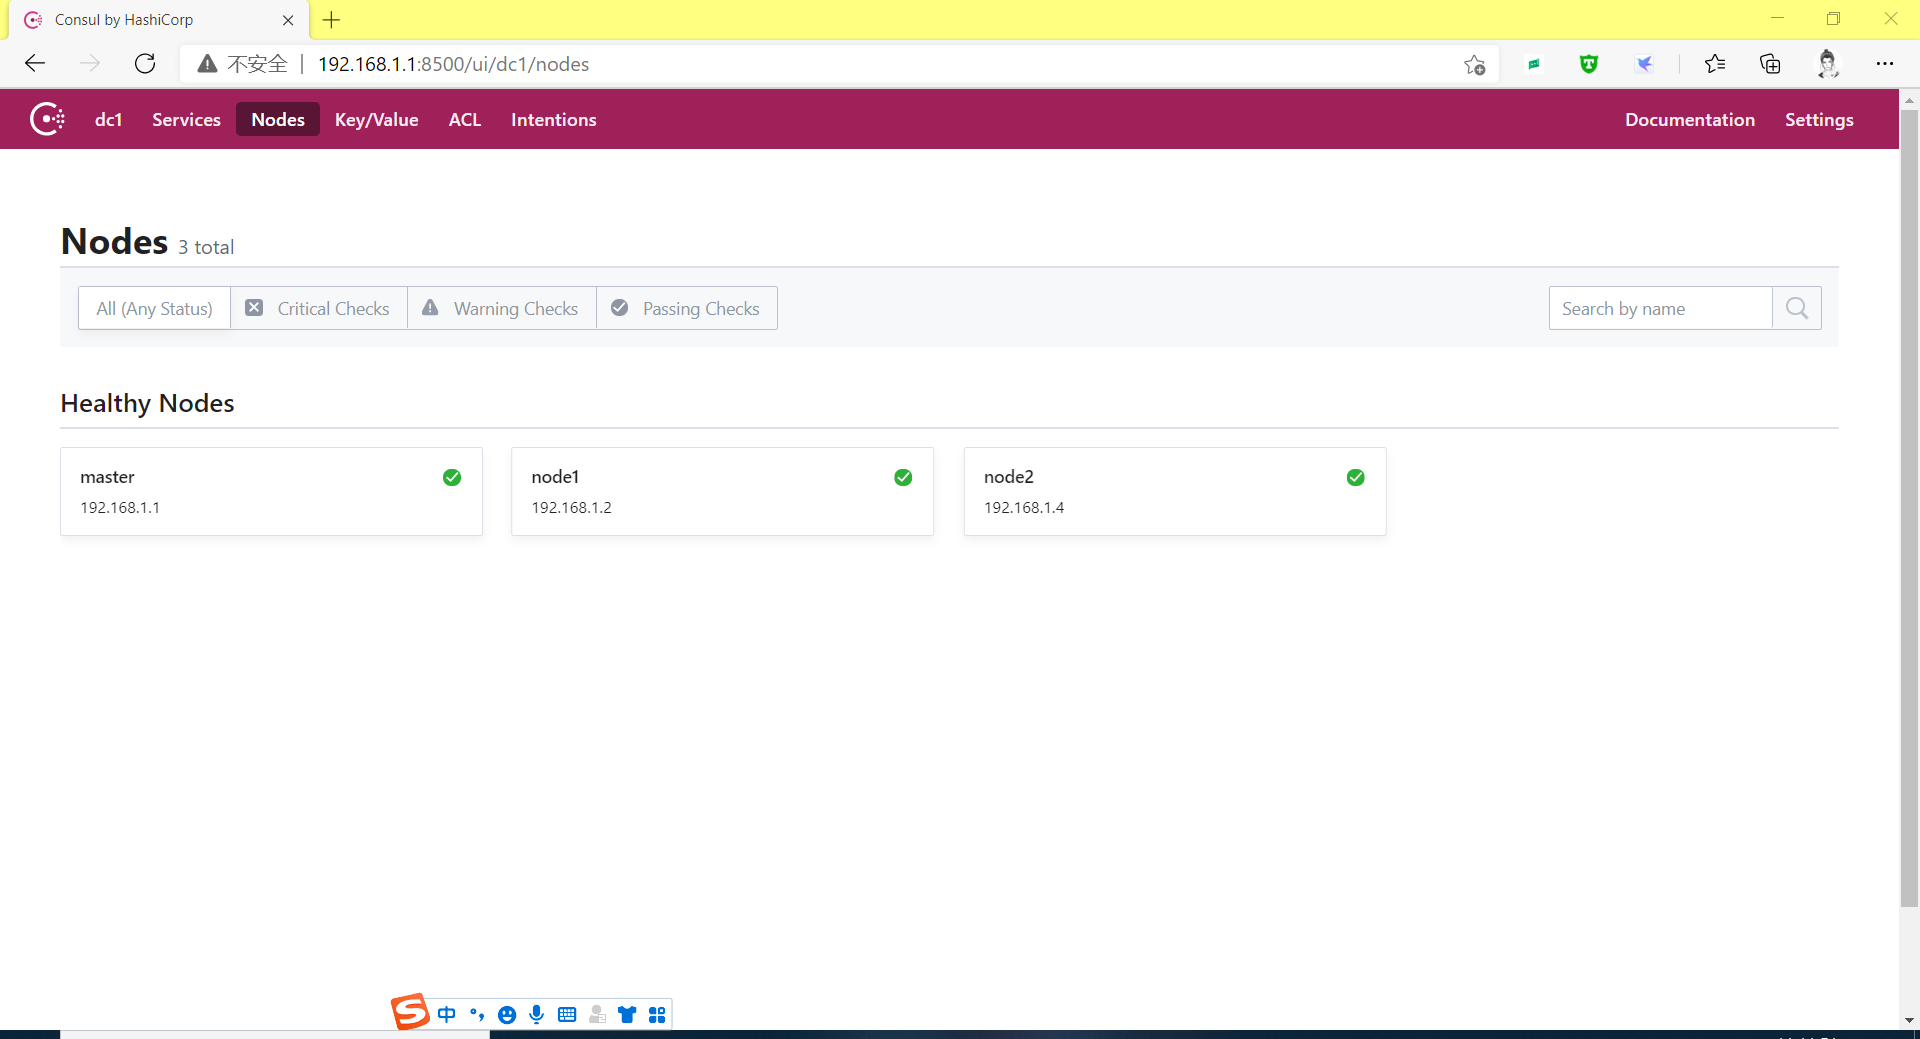
| master | node1 | node2 |
|---|---|---|
| 192.168.1.1 | 192.168.1.2 |
#获取tar包
[root@master ~]# wget https://releases.hashicorp.com/consul/1.8.4/consul_1.8.4_linux_amd64.zip
#解包
[root@master ~]# unzip consul_1.5.1_linux_amd64.zip
Archive:  consul_1.5.1_linux_amd64.zip
  inflating: consul
#移动到/usr/local/bin目录是给用户放置自己的可执行程序的地方,推荐放在这里,不会被系统升级而覆盖同名文件。
[root@master ~]# mv consul /usr/local/bin/
[root@master ~]# chmod  +x /usr/local/bin/consul
#启动conusl服务,在后台运行
[root@master ~]# nohup consul  agent -server -bootstrap -ui -data-dir=/var/lib/consul-data -bind=192.168.1.1 -client=0.0.0.0 -node=master &
命令解释:
nohup:要运行后台中的 nohup 命令
-bootstrap:一般运行在master节点,自动选举为leader(领袖)
-ui:开启consul内部的web界面
-data-dir:数据存储的位置
-bind:制定服务的server IP
-client:制定访问的客户端
-node:节点的名称,主机名
开启的端口:
8300 集群的节点
8301 集群内部的访问
8302 夸数据中心的通信
8500 web ui 界面
8600 使用dns协议查看节点信息的端口


 1 //查看conusl信息
 2 [root@master ~]# consul  info
 3 agent:
 4     check_monitors = 0
 5     check_ttls = 0
 6     checks = 0
 7     services = 0
 8 build:
 9     prerelease =
10     revision = 40cec984
11     version = 1.5.1
12 consul:
13     acl = disabled
14     bootstrap = true
15     known_datacenters = 1
16     leader = true
17     leader_addr = 192.168.1.1:8300  #consul节点IP:端口
18     server = true
19 raft:
20     applied_index = 60
21     commit_index = 60
22     fsm_pending = 0
23     last_contact = 0
24     last_log_index = 60
25     last_log_term = 2
26     last_snapshot_index = 0
27     last_snapshot_term = 0
28     latest_configuration = [{Suffrage:Voter ID:e2448f78-f220-e848-4316-128872e93ea1 Address:192.168.1.1:8300}]
29     latest_configuration_index = 1
30     num_peers = 0
31     protocol_version = 3
32     protocol_version_max = 3
33     protocol_version_min = 0
34     snapshot_version_max = 1
35     snapshot_version_min = 0
36     state = Leader
37     term = 2
38 runtime:
39     arch = amd64
40     cpu_count = 4
41     goroutines = 81
42     max_procs = 4
43     os = linux
44     version = go1.12.1
45 serf_lan:
46     coordinate_resets = 0
47     encrypted = false
48     event_queue = 1
49     event_time = 2
50     failed = 0
51     health_score = 0
52     intent_queue = 0
53     left = 0
54     member_time = 1
55     members = 1
56     query_queue = 0
57     query_time = 1
58 serf_wan:
59     coordinate_resets = 0
60     encrypted = false
61     event_queue = 0
62     event_time = 1
63     failed = 0
64     health_score = 0
65     intent_queue = 0
66     left = 0
67     member_time = 1
68     members = 1
69     query_queue = 0
70     query_time = 1
1 [root@master ~]#  consul  members
2 Node    Address           Status  Type    Build  Protocol  DC   Segment
3 master  192.168.1.1:8301  alive   server  1.5.1  2         dc1  <all>
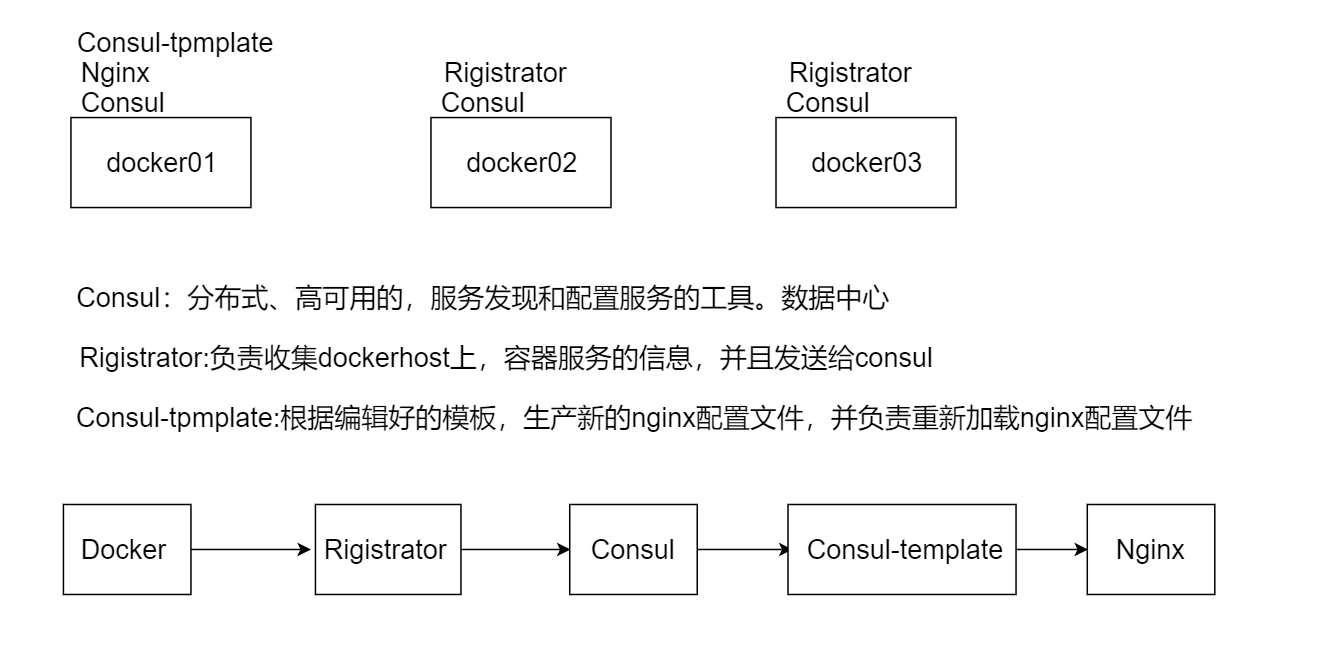
将node1、node2加入到conusl集群
这里我们采用容器的方式去运行consul服务。
#这里名称一定要注意这是个坑,为啥写2,其实着有含义的1代表单机、2代表群集
#节点node1
[root@node1 ~]# docker run -d --name consu2 -p 8301:8301 -p 8301:8301/udp -p 8500:8500 -p 8600:8600 -p 8600:8600/udp --restart always progrium/consul:latest -join 192.168.1.1 -advertise 192.168.1.2 -client 0.0.0.0 --node=node1
#节点node2
[root@node2 ~]# docker run -d --name consu2 -p 8301:8301 -p 8301:8301/udp -p 8500:8500 -p 8600:8600 -p 8600:8600/udp --restart always progrium/consul:latest -join 192.168.1.1 -advertise 192.168.1.4 -client 0.0.0.0 --node=node2
#可能会遇到的问题,ipv4流量转发未开启,开启即可!
[root@node1 ~]#  docker run -d --name consul2 -p 8301:8301 -p 8301:8301/udp -p 8500:8500 -p 8600:8600 -p 8600:8600/udp --restart always progrium/consul:latest -join 192.168.1.1 -advertise 192.168.1.2 -client 0.0.0.0 --node=node1
WARNING: IPv4 forwarding is disabled. Networking will not work.
bd6660df07110e0e524112f931a65d17a54eb29e73cbe47e017bf012e662e07e
[root@node1 ~]# echo  net.ipv4.ip_forward=1 >  /etc/sysctl.conf
[root@node1 ~]# systemctl restart network
[root@node1 ~]# systemctl daemon-reload
[root@node1 ~]# systemctl restart docker
[root@node1 ~]# docker restart  consul2
consul2
访问地址:IP:8500
docker02、docker03上部署registrator服务
registrator是一个能自动发现docker container提供的服务,并在后端 服务注册中心注册服务或取消服务的工具,后端注册中心支持conusl、 etcd、skydns2、zookeeper等。
#在node1节点执行
docker run -d --name registrator -v  /var/run/docker.sock:/tmp/docker.sock --restart always gliderlabs/registrator consul://192.168.1.2:8500
#在node2节点执行
docker run -d --name registrator -v  /var/run/docker.sock:/tmp/docker.sock --restart always gliderlabs/registrator consul://192.168.1.4:8500
#注意IP地址为执行的宿主机IP
master部署一个nginx服务
//依赖环境
# yum -y install gcc openssl openssl-devel zlib zlib-devel pcre pcre-devel
# useradd -M -s /sbin/nologin nginx
# tar -zxf nginx-1.14.0.tar.gz
# ./configure --user=nginx --group=nginx --with-http_stub_status_module --with-http_realip_module --with-pcre --with-http_ssl_module
# make && make install
# ln -s /usr/local/nginx/sbin/* /usr/local/bin/
# nginx -t
nginx: the configuration file /usr/local/nginx/conf/nginx.conf syntax is ok
nginx: configuration file /usr/local/nginx/conf/nginx.conf test is successful
# nginx
------------------------------------------------------------------------
#PS:  这里nginx作为反向代理,代理后端docker02、docker03上nginx的 容器服务,所以我们先去docker02、docker03上部署一些服务,为了方便等会看到负载的效果,所以,我们运行完成容器之后,做一个主界面内容的区分。
nginx作为反向代理,代理后端node1、node2上nginx 的 容器服务,所以我们先去node1、node2上部署一些服务,为 了方便等会看到负载的效果,所以,我们运行完成容器之后,做一个主 界面内容的区分。
node1:web1、web2
node2:web3、web4
 1 #创建nginx容器-p 随意映射容器内的80端口到宿主机
 2 [root@node1 ~]# docker run -itd --name web1 -p 80 nginx:latest
 3 77d39af9c5c8bcaa1839b9002bd09ac093f1e0699cef5bd04515ae38b1ceace8
 4 [root@node1 ~]# docker run -itd --name web2 -p 80 nginx:latest
 5 98ad0a4a5244cbb812ee1c5d2cee4818edc360d6eaea25c70c88f07e88d04a68
 6 #修改容器的nginx首页
 7 [root@node1 ~]# docker exec  -it web1 sh
 8 # echo web1 > /usr/share/nginx/html/index.html
 9 # curl 127.0.0.1
10 web1
11 [root@node1 ~]# docker exec  -it web2 sh
12 # echo web2 > /usr/share/nginx/html/index.html
13 # curl 127.0.0.1
14 web2
 1 #创建容器
 2 [root@node2 ~]# docker run -itd --name web3 -p 80 nginx:latest
 3 29e0495b3a9c1db99f33374115d626fa37217ab67313e1e20845ccf2dd7ccb82
 4 [root@node2 ~]# docker run -itd --name web4 -p 80 nginx:latest
 5 2b2fcd9bd3742b9f806d1804a59a61c1f320bd616e66d5d216d6b2c85231fc20
 6 #修改首页
 7 [root@node2 ~]# docker exec  -it web3  sh
 8 # echo web3 > /usr/share/nginx/html/index.html
 9 # curl 127.0.0.1
10 web3
11 #
12 [root@node2 ~]# docker exec  -it web4  sh
13 # echo web4 > /usr/share/nginx/html/index.html
14 # curl 127.0.0.1
15 web4
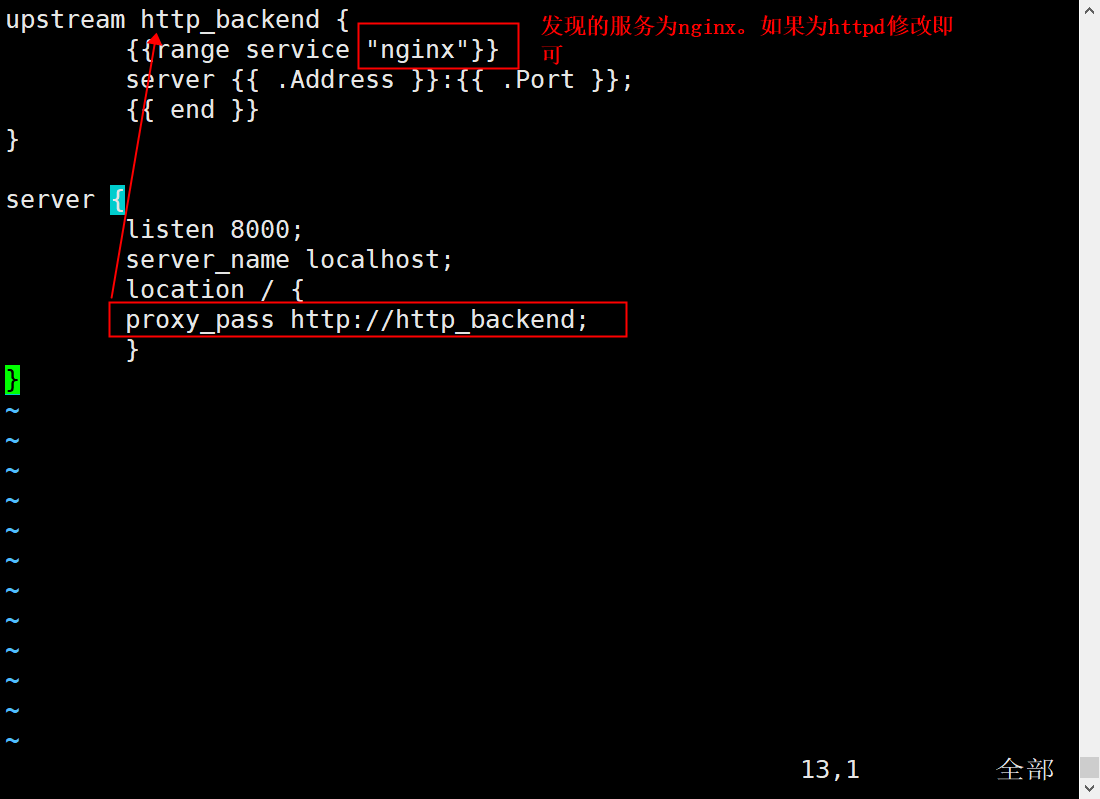
更改nginx服务的配置文件
vim /usr/local/nginx/consul/nginx.ctmpl
upstream http_backend {
        {{range service "nginx"}}
        server {{ .Address }}:{{ .Port }};
        {{ end }}
}

server {
        listen 8000;
        server_name localhost;
        location / {
        proxy_pass http://http_backend;
        }
}
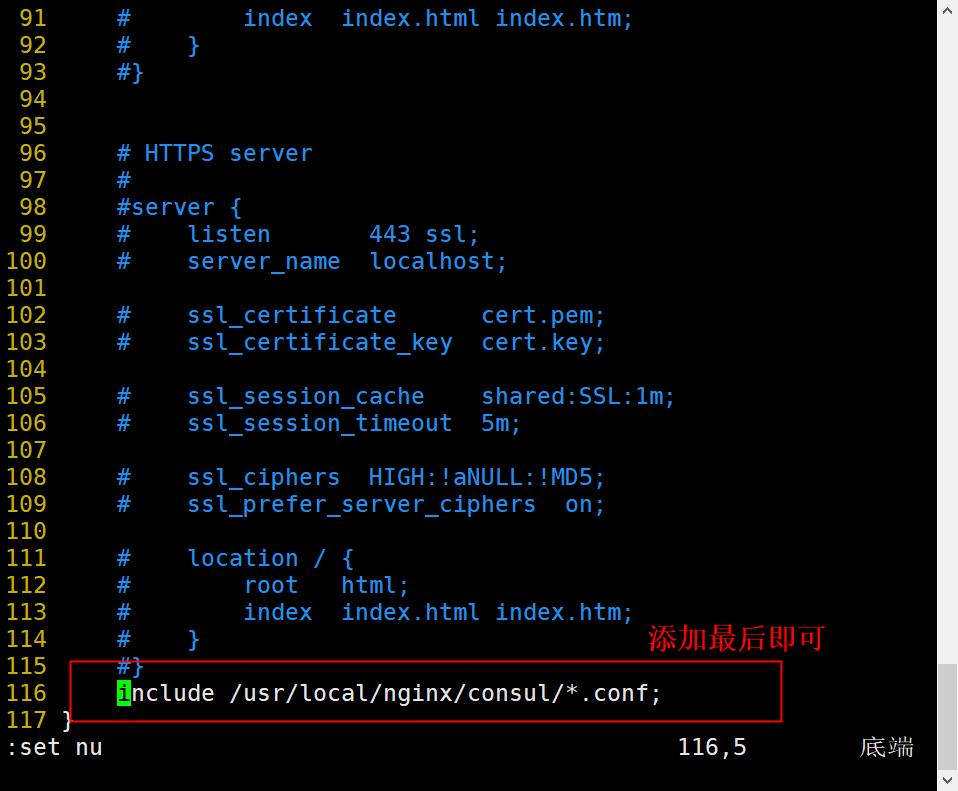
1 [root@master ~]# vim /usr/local/nginx/conf/nginx.conf
2 116     include /usr/local/nginx/consul/*.conf;
3 [root@master ~]# nginx  -t
4 nginx: the configuration file /usr/local/nginx/conf/nginx.conf syntax is ok
5 nginx: configuration file /usr/local/nginx/conf/nginx.conf test is successful
#重启 nginx -s reload
安装consul-template命令
Consul-Template简介
Consul-Template是基于Consul的自动替换配置文件的应用。在Consul-Template没出现之前,大家构建服务发现系统大多采用的是Zookeeper、Etcd+Confd这样类似的系统。
Consul官方推出了自己的模板系统Consul-Template后,动态的配置系统可以分化为Etcd+Confd和Consul+Consul-Template两大阵营。Consul-Template的定位和Confd差不多,Confd的后端可以是Etcd或者Consul。
[root@master soft]# unzip consul-template_0.19.5_linux_amd64.zip
Archive:  consul-template_0.19.5_linux_amd64.zip
  inflating: consul-template
[root@master soft]# mv consul-template /usr/local/bin/
[root@master soft]# chmod  +x /usr/local/bin/consul-template
[root@master soft]# nohup consul-template -consul-addr 192.168.1.1:8500 -template "/usr/local/nginx/consul/nginx.ctmpl:/usr/local/nginx/consul/vhost.conf:/usr/local/bin/nginx -s reload" &
[2] 5729
[root@master soft]# nohup: 忽略输入并把输出追加到"nohup.out"

[root@master soft]# cat /usr/local/nginx/consul/vhost.conf
upstream http_backend {

        server 192.168.1.2:32768;

        server 192.168.1.2:32769;

        server 192.168.1.4:32768;

        server 192.168.1.4:32769;

}

server {
        listen 8000;
        server_name localhost;
        location / {
        proxy_pass http://http_backend;
        }
}
当然,这时不管后端是新添加nginx的web容器,或是删除,新生产的配置文件都会时时的更新,这时我们在运行consul-template这条命令最后添加: /usr/local/bin/nginx -s reload 它的作用。
1.浏览器访问consul ui ip:8500后报以下内容
Consul returned an error. You may have visited a URL that is loading an unknown resource, so you can try going back to the root or try re-submitting your ACL Token/SecretID by going back to ACLs. Try looking in our
#访问,实现了负载均衡
[root@master soft]# curl  localhost:8000
web1
[root@master soft]# curl  localhost:8000
web2
[root@master soft]# curl  localhost:8000
web3
[root@master soft]# curl  localhost:8000
web4
[root@master soft]# curl  localhost:8000
web1
[root@master soft]# curl  localhost:8000
web2
[root@master soft]# curl  localhost:8000
web3
[root@master soft]# curl  localhost:8000
web4
#停止node1主机的容器,查看实时发现效果
[root@node1 sfot]# docker stop web1
^[[Aweb1
[root@node1 sfot]# docker stop web2
web2
#在master访问
[root@master soft]# curl  localhost:8000
web3
[root@master soft]# curl  localhost:8000
web4
[root@master soft]# curl  localhost:8000
web3
[root@master soft]# curl  localhost:8000
web4
文章来源: 博客园
- 还没有人评论,欢迎说说您的想法!
 客服
客服


