
@
上一章节我们创建了手势容器控件PanContainer,它对拖拽物进行包装并响应了平移手势和点击手势。
拖拽物现在虽然可以响应手势操作,但视觉效果较生硬,一个优秀的设计要求UI界面交互流畅,页面元素显得灵动,则少不了动画(Animation)。
本章节我们对拖拽物加入过渡动画
吸附动画
还记的上一章节所描述的拖拽物(pan)和坑(pit)吗?“”吸附“”这是一个非常拟物的过程,当拖拽物品接近坑区域的边缘时,物体就会由于重力或是引力作用会滑落,吸附在坑里。
接下来对势容器控件PanContainer添加这一效果,打开PanContainer.xaml.cs,创建一个bool类型的可绑定对象AutoAdsorption,用于控制是否开启吸附动画。
添加如下代码:
public static readonly BindableProperty AutoAdsorptionProperty =
BindableProperty.Create("AutoAdsorption", typeof(bool), typeof(PanContainer), default(bool));

public bool AutoAdsorption
{
    get { return (bool)GetValue(AutoAdsorptionProperty); }
    set
    {
        SetValue(AutoAdsorptionProperty, value);
        OnPropertyChanged();

    }
}
确定位置
吸附动画触发时,首先要确定拖拽物的中心点是否在坑区域内,如果在,则拖拽物的中心点移动到坑区域的中心点,否则拖拽物的中心点移动到手指的位置。
在平移手势的PanUpdated响应事件处理方法中,添加如下代码:
private async void PanGestureRecognizer_OnPanUpdated(object sender, PanUpdatedEventArgs e)
{
    var isInPit = false;
    var isAdsorbInPit = false;

...

    //GestureStatus.Running中
    if (isYin && isXin)
    {
        isInPit = true;
        if (AutoAdsorption)
        {
            isAdsorbInPit = true;
            translationX = (pitRegion.EndX + pitRegion.StartX - Content.Width) / 2;
            translationY = (pitRegion.EndY + pitRegion.StartY - Content.Height) / 2;
        }

...
isAdsorbInPit是是否执行吸附动画的标志位。
平移动画
在触发吸附动画后,我们需要对拖拽物进行平移动画,使其移动到坑区域的中心点。
使用的用TranslateTo方法执行的,该方法会在200ms内逐渐更改拖拽物的TranslationX和 TranslationY属性
if (AutoAdsorption)
{
    if (isAdsorbInPit)
    {
        if (!IsRuningTranslateToTask)
        {
            IsRuningTranslateToTask = true;
            await Content.TranslateTo(translationX, translationY, 200, Easing.CubicOut).ContinueWith(c => IsRuningTranslateToTask = false); ;
        }

        isAdsorbInPit = false;
    }
    else
    {
        Content.TranslationX = translationX;
        Content.TranslationY = translationY;
    }
}
else
{
    Content.TranslationX = translationX;
    Content.TranslationY = translationY;
}
执行效果如下:

IsRuningTranslateToTask是是否正在执行吸附动画的标志位。若正在执行,则不再执行新的吸附动画。
回弹动画
当手指释放拖拽物时,我们需要对拖拽物进行回弹动画,使其回到原来的位置。
同样的,我们通过动画改变TranslationX和 TranslationY属性,但是为了有一个回弹的效果,要用到缓动函数Easing类。
Easing 类,使用该类可以指定一个传输函数,用于控制动画在运行时如何加快或减慢速度。
MAUI中提供了以下几种缓动函数:
| 缓动函数 | 描述 |
|---|---|
| BounceIn | 在开始时弹跳动画 |
| BounceOut | 在结尾处弹跳动画 |
| CubicIn | 缓慢加速动画 |
| CubicInOut | 在开头加速动画,并在结束时减速动画 |
| CubicOut | 会快速减速动画 |
| Linear | 使用恒定的速度,是默认值 |
| SinIn | 可平滑地加速动画 |
| SinInOut | 在开头平滑地加速动画,并在动画结束时平滑减速 |
| SinOut | 平滑地减速动画 |
| SpringIn | 会导致动画快速加速到末尾 |
| SpringOut | 会导致动画快速减速到末尾 |
它们的函数曲线如下:

使用自定义缓动函数
我们需要一个拉扯回弹的效果,可以通过自定义缓动函数实现。
我用python拟合了一个适合拖拽物回弹的曲线。模拟一种弹性拉扯的效果。
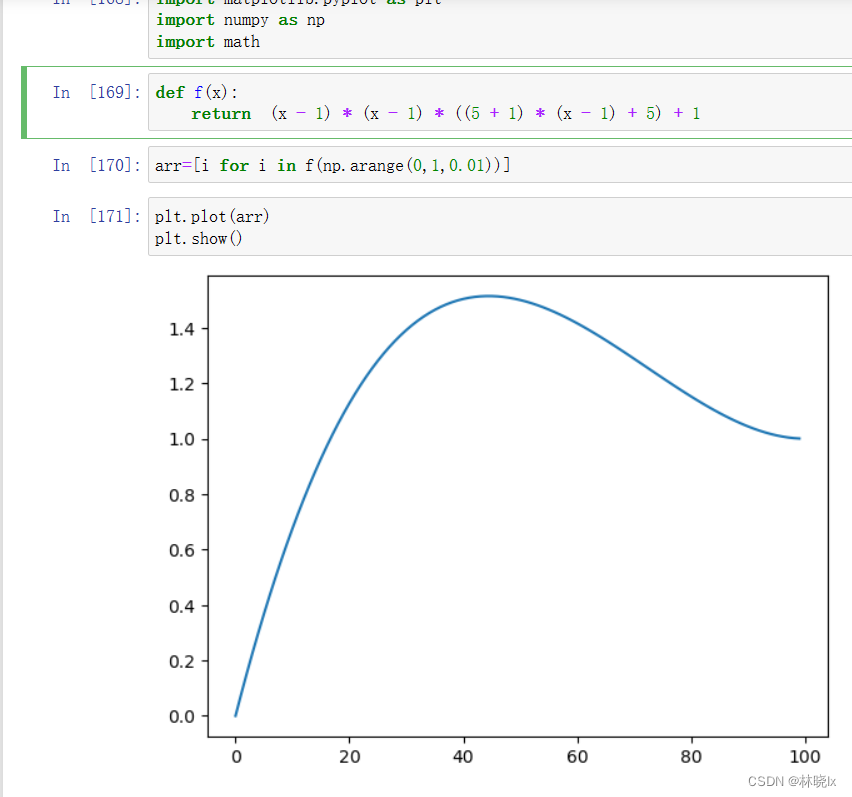
写入代码后测试一下效果:
var mySpringOut =(double x) => (x - 1) * (x - 1) * ((5f + 1) * (x - 1) + 5) + 1;
await Content.TranslateTo(PositionX, PositionY, 200, mySpringOut);

多重动画
在回弹的同时,大小要恢复到原来的大小,我们可以通过动画改变Scale属性来实现。
改变大小和改变位置的动画是同时进行的,我们通过创建Animation对象,添加子动画来实现。详情请参考Animation子动画。
 Content.AbortAnimation("ReshapeAnimations");
var parentAnimation = new Animation();
var mySpringOut =(double x) => (x - 1) * (x - 1) * ((5f + 1) * (x - 1) + 5) + 1;

var scaleUpAnimation1 = new Animation(v => Content.TranslationX = v, Content.TranslationX, PositionX, mySpringOut);
var scaleUpAnimation2 = new Animation(v => Content.TranslationY = v, Content.TranslationY, PositionY, mySpringOut);
var scaleUpAnimation5 = new Animation(v => Content.Scale = v, Content.Scale, 1.0);

parentAnimation.Add(0, 1, scaleUpAnimation1);
parentAnimation.Add(0, 1, scaleUpAnimation2);
parentAnimation.Add(0, 1, scaleUpAnimation5);

parentAnimation.Commit(this, "RestoreAnimation", 16, (uint)PanScaleAnimationLength);
在开始拖拽的时候,也加上缩小的动画,这样拖拽的时候,拖拽物会缩小,释放的时候会恢复原来的大小。
Content.AbortAnimation("ReshapeAnimations");
var scaleAnimation = new Animation();
var scaleUpAnimation0 = new Animation(v => Content.Scale = v, Content.Scale, PanScale);
scaleAnimation.Add(0, 1, scaleUpAnimation0);

scaleAnimation.Commit(this, "ReshapeAnimations", 16, (uint)PanScaleAnimationLength);
注意,放大和缩小是两个成对的动画,他们共同持有一个handler即ReshapeAnimations,不能同时进行,所以在开始一个动画前,要先调用Content.AbortAnimation("ReshapeAnimations")以终止之前的动画。
最终运行效果:

点击动画
点击时为了模拟水波纹效果,可以使用多重动画来实现。
在点击时,我们分三次连续的缩小,放大再缩小,这样就会有一个水波纹的效果。
在点击手势的OnTapped响应事件处理方法中,添加如下代码:
private void TapGestureRecognizer_OnTapped(object sender, EventArgs e)
{
    var scaleAnimation = new Animation();
    var scaleUpAnimation0 = new Animation(v => Content.Scale = v, 1.0, 0.9);
    var scaleUpAnimation1 = new Animation(v => Content.Scale = v, 0.9, 1.1);
    var scaleUpAnimation2 = new Animation(v => Content.Scale = v, 1.1, 1.0);
    scaleAnimation.Add(0, 0.3, scaleUpAnimation0);
    scaleAnimation.Add(0.3, 0.6, scaleUpAnimation1);
    scaleAnimation.Add(0.6, 1, scaleUpAnimation2);

    scaleAnimation.Commit(this, "ReshapeAnimations", 16, 400);

    this.OnTapped?.Invoke(this, EventArgs.Empty);
}
最终运行效果:

下一章将结合手势容器实现一个圆形进度条。
项目地址
文章来源: 博客园
- 还没有人评论,欢迎说说您的想法!
 客服
客服


