
承接上篇。
改变我们的测试驱动方式,灵活设置测试用例。
数据驱动测试
数据驱动测试的核心是:
测试数据与测试脚本分离,实现测试脚本参数化,
提高测试脚本的可重用性。在自动化功能测试中如果灵活使用数据源与测试脚本,
便能轻松创建与运行成百上千个测试用例。自动化测试框架必须要有与电子表格、文本文件、数据库集成的能力。
首先小伙伴们就会问,你要先解析Excel吧,那你肯定得给我上代码,是的,必须的上代码。
package com.testapi.until;

import java.io.FileInputStream;
import java.io.FileNotFoundException;
import java.io.IOException;
import org.apache.poi.xssf.usermodel.XSSFCell;
import org.apache.poi.xssf.usermodel.XSSFRow;
import org.apache.poi.xssf.usermodel.XSSFSheet;
import org.apache.poi.xssf.usermodel.XSSFWorkbook;
public class ExcelUtils {
    private static XSSFSheet ExcelWSheet;
    private static XSSFWorkbook ExcelWBook;
    private static XSSFCell Cell;
    private static XSSFRow Row;
    public static Object[][] getTableArray(String FilePath, String SheetName) throws Exception {
       String[][]tabArray = null;
       try {
           FileInputStream ExcelFile = new FileInputStream(FilePath);
           ExcelWBook = new XSSFWorkbook(ExcelFile);
           ExcelWSheet = ExcelWBook.getSheet(SheetName);
           int startRow = 1;
           int startCol = 1;
           int ci,cj = 0;
           int totalRows = ExcelWSheet.getLastRowNum();
           int totalCols = 2;
           tabArray=new String[totalRows][6];
           ci=0;
           cj=0;
           int cm = 0;int cl = 0;int ch = 0;
           for (int i=startRow;i<=totalRows;i++, ci++) {
                   tabArray[ci][0]=getCellData(i,2);
                   tabArray[ci][1]=getCellData(i,3);
                   tabArray[ci][2]=getCellData(i,4);
                   tabArray[ci][3]=getCellData(i,5);
                   tabArray[ci][4]=getCellData(i,6);
                }
            }
        catch (FileNotFoundException e){
            System.out.println("Could not read the Excel sheet");
            e.printStackTrace();
            }
        catch (IOException e){
            System.out.println("Could not read the Excel sheet");
            e.printStackTrace();
            }
        return(tabArray);
        }
    public static String getCellData(int RowNum, int ColNum) throws Exception {
        try{
            Cell = ExcelWSheet.getRow(RowNum).getCell(ColNum);
            int dataType = Cell.getCellType();
            if  (dataType == 3) {
                return "";
            }
            else{
                String CellData = Cell.getStringCellValue();
                return CellData;
            }
        }
            catch (Exception e){
//            System.out.println(e.getMessage());
            throw (e);
            }
        }
    public static void main(String[] args) throws Exception {
        ExcelUtils excelUtils=new ExcelUtils();
        Object[][] m = excelUtils.getTableArray("C:\Users\Administrator\eclipse-workspace\ApiTest\casedata\casedata.xlsx","Sheet1");

    }
    }
这就是我们的代码,那么小伙伴迫不及待了,你快来告诉我,
你的测试用例怎么组织的,好的 ,热腾腾的钙素你,我给你的就是代码,就是源码。源码如下
package com.testapi.casev;
import static org.testng.Assert.assertEquals;

import org.testng.annotations.AfterTest;
import org.testng.annotations.BeforeTest;
import org.testng.annotations.DataProvider;
import org.testng.annotations.Listeners;
import org.testng.annotations.Test;

import com.testapi.until.ExcelUtils;
import com.testapi.until.Getcode;
import com.testapi.until.Makejson;
import com.testapi.until.ParseJson;
import com.testapi.until.*;
@Listeners({ZTestReport.class})
public class Testapi {
    @DataProvider(name="DP1")
    public Object[][] createData() throws Exception {
        ExcelUtils excelUtils=new ExcelUtils();
        Object[][] m = ExcelUtils.getTableArray("casedata\casedata.xlsx","Sheet1");
        return m;
    }
  @Test(dataProvider="DP1")
  public void f(String url,String path,String meth,String map,String jsonid,String qiwang) {
    String param1 = Makejson.makejson(map);
    Getcode getcode=new Getcode();
    url=url+path;
    String resulst=getcode.getHttpResponse(param1, url,meth.toUpperCase());
    String bnei=ParseJson.Json(resulst);
    assertEquals(bnei,qiwang);
  }
  @BeforeTest
  public void beforeTest() {
  }
  @AfterTest
  public void afterTest() {
  }

}
这就是源码,这就是源码,
那么,你能让我看看你的Excel怎么写的吗,可以
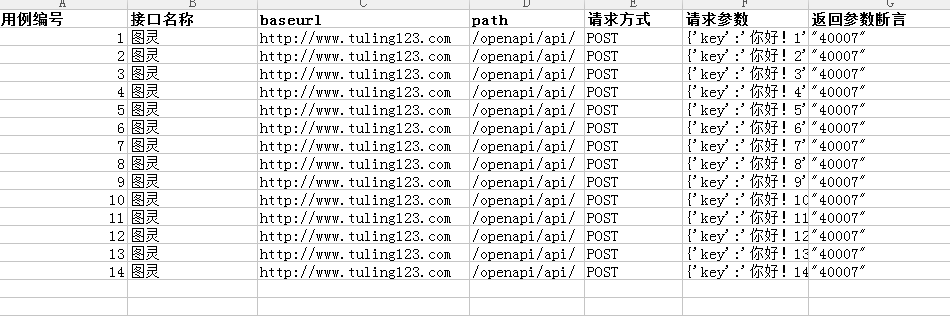
目前支持的断言是断言code的字段,其实还可以丰富,接下来会优化这方面。
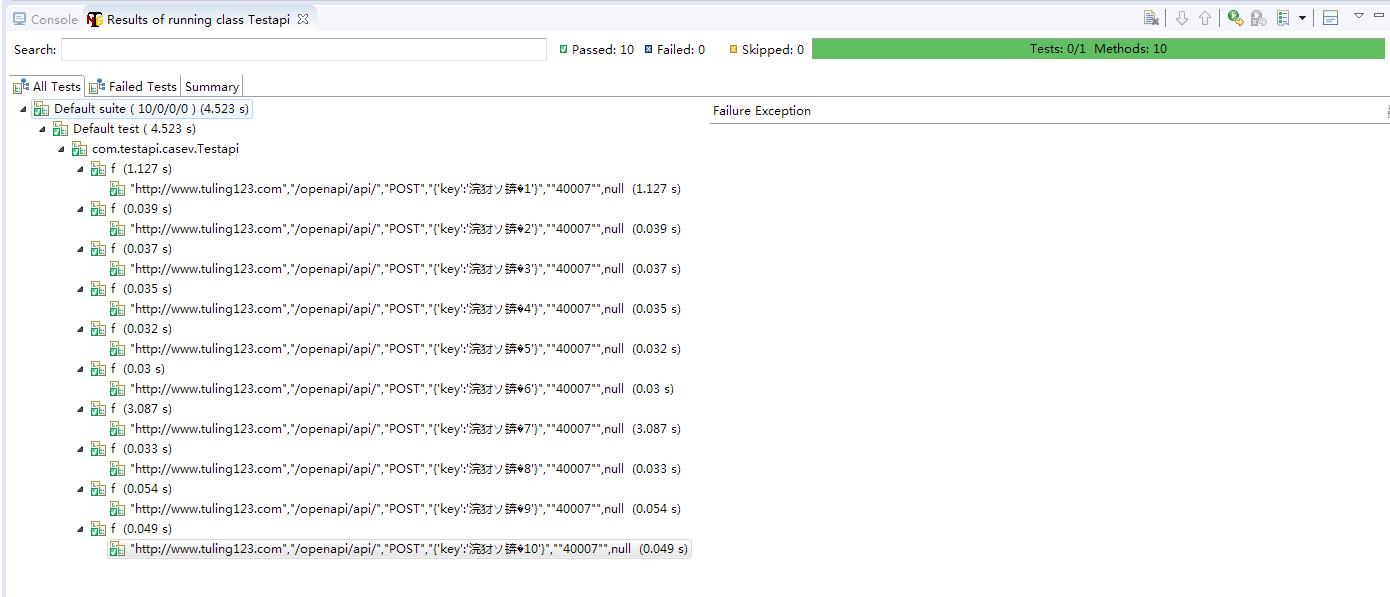
运行testng测试
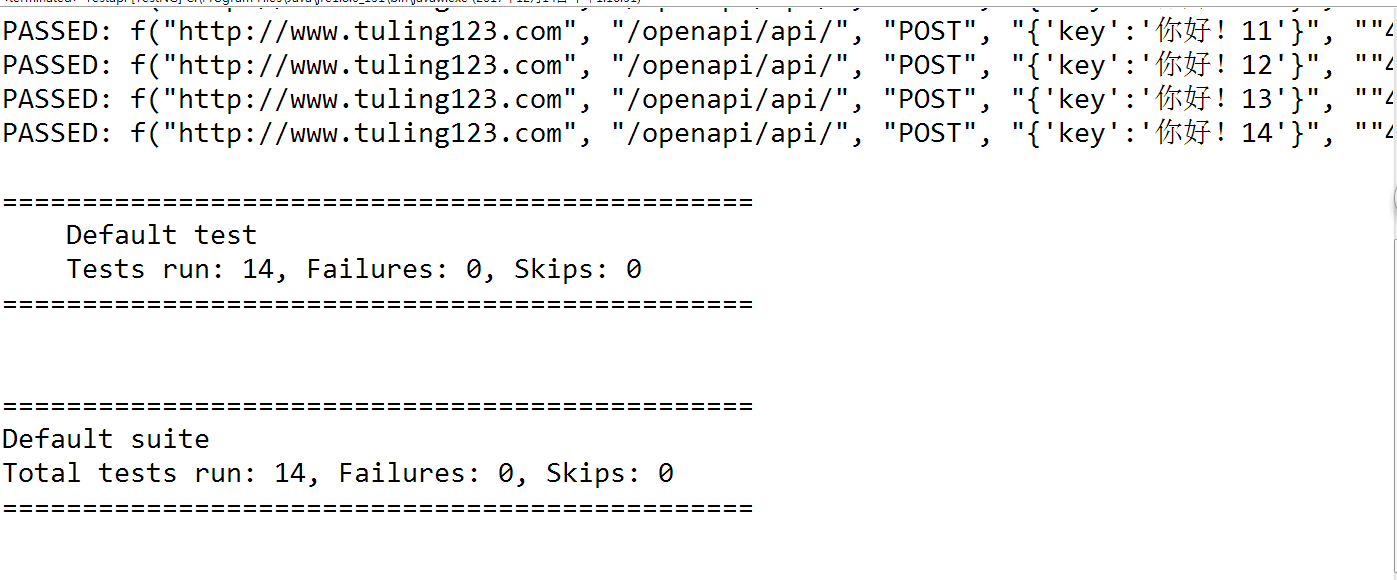
控制台输出
最后的测试报告
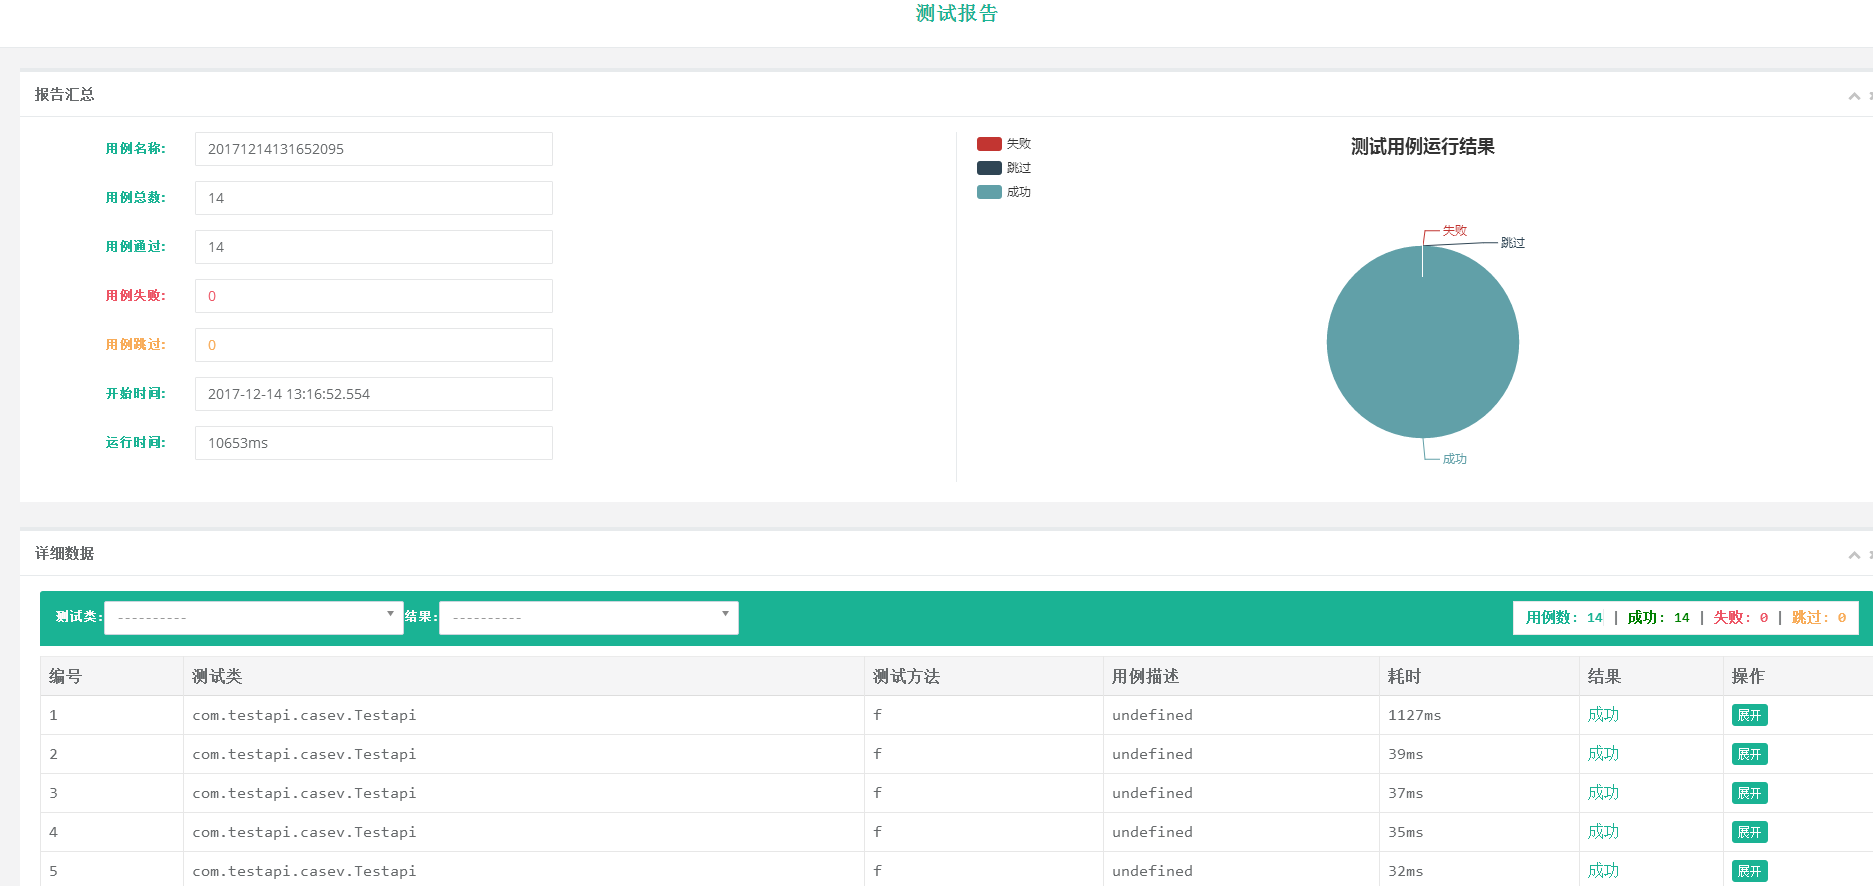
测试报告,要感谢飞总的ztest
开源代码 github 传送门 喜欢的可以star。
作者寄语:
前进的道路我们充满着迷茫,
前进的每一步我们都会有收获。
路在脚下,我们决定不了我们的出身,但是我们可以努力改变我们未来。
告别昨天失败的自己,努力拼搏今天,成就美好明天
内容来源于网络如有侵权请私信删除
- 还没有人评论,欢迎说说您的想法!
 客服
客服


