CAS 默认的登录页面显然不适合实际的使用,本文主要介绍如何自定义登录页面;文中使用到的软件版本:JDK 1.8.0_191、Tomcat 8.5.76、CAS 5.3.16。
1、服务端准备
这里假设 CAS 服务端已经安装完毕,地址为:http://127.0.0.1:8080/cas,本文描述的修改都针对 CAS 服务端;服务端的安装方法可参考:CAS 入门实战(2)--服务端安装。
2、自定义主题
这里假设新增的主题名称为:mytheme
2.1、新增主题配置文件
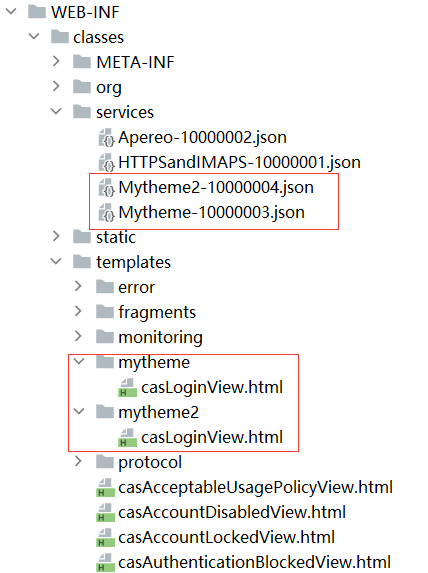
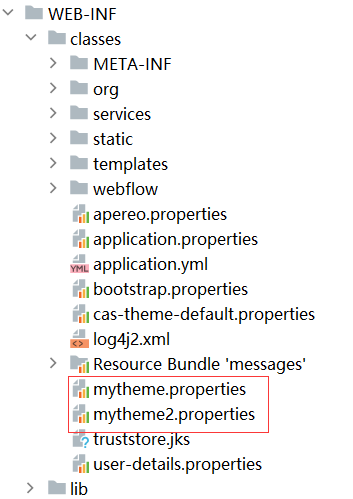
在 WEB-INFclasses 下新增 mytheme.properties:
cas.standard.css.file=/css/cas.css
其他变量根据自己页面的需要来定义,如果自定义的页面用不到,可以不用定义其他的变量。
2.2、新增主题页面
在 WEB-INFclassestemplates 下新建 mytheme 目录,并在 mytheme 目录下创建登录页面 casLoginView.html:
<!DOCTYPE html>
<html lang="en">
<head>
    <meta charset="UTF-8">
    <meta http-equiv="X-UA-Compatible" content="IE=edge"/>
    <meta name="viewport" content="width=device-width, initial-scale=1, shrink-to-fit=no"/>

    <title>登录</title>
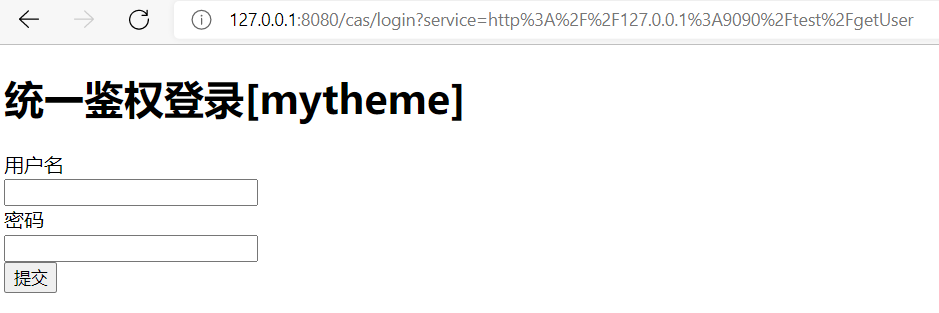
    <h1>统一鉴权登录[mytheme]</h1>
    <form method="post" id="fm1" th:object="${credential}" action="login">
        <div th:if="${#fields.hasErrors('*')}">
          <span th:each="err : ${#fields.errors('*')}" th:utext="${err}">Example error</span>
      </div>

        <section>
        <label>用户名</label>

        <div th:if="${openIdLocalId}">
            <strong>
                <span th:utext="${openIdLocalId}"/>
            </strong>
            <input type="hidden"
                   id="username"
                   name="username"
                   th:value="${openIdLocalId}"/>
        </div>
        <div th:unless="${openIdLocalId}">
            <input
                   id="username"
                   size="25"
                   tabindex="1"
                   type="text"
                   th:disabled="${guaEnabled}"
                   th:field="*{username}"
                   th:accesskey="#{screen.welcome.label.netid.accesskey}"
                   autocomplete="off"/>
        </div>
        </section>
        <section>
        <label>密码</label>

        <div>
            <input
                   type="password"
                   id="password"
                   size="25"
                   tabindex="2"
                   th:accesskey="#{screen.welcome.label.password.accesskey}"
                   th:field="*{password}"
                   autocomplete="off"/>
        </div>
        </section>
        <input type="hidden" name="execution" th:value="${flowExecutionKey}"/>
          <input type="hidden" name="_eventId" value="submit"/>
          <input type="hidden" name="geolocation"/>

          <input type="submit" value="提交">
    </form>
</head>
这里定义了一个简单的页面,form 中的元素不要变,其他的可以根据需要修改。自定义登录页面使用到的 css 、js 文件都可以放到 mytheme 目录下。
3、使用自定义主题
3.1、通过设置默认主题方式使用自定义主题
如果所有的客户端都使用同一套的自定义主题,则可在 WEB-INFclassesapplication.properties 中增加如下配置:
cas.theme.defaultThemeName=mytheme
重启 CAS 服务端即可。

3.2、通过 Service 方式使用自定义主题
不同的客户端可以定义相应的 Service,在 Service 中可以设置主题;Service 的定义保护如下的属性:
| 属性 | 说明 |
| @class | 服务注册类名 |
| serviceId | 服务对应的客户端 |
| name | 服务名称 |
| id | 服务id |
| description | 描述 |
| evaluationOrder | 匹配的次序 |
| theme | 主题 |
按照上面的步骤再定义一个主题:mytheme2,然后在 WEB-INFclassesservices 目录下创建 Service 的配置文件。
Mytheme-10000003.json:
{
  "@class" : "org.apereo.cas.services.RegexRegisteredService",
  "serviceId" : "^(https|http|imaps)://127.0.0.1:9090.*",
  "name" : "127.0.0.1:9090",
  "id" : 10000003,
  "description" : "",
  "evaluationOrder" : 10,
  "theme" : "mytheme"
}
Mytheme2-10000004.json:
{
  "@class" : "org.apereo.cas.services.RegexRegisteredService",
  "serviceId" : "^(https|http|imaps)://127.0.0.1:9091.*",
  "name" : "127.0.0.1:9091",
  "id" : 10000004,
  "description" : "",
  "evaluationOrder" : 11,
  "theme" : "mytheme2"
}
重启后访问不同的客户端会转到不同的主题页面。
访问客户端1 http://127.0.0.1:9090/test/getUser:

访问客户端2 http://127.0.0.1:9091/test/getUser:

4、涉及关键文件截图


文章来源: 博客园
- 还没有人评论,欢迎说说您的想法!


 客服
客服


