
前言
pytest测试框架也是主流的一个测试框架,推荐使用该框架,对比unnitest框架来说,其效率更高。前面的文章讲解了,如何使用pytest,这篇文章一起来看下如何针对pytest的测试用例进行控制。
本篇文章是《Selenium3自动化测试【38】单元测试Pytest》的后续,建议连续阅读,效果更佳。
1. 测试用例的运行控制
Pytest执行用例的方式,不单单是Pytest这一种方式,Pytest提供了3种运行方式执行测试用例。
- pytest(一般采用该种方式);
- pytest test.py或pytest test.py;
- python –m pytest。
在pytestDemo目录下,新创建一个Demo_test.py文件,代码如下:
# 乘法,返回a*b的值
def multi(a,b):
    return a*b

# 除法,返回a/b的值
def divide(a,b):
    return a/b

class TestClass:
    def test_multi(self):
        assert multi(3, 3) == 6

    def test_divide(self):
        assert divide(3, 2) == 4
1.1 方式1:pytest
格式为:【pytest 文件名/】或进入pytestDemo目录下,运行pytest,执行某个目录下所有的用例,结果如下,可观察到Demo_test.py与test_demo.py两个测试文件均被运行。
E:pytestDemo>pytest
=================== test session starts =================================
platform win32 -- Python 3.7.5, pytest-5.4.1, py-1.8.1, pluggy-0.13.1
rootdir: E:pytestDemo
collected 4 items

Demo_test.py FF                                                                                                  [ 50%]
test_demo.py ..                                                                                                  [100%]

======================= FAILURES ================================
_______________________ TestClass.test_multi _________________________

self = <pytestDemo.Demo_test.TestClass object at 0x00000190540EAA48>

    def test_multi(self):
>       assert multi(3, 3) == 6
E       assert 9 == 6
E        +  where 9 = multi(3, 3)

Demo_test.py:25: AssertionError
_________________ TestClass.test_divide _________________________

self = <pytestDemo.Demo_test.TestClass object at 0x00000190540DF208>

    def test_divide(self):
>       assert divide(3, 2) == 4
E       assert 1.5 == 4
E        +  where 1.5 = divide(3, 2)

Demo_test.py:28: AssertionError
==================== short test summary info ==========================
FAILED Demo_test.py::TestClass::test_multi - assert 9 == 6
FAILED Demo_test.py::TestClass::test_divide - assert 1.5 == 4
=================== 2 failed, 2 passed in 0.07s =======================
1.2 方式2:pytest test_*.py
执行某一个py文件下用例【pytest 脚本名称.py】,操作步骤及运行结果如下,可观察到仅仅运行了Demo_test.py文件,而test_demo.py并未被运行。
E:pytestDemo>pytest Demo_test.py
========= test session starts ==================================
platform win32 -- Python 3.7.5, pytest-5.4.1, py-1.8.1, pluggy-0.13.1
rootdir: E:pytestDemo
collected 2 items
Demo_test.py FF                                                                                                  [100%]

========================= FAILURES ================================
_____ TestClass.test_multi _________________________
self = <pytestDemo.Demo_test.TestClass object at 0x000001B64767ED48>
    def test_multi(self):
>       assert multi(3, 3) == 6
E       assert 9 == 6
E        +  where 9 = multi(3, 3)

Demo_test.py:25: AssertionError
________________________TestClass.test_divide ____________________________
self = <pytestDemo.Demo_test.TestClass object at 0x000001B64767EF48>
    def test_divide(self):
>       assert divide(3, 2) == 4
E       assert 1.5 == 4
E        +  where 1.5 = divide(3, 2)

Demo_test.py:28: AssertionError
===================== short test summary info =========================
FAILED Demo_test.py::TestClass::test_multi - assert 9 == 6
FAILED Demo_test.py::TestClass::test_divide - assert 1.5 == 4
================ 2 failed in 0.10s ===================
1.3 方式3:python -m pytest
通过python -m pytest运行当前目录下的所有测试用例文件。
E:pytestDemo>python -m pytest
================test session starts ====================================
platform win32 -- Python 3.7.5, pytest-5.4.1, py-1.8.1, pluggy-0.13.1
rootdir: E:pytestDemo
collected 4 items
Demo_test.py FF                                                                                                  [ 50%]
test_demo.py ..                                                                                                  [100%]
=====================FAILURES ==========================
__________ TestClass.test_multi ____________________________________
self = <pytestDemo.Demo_test.TestClass object at 0x0000019554B8AE48>
    def test_multi(self):
>       assert multi(3, 3) == 6
E       assert 9 == 6
E        +  where 9 = multi(3, 3)

Demo_test.py:25: AssertionError
__________________TestClass.test_divide ____________________

self = <pytestDemo.Demo_test.TestClass object at 0x0000019554B4A708>
    def test_divide(self):
>       assert divide(3, 2) == 4
E       assert 1.5 == 4
E        +  where 1.5 = divide(3, 2)
Demo_test.py:28: AssertionError
===================== short test summary info ====================
FAILED Demo_test.py::TestClass::test_multi - assert 9 == 6
FAILED Demo_test.py::TestClass::test_divide - assert 1.5 == 4
=================== 2 failed, 2 passed in 0.14s ====================
1.4 节点运行
通过节点运行方式可运行某个.py文件(模块)里的某个函数或某个方法,如仅仅运行Demo_test.py文件中的test_multi方法,而Demo_test.py中的test_divide不要运行。
通过“pytest Demo_test.py::TestClass::test_multi”运行后,在结果中可观察到仅仅运行了test_multi方法。
E:pytestDemo>pytest Demo_test.py::TestClass::test_multi
=================== test session starts ===================
platform win32 -- Python 3.7.5, pytest-5.4.1, py-1.8.1, pluggy-0.13.1
rootdir: E:pytestDemo
collected 1 item

Demo_test.py F                                                                                                   [100%]

======================== FAILURES ======================
_____________________TestClass.test_multi _________________________
self = <pytestDemo.Demo_test.TestClass object at 0x0000015DDF3E64C8>
    def test_multi(self):
>       assert multi(3, 3) == 6
E       assert 9 == 6
E        +  where 9 = multi(3, 3)

Demo_test.py:25: AssertionError
=================== short test summary info =============================
FAILED Demo_test.py::TestClass::test_multi - assert 9 == 6
==================== 1 failed in 0.05s ===================
1.5 遇到错误停止测试
Demo_test.py文件中的test_multi与 test_divide两个方法运行断言,均会执行失败。通过pytest -x Demo_test.py执行过程中,当遇到第一个方法或函数执行无法通过,则将停止运行,后面的方法或函数将不被执行,如下所示:
E:pytestDemo>pytest -x Demo_test.py
====================== test session starts ====================
platform win32 -- Python 3.7.5, pytest-5.4.1, py-1.8.1, pluggy-0.13.1
rootdir: E:pytestDemo
collected 2 items
Demo_test.py F
=================================== FAILURES =====================
_______________ TestClass.test_multi _____________________________
self = <pytestDemo.Demo_test.TestClass object at 0x00000208030AFD48>
    def test_multi(self):
>       assert multi(3, 3) == 6
E       assert 9 == 6
E        +  where 9 = multi(3, 3)

Demo_test.py:25: AssertionError
============================== short test summary info ==============
FAILED Demo_test.py::TestClass::test_multi - assert 9 == 6
!!!!!!!!!!!!!!!!!!!!!!!!!!!!!!!!!!!!!!!!!!!!!!!!!!!!!!!!! stopping after 1 failures !!!!!!!!!!!!!!!!!!!!!!!!!!!!!!!!!!!!!!!!!!!!!!!!!!!!!!!!!!
============================= 1 failed in 0.06s =========================
pytest测试用例编写非常简单,pytest可以在不同的函数、包中发现用例,但pytest有如下约束。
2. 编译器中配置pytest
Python默认自带的单元测试框架是unittest,因此在PyCharm编译器中默认的单元测试框架一般是unittest。如果想修改当前工程的单元测试框架,可通过修改PyCharm默认的【test runner】来指定为单元测试框架pytest。
修改路径file->Setting->Tools->python Integrated Tools>Default test runner-> pytest,如图所示。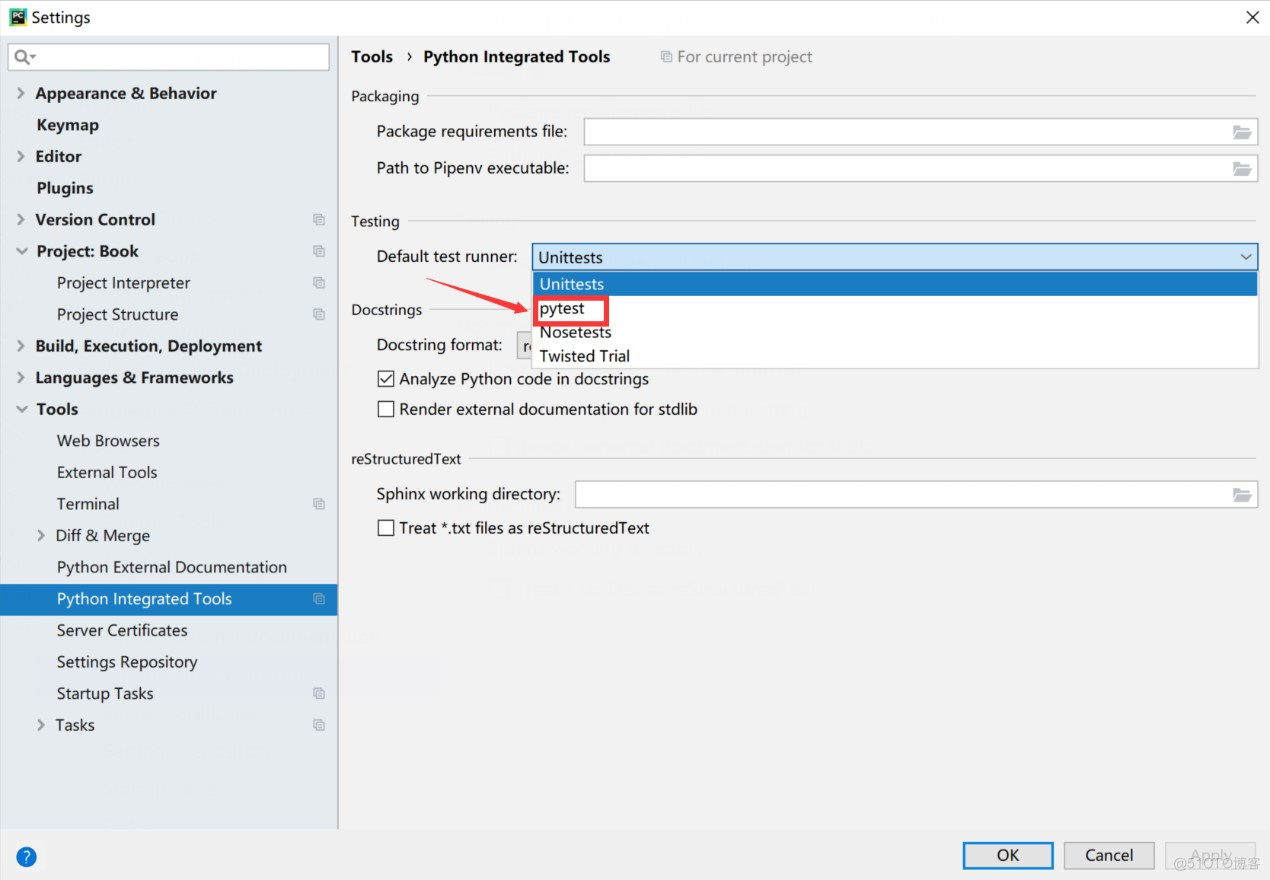
图 PyTest的设定
【测试测试课程】....


图书京东、当当有售
京东:https://item.jd.com/12784287.html
当当:http://product.dangdang.com/29177828.html)!
文章来源: 博客园
- 还没有人评论,欢迎说说您的想法!
 客服
客服


