
我们是袋鼠云数栈 UED 团队,致力于打造优秀的一站式数据中台产品。我们始终保持工匠精神,探索前端道路,为社区积累并传播经验价值。
本文作者:霜序
前言
在前一篇文章中,我们详细的说了 react-router@3.x 升级到 @6.x 需要注意的问题以及变更的使用方式。
react-router 版本更新非常快,但是它的底层实现原理确是万变不离其中,在本文中会从前端路由出发到 react-router 原理总结与分享。
前端路由
在 Web 前端单页面应用 SPA(Single Page Application)中,路由是描述 URL 和 UI 之间的映射关系,这种映射是单向的,即 URL 的改变会引起 UI 更新,无需刷新页面
如何实现前端路由
实现前端路由,需要解决两个核心问题
- 如何改变 URL 却不引起页面刷新?
- 如何监测 URL 变化?
在前端路由的实现模式有两种模式,hash 和 history 模式,分别回答上述两个问题
hash 模式
- hash 是 url 中 hash(#) 及后面的部分,常用锚点在页面内做导航,改变 url 中的 hash 部分不会引起页面的刷新
- 通过 hashchange 事件监听 URL 的改变。改变 URL 的方式只有以下几种:通过浏览器导航栏的前进后退、通过
<a>标签、通过window.location,这几种方式都会触发hashchange事件
history 模式
- history 提供了
pushState和replaceState两个方法,这两个方法改变 URL 的 path 部分不会引起页面刷新 - 通过 popchange 事件监听 URL 的改变。需要注意只在通过浏览器导航栏的前进后退改变 URL 时会触发
popstate事件,通过<a>标签和pushState/replaceState不会触发popstate方法。但我们可以拦截<a>标签的点击事件和pushState/replaceState的调用来检测 URL 变化,也是可以达到监听 URL 的变化,相对hashchange显得略微复杂
JS 实现前端路由
基于 hash 实现
由于三种改变 hash 的方式都会触发hashchange方法,所以只需要监听hashchange方法。需要在DOMContentLoaded后,处理一下默认的 hash 值
// 页面加载完不会触发 hashchange,这里主动触发一次 hashchange 事件,处理默认hash
window.addEventListener('DOMContentLoaded', onLoad);
// 监听路由变化
window.addEventListener('hashchange', onHashChange);
// 路由变化时,根据路由渲染对应 UI
function onHashChange() {
  switch (location.hash) {
    case '#/home':
      routerView.innerHTML = 'This is Home';
      return;
    case '#/about':
      routerView.innerHTML = 'This is About';
      return;
    case '#/list':
      routerView.innerHTML = 'This is List';
      return;
    default:
      routerView.innerHTML = 'Not Found';
      return;
  }
}
基于 history 实现
因为 history 模式下,<a>标签和pushState/replaceState不会触发popstate方法,我们需要对<a>的跳转和pushState/replaceState做特殊处理。
- 对
<a>作点击事件,禁用默认行为,调用pushState方法并手动触发popstate的监听事件 - 对
pushState/replaceState可以重写 history 的方法并通过派发事件能够监听对应事件
var _wr = function (type) {
  var orig = history[type];
  return function () {
    var e = new Event(type);
    e.arguments = arguments;
    var rv = orig.apply(this, arguments);
    window.dispatchEvent(e);
    return rv;
  };
};
// 重写pushstate事件
history.pushState = _wr('pushstate');

function onLoad() {
  routerView = document.querySelector('#routeView');
  onPopState();
  // 拦截 <a> 标签点击事件默认行为
  // 点击时使用 pushState 修改 URL并更新手动 UI,从而实现点击链接更新 URL 和 UI 的效果。
  var linkList = document.querySelectorAll('a[href]');
  linkList.forEach((el) =>
    el.addEventListener('click', function (e) {
      e.preventDefault();
      history.pushState(null, '', el.getAttribute('href'));
      onPopState();
    }),
  );
}
// 监听pushstate方法
window.addEventListener('pushstate', onPopState());
// 页面加载完不会触发 hashchange,这里主动触发一次 popstate 事件,处理默认pathname
window.addEventListener('DOMContentLoaded', onLoad);
// 监听路由变化
window.addEventListener('popstate', onPopState);
// 路由变化时,根据路由渲染对应 UI
function onPopState() {
  switch (location.pathname) {
    case '/home':
      routerView.innerHTML = 'This is Home';
      return;
    case '/about':
      routerView.innerHTML = 'This is About';
      return;
    case '/list':
      routerView.innerHTML = 'This is List';
      return;
    default:
      routerView.innerHTML = 'Not Found';
      return;
  }
}
React-Router 的架构
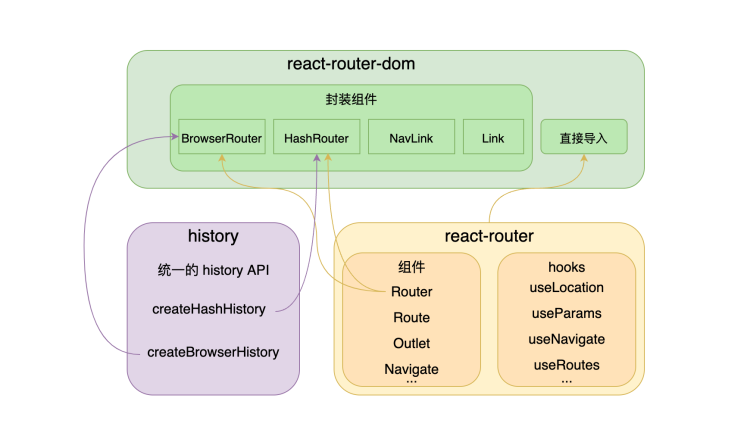
- history 库给 browser、hash 两种 history 提供了统一的 API,给到 react-router-dom 使用
- react-router 实现了路由的最核心能力。提供了
<Router>、<Route>等组件,以及配套 hook - react-router-dom 是对 react-router 更上一层封装。把 history 传入
<Router>并初始化成<BrowserRouter>、<HashRouter>,补充了<Link>这样给浏览器直接用的组件。同时把 react-router 直接导出,减少依赖
History 实现
history
在上文中说到,BrowserRouter使用 history 库提供的createBrowserHistory创建的history对象改变路由状态和监听路由变化。
❓ 那么 history 对象需要提供哪些功能讷?
- 监听路由变化的
listen方法以及对应的清理监听unlisten方法 - 改变路由的
push方法
// 创建和管理listeners的方法
export const EventEmitter = () => {
  const events = [];
  return {
    subscribe(fn) {
      events.push(fn);
      return function () {
        events = events.filter((handler) => handler !== fn);
      };
    },
    emit(arg) {
      events.forEach((fn) => fn && fn(arg));
    },
  };
};
BrowserHistory
const createBrowserHistory = () => {
  const EventBus = EventEmitter();
  // 初始化location
  let location = {
    pathname: '/',
  };
  // 路由变化时的回调
  const handlePop = function () {
    const currentLocation = {
      pathname: window.location.pathname,
    };
    EventBus.emit(currentLocation); // 路由变化时执行回调
  };
  // 定义history.push方法
  const push = (path) => {
    const history = window.history;
    // 为了保持state栈的一致性
    history.pushState(null, '', path);
    // 由于push并不触发popstate,我们需要手动调用回调函数
    location = { pathname: path };
    EventBus.emit(location);
  };

  const listen = (listener) => EventBus.subscribe(listener);

  // 处理浏览器的前进后退
  window.addEventListener('popstate', handlePop);

  // 返回history
  const history = {
    location,
    listen,
    push,
  };
  return history;
};
对于 BrowserHistory 来说,我们的处理需要增加一项,当我们触发 push 的时候,需要手动通知所有的监听者,因为 pushState 无法触发 popState 事件,因此需要手动触发
HashHistory
const createHashHistory = () => {
  const EventBus = EventEmitter();
  let location = {
    pathname: '/',
  };
  // 路由变化时的回调
  const handlePop = function () {
    const currentLocation = {
      pathname: window.location.hash.slice(1),
    };
    EventBus.emit(currentLocation); // 路由变化时执行回调
  };
  // 不用手动执行回调,因为hash改变会触发hashchange事件
  const push = (path) => (window.location.hash = path);
  const listen = (listener: Function) => EventBus.subscribe(listener);
  // 监听hashchange事件
  window.addEventListener('hashchange', handlePop);
  // 返回的history上有个listen方法
  const history = {
    location,
    listen,
    push,
  };
  return history;
};
在实现 hashHistory 的时候,我们只是对hashchange进行了监听,当该事件发生时,我们获取到最新的 location 对象,在通知所有的监听者 listener 执行回调函数
React-Router@6 丐版实现
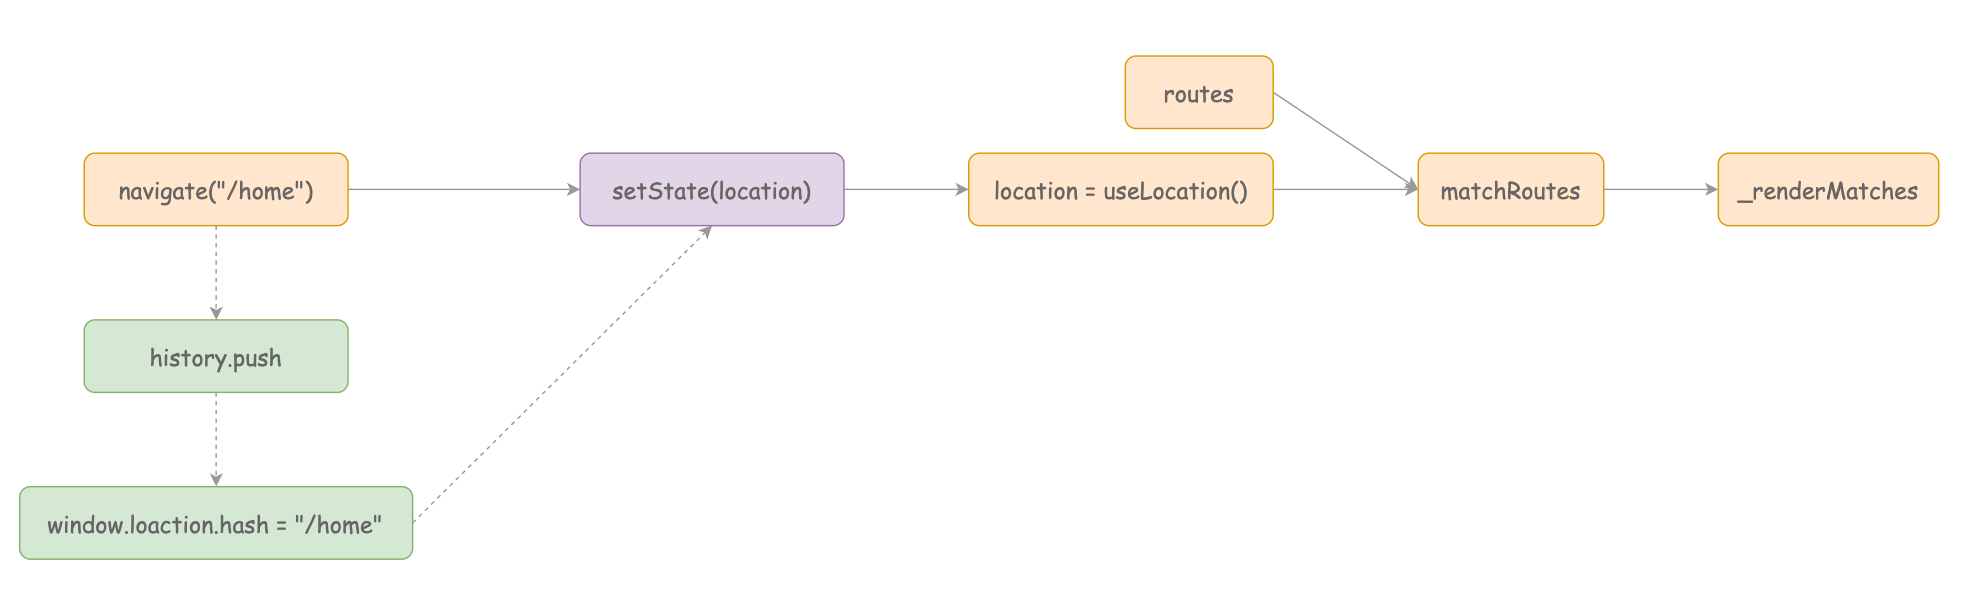
- 绿色为 history 中的方法
- 紫色为 react-router-dom 中的方法
- 橙色为 react-router 中的方法
Router
内容来源于网络如有侵权请私信删除文章来源: 博客园
- 还没有人评论,欢迎说说您的想法!
相关课程


 客服
客服


