
作者:芈橙
比原项目仓库:
Github地址:https://github.com/Bytom/bytom
Gitee地址:https://gitee.com/BytomBlockchain/bytom
本文解析的为比原提供的币币合约 模板如下:
contract TradeOffer(assetRequested: Asset,
                    amountRequested: Amount,
                    seller: Program,
                    cancelKey: PublicKey) locks offered {
  clause trade() requires payment: amountRequested of assetRequested {
    lock payment with seller
    unlock offered
  }
  clause cancel(sellerSig: Signature) {
    verify checkTxSig(cancelKey, sellerSig)
    unlock offered
  }
}
导读: 初次接触比原只能合约的请点击比原智能合约入门 和 Equity 语言入门 学习,方便更好的理解该文档
锁定合约
第一步:调用create-account-receiver 生成 control_program


以下是相关代码片段:
sendHttpPost("{"account_id":"0IJVD7MNG0A02"}","create-account-receiver","http://127.0.0.1:9888","");第二步调用list-pubkeys 获取 pubkey


以下是相关代码片段:
sendHttpPost("{"account_id":"0IJVD7MNG0A02"}","list-pubkeys","http://127.0.0.1:9888","");第三步: 将1 2步获取的值调用compile接口编译合约获得program 合约程序


以下是相关代码片段:
            JSONObject param=new JSONObject();
            JSONArray agrs=new JSONArray();
            //合约的四个参数值
            JSONObject assetParam=new JSONObject();
            assetParam.put("string","81d097312645696daea84b761d2898d950d8fba0de06c9267d8513b16663dd3a");
            agrs.put(assetParam);
            JSONObject amountParam=new JSONObject();
            amountParam.put("integer",200000000l);
            agrs.put(amountParam);
            JSONObject programParam=new JSONObject();
            programParam.put("string",control_program);
            agrs.put(programParam);
            JSONObject publicKeyParam=new JSONObject();
            publicKeyParam.put("string",pubkey);
            agrs.put(publicKeyParam);
            param.put("agrs",agrs);
            param.put("contract","contract TradeOffer(assetRequested: Asset, amountRequested: Amount, seller: Program, cancelKey: PublicKey) locks offered { clause trade() requires payment: amountRequested of assetRequested { lock payment with seller unlock offered } clause cancel(sellerSig: Signature) { verify checkTxSig(cancelKey, sellerSig) unlock offered } }");
            //调用编译合约
            sendHttpPost(param.toString(),"list-pubkeys","http://127.0.0.1:9888","");
第四步:将program 传入build-transaction接口去build一个交易的到data


以下是相关代码片段:
            param=new JSONObject();
            agrs=new JSONArray();
            JSONObject spendAccount=new JSONObject();
            spendAccount.put("account_id","0H757LPD00A02");
            spendAccount.put("amount",9909099090000l);
            spendAccount.put("asset_id","161b9767b664df907fa926a31f9e835236e57f3e9ccc5f80c12bd97723322652");
            spendAccount.put("type","spend_account");
            agrs.put(spendAccount);
            JSONObject controlAccount=new JSONObject();
            controlAccount.put("control_program",program);
            controlAccount.put("amount",9909099090000l);
            controlAccount.put("asset_id","161b9767b664df907fa926a31f9e835236e57f3e9ccc5f80c12bd97723322652");
            controlAccount.put("type","control_program");
            agrs.put(controlAccount);
            JSONObject spendAccount2=new JSONObject();
            spendAccount2.put("account_id","0H757LPD00A02");
            spendAccount2.put("amount",6000000l);
            spendAccount2.put("asset_id","ffffffffffffffffffffffffffffffffffffffffffffffffffffffffffffffff");
            spendAccount2.put("type","spend_account");
            agrs.put(spendAccount2);
            param.put("actions",agrs);
            param.put("ttl",0);
            sendHttpPost(param.toString(),"build-transaction","http://127.0.0.1:9888","");
第五步:输入密码调用sign-transaction签名第四步build的data 得到raw_transaction


以下是相关代码片段:
            param=new JSONObject();
            param.put("password","xxx");
            param.put("transaction",data);
            sendHttpPost(param.toString(),"sign-transaction","http://127.0.0.1:9888","");
第六步:调用submit-transactions提交交易

以下是相关代码片段:
            param=new JSONObject();
            param.put("raw_transaction",raw_transaction);
            sendHttpPost(param.toString(),"submit-transactions","http://127.0.0.1:9888","");
解锁/取消合约
首先需要decode出生成合约时候的参数
调用list-unspent-outputs 获取生成的合约信息获取program

以下是相关代码片段:
param=new JSONObject();
        param.put("id",outputid);
        param.put("smart_contract",true);
        sendHttpPost(param.toString(),"list-unspent-outputs","http://127.0.0.1:9888","");
调用decode-program 传入获取生成的合约参数信息
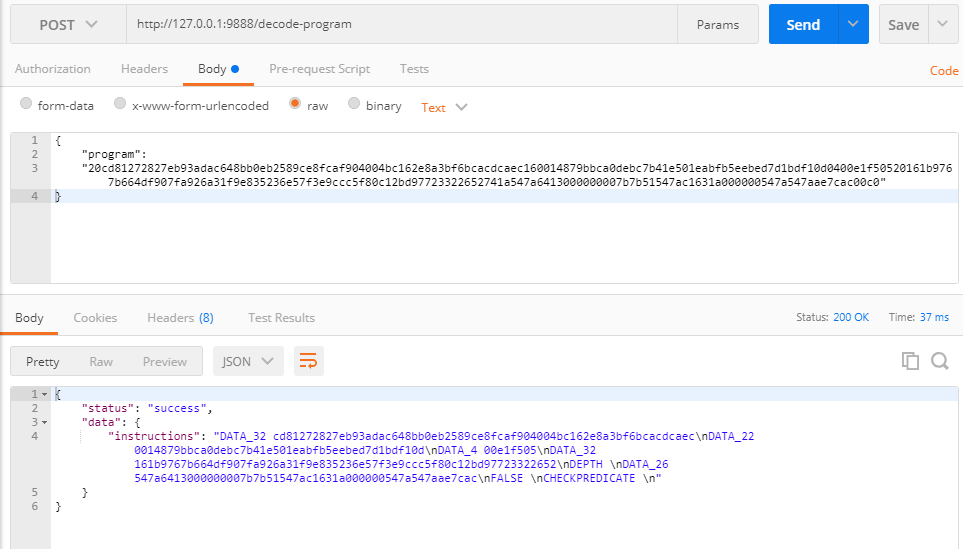
以下是相关代码片段:
param=new JSONObject();
        param.put("program",program);
        sendHttpPost(param.toString(),"decode-program","http://127.0.0.1:9888","");
需要注意的是decode出来的为值是逆序的(后续会有文章详细介绍)
解锁/取消其实就是把生成合约的步骤中的第三步去掉,替换调用生成合约第四步的参数即可
取消合约的构造参数如下: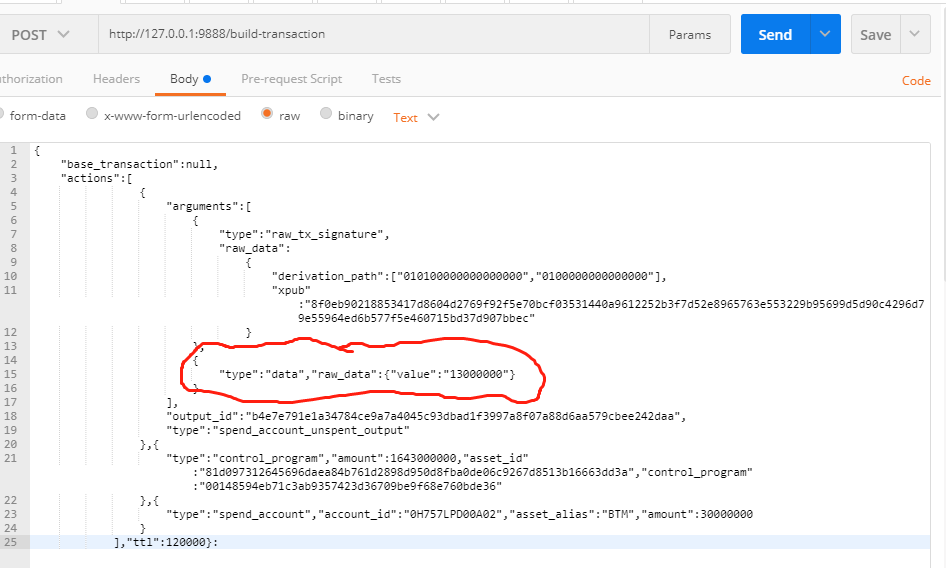
                spendAccountUnspentOutput = arguments: [{
                  type: 'raw_tx_signature',
                  // 生成合约第二步的pubkeylist 详情
                  raw_data: {
                    derivation_path: pubkeylist.pubkey_infos[0].derivation_path,
                    xpub: pubkeylist.root_xpub
                  }
                }, {
                  type: 'data',
                  raw_data: {
                    // 参数偏移量 在一个合约里是固定的
                    value: '13000000'
                  }
                }],
                output_id: output_id,
                type: 'spend_account_unspent_output'
              }
              const controlAction = {
                type: 'control_program',
                amount: 100000000,
                asset_id: asset_id,
                control_program:control_program
              }
              const gasAction = {
                type: 'spend_account',
                account_id:account_id,
                asset_alias: 'BTM',
                amount: 50000000
              }
执行合约的参数构造如下:
           const spendAccountUnspentOutput = {
                arguments: [{
                  type: 'data',
                  raw_data: {
                    //  00000000 指的是第一个 clause,表示直接执行,无需跳转
                    value: '00000000'
                  }
                }],
                output_id: output_id,
                type: 'spend_account_unspent_output'
              }
              // 合约执行提供的资产
              const issueControlAction = {
                control_program: control_program,
                amount:  100000000,
                asset_id: asset_id,
                type: 'control_program'
              }
              // 合约执行提供的资产
              const issueSpendAction = {
                account_id: account_id,
                amount: 100000000,
                asset_id: asset_id,
                type: 'spend_account'
              }
              // 矿工费
              const gasAction = {
                type: 'spend_account',
                account_id: account_id,
                asset_alias: 'BTM',
                amount: 50000000
              }
              // 合约执行获得资产对象
              const controlAction = {
                type: 'control_program',
                amount:  100000000,
                asset_id: asset_id,
                control_program: compileData.control_program
              }
build 操作其实就是指定输入输出的过程,详情请查看 官方build文档 和 官方api文档
备注
调用比原基于okhttp接口javautil 如下:
    public static String sendHttpPost(String bodyStr,String method,String bytomApiserverUrl,String bytomApiserverToken) throws IOException {
        OkHttpClient client = new OkHttpClient();
        MediaType mediaType = MediaType.parse("application/json");
        RequestBody body = RequestBody.create(mediaType, bodyStr);
        Request request = new Request.Builder()
                .url(bytomApiserverUrl+"/"+method)
                .post(body)
                .addHeader("cache-control", "no-cache")
                .addHeader("Connection", "close")
                .build();
        if (bytomApiserverUrl==null || bytomApiserverUrl.contains("127.0.0.1") || bytomApiserverUrl.contains("localhost")){

        }else {
            byte[] encodedAuth = Base64.encodeBase64(bytomApiserverToken.getBytes(Charset.forName("US-ASCII")));
            String authHeader = "Basic " + new String(encodedAuth);
            request = new Request.Builder()
                    .url(bytomApiserverUrl+"/"+method)
                    .post(body)
                    .addHeader("authorization", authHeader)
                    .addHeader("cache-control", "no-cache")
                    .addHeader("Connection", "close")
                    .build();
        }
        Response response = client.newCall(request).execute();
        return response.body().string();
    }
内容来源于网络如有侵权请私信删除
- 还没有人评论,欢迎说说您的想法!


 客服
客服


