
下载附件后发现是个win32下的可执行文件,拖入IDA后,F5查看主函数但出现了错误,将main区域的汇编代码全部选择,右键点击create funcion 即可解决,但还是错误,原因说是sp的错误,这时点击option的general,将里面的Stack pointer打勾,发现mian函数最后return 的值为-4,将其改为0即可顺利反编译出主函数!
主函数的内容为下:
int __usercall wmain@<eax>(int a1@<edi>, int a2, int a3)
{
  unsigned int v3; // kr00_4
  __int16 *v5; // eax
  int v6; // esi
  __int16 v7; // cx
  char v8; // al
  unsigned __int16 v9[512]; // [esp+Ch] [ebp-504h]
  void (__cdecl *MultiByteStr[64])(int); // [esp+40Ch] [ebp-104h]

  if ( a2 != 1 )//有参数
  {
    OutputDebugStringW(*(LPCWSTR *)(a3 + 4));
    memset(MultiByteStr, 0, 0x100u);
    v5 = *(__int16 **)(a3 + 4);
    v6 = (int)(v5 + 1);
    do
    {
      v7 = *v5;
      ++v5;
    }
    while ( v7 );
    WideCharToMultiByte(0, 0, *(LPCWSTR *)(a3 + 4), -1, (LPSTR)MultiByteStr, ((signed int)v5 - v6) >> 1, 0, 0);
    __debugbreak();                             // inc 3断点!!!!
    v8 = *off_40FEC0;
    MultiByteStr[0](a1);
    JUMPOUT(dword_401150[0]);
  }
//没有参数
  printf("%sn", off_40FEC0);
  wprintf(L"please input your password:n");
  wscanf(L"%s", v9);
  v3 = wcslen(v9);
  if ( v3 > 0x10 || !v3 || sub_401180((char *)v9) == -1 )
    return 0;
  wprintf(L"{FLAG:%s}n", v9);
  return 0;
}
可以清晰的知道,当我们输入的密码<=16且不为空,sub_401180((char *)v9) != -1,就会把我们的flag字符串输出!这里要注意的是,主函数的最开始对输入的参数进行了判断,参数会影响程序的运行方向,而且还有一个很明显的inc3断点!!!
进入关键函数sub_401180()函数查看,如下:
  1 int __thiscall sub_401180(char *this)
  2 {
  3   char *v1; // ebx
  4   LPWSTR v2; // eax
  5   LPWSTR v3; // edx
  6   WCHAR v4; // cx
  7   unsigned int v5; // eax
  8   __int16 *v6; // edi
  9   WCHAR v7; // cx
 10   __int16 *v8; // edi
 11   __int16 v9; // ax
 12   char *v10; // eax
 13   __int16 v11; // cx
 14   unsigned int v12; // eax
 15   __int16 *v13; // edi
 16   __int16 v14; // cx
 17   int result; // eax
 18   struct _PROCESS_INFORMATION ProcessInformation; // [esp+10h] [ebp-11A8h]
 19   SIZE_T NumberOfBytesRead; // [esp+20h] [ebp-1198h]
 20   SIZE_T NumberOfBytesWritten; // [esp+24h] [ebp-1194h]
 21   struct _STARTUPINFOW StartupInfo; // [esp+28h] [ebp-1190h]
 22   struct _DEBUG_EVENT DebugEvent; // [esp+70h] [ebp-1148h]
 23   CONTEXT Context; // [esp+D0h] [ebp-10E8h]
 24   int v22; // [esp+3A0h] [ebp-E18h]
 25   int v23; // [esp+3A4h] [ebp-E14h]
 26   int v24; // [esp+3A8h] [ebp-E10h]
 27   char v25; // [esp+3ACh] [ebp-E0Ch]
 28   int Buffer; // [esp+3B0h] [ebp-E08h]
 29   int v27; // [esp+3B4h] [ebp-E04h]
 30   int v28; // [esp+3B8h] [ebp-E00h]
 31   int v29; // [esp+3BCh] [ebp-DFCh]
 32   __int16 v30; // [esp+7AEh] [ebp-A0Ah]
 33   WCHAR CommandLine; // [esp+7B0h] [ebp-A08h]
 34
 35   ProcessInformation.hProcess = 0;
 36   ProcessInformation.hThread = 0;
 37   ProcessInformation.dwProcessId = 0;
 38   ProcessInformation.dwThreadId = 0;
 39   v1 = this;
 40   memset(&StartupInfo, 0, 0x44u);
 41   memset(&DebugEvent, 0, 0x60u);
 42   StartupInfo.cb = 68;
 43   memset(&CommandLine, 0, 0xA00u);
 44   v2 = GetCommandLineW();
 45   v3 = v2;
 46   do
 47   {
 48     v4 = *v2;
 49     ++v2;
 50   }
 51   while ( v4 );
 52   v5 = (char *)v2 - (char *)v3;
 53   v6 = &v30;
 54   do
 55   {
 56     v7 = v6[1];
 57     ++v6;
 58   }
 59   while ( v7 );
 60   qmemcpy(v6, v3, v5);
 61   v8 = &v30;
 62   do
 63   {
 64     v9 = v8[1];
 65     ++v8;
 66   }
 67   while ( v9 );
 68   *(_DWORD *)v8 = 32;
 69   v10 = v1;
 70   do
 71   {
 72     v11 = *(_WORD *)v10;
 73     v10 += 2;
 74   }
 75   while ( v11 );
 76   v12 = v10 - v1;
 77   v13 = &v30;
 78   do
 79   {
 80     v14 = v13[1];
 81     ++v13;
 82   }
 83   while ( v14 );
 84   qmemcpy(v13, v1, v12);
    //此函数为创建一个子线程,并进入调试状态
 85   CreateProcessW(0, &CommandLine, 0, 0, 0, 1u, 0, 0, &StartupInfo, &ProcessInformation);
    //此函数通知被调试程序继续运行
 86   ContinueDebugEvent(ProcessInformation.dwProcessId, ProcessInformation.dwThreadId, 0x10002u);
    //此函数等待被调试事件(时间无限),直到DebugEvent.dwDebugEventCode == 8(OUTPUT_DEBUG_STRING_EVENT)产生,即调用了outputdebugstring
 87   WaitForDebugEvent(&DebugEvent, 0xFFFFFFFF);
 88   while ( DebugEvent.dwDebugEventCode != 8 )
 89   {
 90     ContinueDebugEvent(ProcessInformation.dwProcessId, ProcessInformation.dwThreadId, 0x10002u);
 91     WaitForDebugEvent(&DebugEvent, 0xFFFFFFFF);
 92   }
 93   LOWORD(Buffer) = 0;
    //此函数读取进程内存,并把数据储存至Buffer中
 94   ReadProcessMemory(
 95     ProcessInformation.hProcess,
 96     DebugEvent.u.CreateThread.hThread,
 97     &Buffer,
 98     DebugEvent.u.DebugString.nDebugStringLength,
 99     &NumberOfBytesRead);
    //被调试程序继续运行
100   ContinueDebugEvent(ProcessInformation.dwProcessId, ProcessInformation.dwThreadId, 0x10002u);
    //等待调试事件
101   WaitForDebugEvent(&DebugEvent, 0xFFFFFFFF);
102   Context.ContextFlags = 65537;
    //读取进程内存,并把数据储存至Buffer内
103   ReadProcessMemory(
104     ProcessInformation.hProcess,
105     DebugEvent.u.CreateThread.hThread,
106     &Buffer,
107     DebugEvent.u.DebugString.nDebugStringLength,
108     &NumberOfBytesRead);
    //得到中断线程的上下文信息,此时Context.Eip就是发生中断处的下一个地址
109   GetThreadContext(ProcessInformation.hThread, &Context);
110   v22 = 0x148A4690;
111   v23 = 0xF14300E;
112   v24 = 0x75C83B41;
113   v25 = 0xF5u;
    //在发生中断处,将v22~v25写入进程内存
114   WriteProcessMemory(ProcessInformation.hProcess, (LPVOID)(Context.Eip - 1), &v22, 0xDu, &NumberOfBytesWritten);
    //被调试程序继续运行
115   ContinueDebugEvent(ProcessInformation.dwProcessId, ProcessInformation.dwThreadId, 0x10002u);
    //等待调试事件
116   WaitForDebugEvent(&DebugEvent, 0xFFFFFFFF);
117   LOWORD(Buffer) = 0;
  //读取进程内存,并将数据储存至Buffer内
118   ReadProcessMemory(
119     ProcessInformation.hProcess,
120     DebugEvent.u.CreateThread.hThread,
121     &Buffer,
122     DebugEvent.u.DebugString.nDebugStringLength,
123     &NumberOfBytesRead);
    //最后的判断
124   if ( Buffer != 0x2B5C5C25 || v27 != 0x36195D2F || v28 != 0x7672642C )
125     result = -1;
126   else
127     result = -(v29 != 0x524E6680);
128   return result;
129 }
发现里面是一些windows api,相应的解释,注释已经给出。大概的操作就是在主进程(父进程)中开启一个子进程,并进入调试状态,利用子进程对运行的进程内存进行一些写入数据和读取内存操作。由于对子程序进行了调试的判断,因此父进程很难接收到事件的消息,所以动态调试很困难(但也可以!我最开始动态调试,但我疏忽了以为只有12个字节,所以只弄出了前12个(>o<),当然也可以全部弄出来,不过很麻烦!)。回到函数中,有几个关键的点:
①对进程的内存进行了写入数据的操作
②写入数据的地址在中断地址处
③取出进程内存的的数据,并比较数据
所以,我们要知道这个中断点在哪里,才能知道是对那个区域进行了写入操作,恰好主函数中有一个明显的inc 3中断操作,利用ollydebug打开,找到相应位置,如下

因此我们需要把v22~v25的数据内容写入,注意是小端顺序(在运行 调试到这里的时候,中途会直接终止,不过问题也不大,可以直接jmp这里,写入后的数据如下:
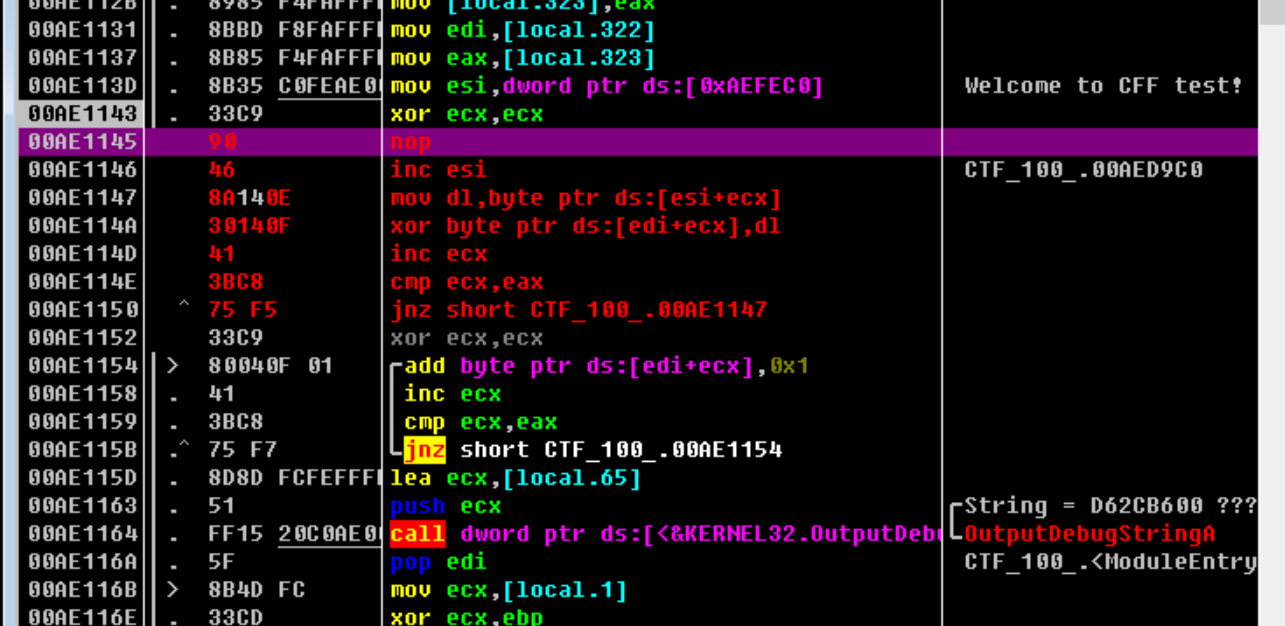
继续往下运行可以知道,把我们输入的数据与'elcome to CFF test!'进行异或运算,再把结果都+1,得出的数据通过调用outputdebugstring,使得waitfordebugevent函数接受到该事件,读取异或后的结果,与给出的数据进行比较。
到这里,程序的逻辑已经清楚了!,只需写出解密脚本即可
如下:
b=[0x25,0x5c,0x5c,0x2b,0x2f,0x5d,0x19,0x36,0x2c,0x64,0x72,0x76,0x80,0x66,0x4e,0x52]
c='elcome to CFF test!'
print(len(c))
for i in range(16):
    x=chr(ord(c[i])^(b[i]-1))
    print(x,end='')
最后的运行结果:

结果即是flag!
解这道题可是花了我好长时间,一开始看writeup各种看不懂,(还没学到家呀!),查资料,这才慢慢弄懂了,但其实还有一些地方不太懂,就比如有参数才会运行的inc 3指令,程序是怎么get到这个地址的,还是有点没明白,希望有大佬可以告诉我,自己以后如果知道了,会来更的!关于里面的一些api函数,强烈建议大家看这个博客https://blog.csdn.net/xiammy/article/details/1675793,你们会收获到惊喜的!
文章来源: 博客园
- 还没有人评论,欢迎说说您的想法!


 客服
客服


