
一、LNMP
1.使用LNMP的优点:
- 资源占用少
- 更多并发
- 代理服务器
- 热启动
- 稳定高效
- 负载均衡
- 邮件服务器
2、安装前准备:
2.1查看防火墙(默认开启):
[root@localhost ~]# systemctl status firewalld
2.2关闭防火墙:
[root@localhost ~]# systemctl stop firewalld.service #停止firewall服务
[root@localhost ~]# systemctl disable firewalld.service #禁止开机自启动
2.2.1或者开启某端口号
#安装完nginx之后再修改
[root@localhost ~]# vim /etc/nginx/conf.d/default.conf

> listen   81; #修改80端口为81,按自己需求。

[root@localhost ~]# systemctl restart nginx #重启nginx
[root@localhost ~]# firewall-cmd --add-port=81/tcp #临时开启81端口
[root@localhost ~]# firewall-cmd --permanent --add-port=81/tcp #永久添加81端口
[root@localhost ~]# firewall-cmd --reload  #重启防火墙
3、YUM安装与相关配置:
3.1配置Nginx仓库
[root@localhost ~]# vim /etc/yum.repos.d/nginx.repo
在官方源找到的.Repo包帮助,写入Nginx.repo中:
# /etc/yum.repos.d/nginx.repo
# Date 2019_7_14

[nginx-stable]
name=nginx stable repo
baseurl=http://nginx.org/packages/centos/$releasever/$basearch/
gpgcheck=1
enabled=1
gpgkey=https://nginx.org/keys/nginx_signing.key

[nginx-mainline]
name=nginx mainline repo
baseurl=http://nginx.org/packages/mainline/centos/$releasever/$basearch/
gpgcheck=1
enabled=0
gpgkey=https://nginx.org/keys/nginx_signing.key
安装步骤:
[root@localhost ~]# yum update #更新源仓库
[root@localhost ~]# yum install -y nginx #安装nginx
[root@localhost ~]# systemctl start nginx #开启nginx服务
[root@localhost ~]# systemctl enable nginx #开机自启
[root@localhost ~]# nginx -t #测试命令
[root@localhost ~]# nginx -s reload #当修改nginx.conf后的重载
3.2安装php-fpm
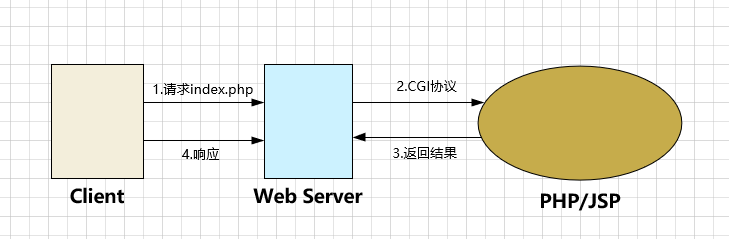
在安装php-fpm之前首先了解一下什么是CGI(Common Gateway Interface)。
-
cgi:它是一种协议。通过cgi协议,web server可以将动态请求和相关参数发送给专门处理动态内容的应用程序。
-
fastcgi:也是一种协议,只不过是cgi的优化版。cgi的性能较差,fastcgi则在其基础上进行了改进。
-
php-cgi:fastcgi是一种协议,而php-cgi实现了这种协议。不过这种实现比较烂。它是单进程的,一个进程处理一个请求,处理结束后进程就销毁。
-
php-cgi工作流程(单进程):
-
php-fpm:是对php-cgi的改进版,它直接管理多个php-cgi进程/线程。也就是说,php-fpm是php-cgi的进程管理器因此它也算是fastcgi协议的实现。在一定程度上讲,php-fpm与php的关系,和tomcat对java的关系是类似的。
-
php-fpm转发过程图解

总结:web server和CGI的交互模式
- cgi模式:httpd接收到一个动态请求就fork一个cgi进程,cgi进程返回结果给httpd进程后自我销毁。
- 动态模块模式(同一服务器中):将php-cgi的模块(例如php5_module)编译进httpd。在httpd启动时会加载模块,加载时也将对应的模块激活,php-cgi也就启动了。
- php-fpm模式(不在服务器中,可独立成某一httpd模块):使用php-fpm管理php-cgi,此时httpd不再控制php-cgi进程的启动。可以将php-fpm独立运行在非web服务器上,实现所谓的动静分离。使用php-fpm管理php-cgi,此时httpd不再控制php-cgi进程的启动。可以将php-fpm独立运行在非web服务器上,实现所谓的动静分离。
这里使用yum安装 php-fpm
[root@localhost ~] yum install -y php-fpm
3.3配置PHP文件
[root@localhost ~]# find / -name html #找到nginx下的html目录
[root@localhost ~]# vim /usr/share/nginx/html/index.php #编辑php访问页面
>
# /usr/share/nginx/html/index.php
# PHP页面测试配置
    <?php
            phpinfo();
    ?>
3.4配置文件识别到PHP
[root@localhost ~]# vim /etc/nginx/conf.d/default.conf

>找到以下位置,并启用
# pass the PHP scripts to FastCGI server listening on 127.0.0.1:9000
location ~ .php$ {
          root           html;
          fastcgi_pass   127.0.0.1:9000;
          fastcgi_index  index.php;
          fastcgi_param  SCRIPT_FILENAME  /usr/share/nginx/html/$fastcgi_script_name;# 修改路径
          include        fastcgi_params;
    	   }

[root@localhost ~]# nginx -s reload # 重启
记一次服务器nginx配置问题:(the page you are looking for is currently unavailable)
1.php-fpm 未正常启动
[root@localhost ~]# ps -ef |grep 9000 #查看php-fpm服务是否开启
[root@localhost ~]# systemctl restart php-fpm
[root@localhost ~]# systemctl restart nginx
2.nginx启动端口修改为81端口:
在浏览器中打开 192.168.110.128:81/index.php
3.更改php路径
[root@localhost ~]# vim /etc/nginx/conf.d/default.conf
# 找到 pass the PHP scripts to FastCGI server listening on 127.0.0.1:9000
# 修改相关配置

    location ~ .php$ {
        root           /usr/share/nginx/html;#修改为绝对路径
        fastcgi_pass   127.0.0.1:9000;
        fastcgi_index  index.php;
        fastcgi_param  SCRIPT_FILENAME  $document_root$fastcgi_script_name;#修改为$document或绝对路径
        include        fastcgi_params;
    }
4、安装mariadb(mysql)
[root@localhost ~]# yum install -y mariadb mariadb-server
[root@localhost ~]# systemctl start mariadb.service #启动MariaDB
[root@localhost ~]# systemctl stop mariadb.service #停止MariaDB
[root@localhost ~]# systemctl restart mariadb.service #重启MariaDB
[root@localhost ~]# systemctl enable mariadb.service #设置开机启动
4.1创建修改密码(默认无)
[root@localhost ~]# /usr/bin/mysqladmin -u root password 'passwd' #'passwd'为你设置的密码
[root@localhost ~]# systemctl restart mariadb # 重启
4.2安装PHP以及组件,使PHP支持 MariaDB
当遇到依赖包问题,可选
[root@localhost ~]# yum install -y php php-mysql php-gd libjpeg* php-ldap php-odbc php-pear php-xml php-xmlrpc php-mbstring php-bcmath php-mhash
4.3PHP测试链接数据库
[root@localhost ~]# vim /usr/share/nginx/html/db.php
>#输入以下测试文件

<?php
    $link=mysql_connect("localhost","root","passwd");
    if(!$link) echo "Link Error!";
    else echo "OK!Link Acces!";
    mysql_close();
?>
# 重启Php-fpm、nginx、mariadb-server
5、遇到的问题,查看日志
[root@localhost ~]# cat /var/log/nginx/error.log
[root@localhost ~]# cat /var/log/php-fpm/error.log
[root@localhost ~]# cat /var/log/php-fpm/www-error.log
内容来源于网络如有侵权请私信删除
文章来源: 博客园
- 还没有人评论,欢迎说说您的想法!
 客服
客服


