
一、Spring事务使用
1.通过maven方式引入jar包
     <dependency>
      <groupId>com.alibaba</groupId>
      <artifactId>druid</artifactId>
      <version>1.2.8</version>
    </dependency>
    <dependency>
      <groupId>mysql</groupId>
      <artifactId>mysql-connector-java</artifactId>
      <version>8.0.28</version>
    </dependency>
    <dependency>
      <groupId>org.springframework</groupId>
      <artifactId>spring-tx</artifactId>
      <version>5.2.20.RELEASE</version>
    </dependency>
    <dependency>
      <groupId>org.springframework</groupId>
      <artifactId>spring-jdbc</artifactId>
      <version>5.2.20.RELEASE</version>
    </dependency>
2.创建配置类,使用注解@EnableTransactionManagement开启事务功能。代码如下:
package com.ybe.transaction.config;

import com.alibaba.druid.pool.DruidDataSource;
import org.springframework.context.annotation.Bean;
import org.springframework.context.annotation.ComponentScan;
import org.springframework.context.annotation.Configuration;
import org.springframework.jdbc.core.JdbcTemplate;
import org.springframework.jdbc.datasource.DataSourceTransactionManager;
import org.springframework.transaction.PlatformTransactionManager;
import org.springframework.transaction.annotation.EnableTransactionManagement;

import javax.sql.DataSource;

@Configuration
@EnableTransactionManagement
@ComponentScan("com.ybe.transaction")
public class TransactionConfig {

    @Bean
    public DataSource dataSource() {
        DruidDataSource data = new DruidDataSource();
        data.setDriverClassName("com.mysql.cj.jdbc.Driver");
        data.setUrl("jdbc:mysql://localhost:3306/xxx?useUnicode=true&characterEncoding=UTF-8&serverTimezone=GMT%2B8");
        data.setUsername("xxx");
        data.setPassword("xxx");
        return data;
    }

    @Bean
    public JdbcTemplate jdbcTemplate(DataSource dataSource) {
        return new JdbcTemplate(dataSource);
    }

    @Bean
    public PlatformTransactionManager transactionManager(DataSource dataSource) {
        return new DataSourceTransactionManager(dataSource);
    }
}
3.使用@Transactional注解,代码如下:
package com.ybe.transaction.service;

import com.ybe.transaction.dao.BookDao;
import org.springframework.beans.factory.annotation.Autowired;
import org.springframework.stereotype.Service;
import org.springframework.transaction.annotation.Propagation;
import org.springframework.transaction.annotation.Transactional;

@Service
public class BookService {
    @Autowired
    BookDao bookDao;

    public BookDao getBookDao() {
        return bookDao;
    }

    public void setBookDao(BookDao bookDao) {
        this.bookDao = bookDao;
    }

    /**
     * 结账:传入哪个用户买了哪本书
     * @param id
     */
    @Transactional(propagation = Propagation.REQUIRED)
    public void checkout(int id){
        bookDao.updateStock(id);
    }

}
package com.ybe.transaction.dao;

import org.springframework.beans.factory.annotation.Autowired;
import org.springframework.jdbc.core.JdbcTemplate;
import org.springframework.stereotype.Repository;
import org.springframework.transaction.annotation.Propagation;
import org.springframework.transaction.annotation.Transactional;

@Repository
public class BookDao {
    @Autowired
    JdbcTemplate jdbcTemplate;

    public JdbcTemplate getJdbcTemplate() {
        return jdbcTemplate;
    }

    public void setJdbcTemplate(JdbcTemplate jdbcTemplate) {
        this.jdbcTemplate = jdbcTemplate;
    }

    /**
     * 减库存,减去某本书的库存
     * @param id
     */
    @Transactional(propagation = Propagation.REQUIRES_NEW)
    public void updateStock(int id){
        String sql = "update book_stock set stock=stock-1 where id=?";
        jdbcTemplate.update(sql,id);
//        for (int i = 1 ;i>=0 ;i--)
//            System.out.println(10/i);
    }
}
5.Main的代码
    AnnotationConfigApplicationContext configApplicationContext = new AnnotationConfigApplicationContext(TransactionConfig.class);
    BookService bean = configApplicationContext.getBean(BookService.class);
    bean.checkout(1);
    System.out.println("完成");
三、Spring事务的源码分析
Spring事务和SpringAOP一样,都是利用了SpringIoc容器的插件功能。在SpringIOC容器的生命周期过程中整合了Spring事务的功能。大概过程:通过 @Import注册 TransactionManagementConfigurationSelector 类。该类中实现了 ImportSelector接口的selectImports方法 。在创建AnnoteationConfigApplicationContext的构造函数中会调用refresh()方法。在 invokeBeanFactoryPostProcessors()中会调用TransactionManagementConfigurationSelector 类的 selectImports 方法,会生成 AutoProxyRegistrar 的对象和ProxyTransactionManagementConfiguration对象。AutoProxyRegistrar会调用该类的registerBeanDefinitions方法注册类型为InfrastructureAdvisorAutoProxyCreator的RootBeanDefinition。ProxyTransactionManagementConfiguration中注入了BeanFactoryTransactionAttributeSourceAdvisor类型的Bean,即事务通知类,该类继承了 Advisor。 在finishBeanFactoryInitialization()过程中第一次调用 getAdvicesAndAdvisorsForBean 的时候,会先进行Advisors的创建,再获取候选的Advisors。在创建完 Bean后会调用InfrastructureAdvisorAutoProxyCreator的 postProcessAfterInitialization方法,从 Advisors 中查找是否匹配当前正在创建的Bean,如果能匹配,则创建相关的事务动态代理对象。
完整源码分析分三部分:Spring事务的初始化、事务的创建、事务的调用过程。
一、Spring事务的初始化
主要逻辑是找到所有标注了 @EnableTransactionManagement的类,并且解析标注中的事务通知方法和BeanPostProcessor的实现类BeanFactoryTransactionAttributeSourceAdvisor。
整体代码流程图如下:
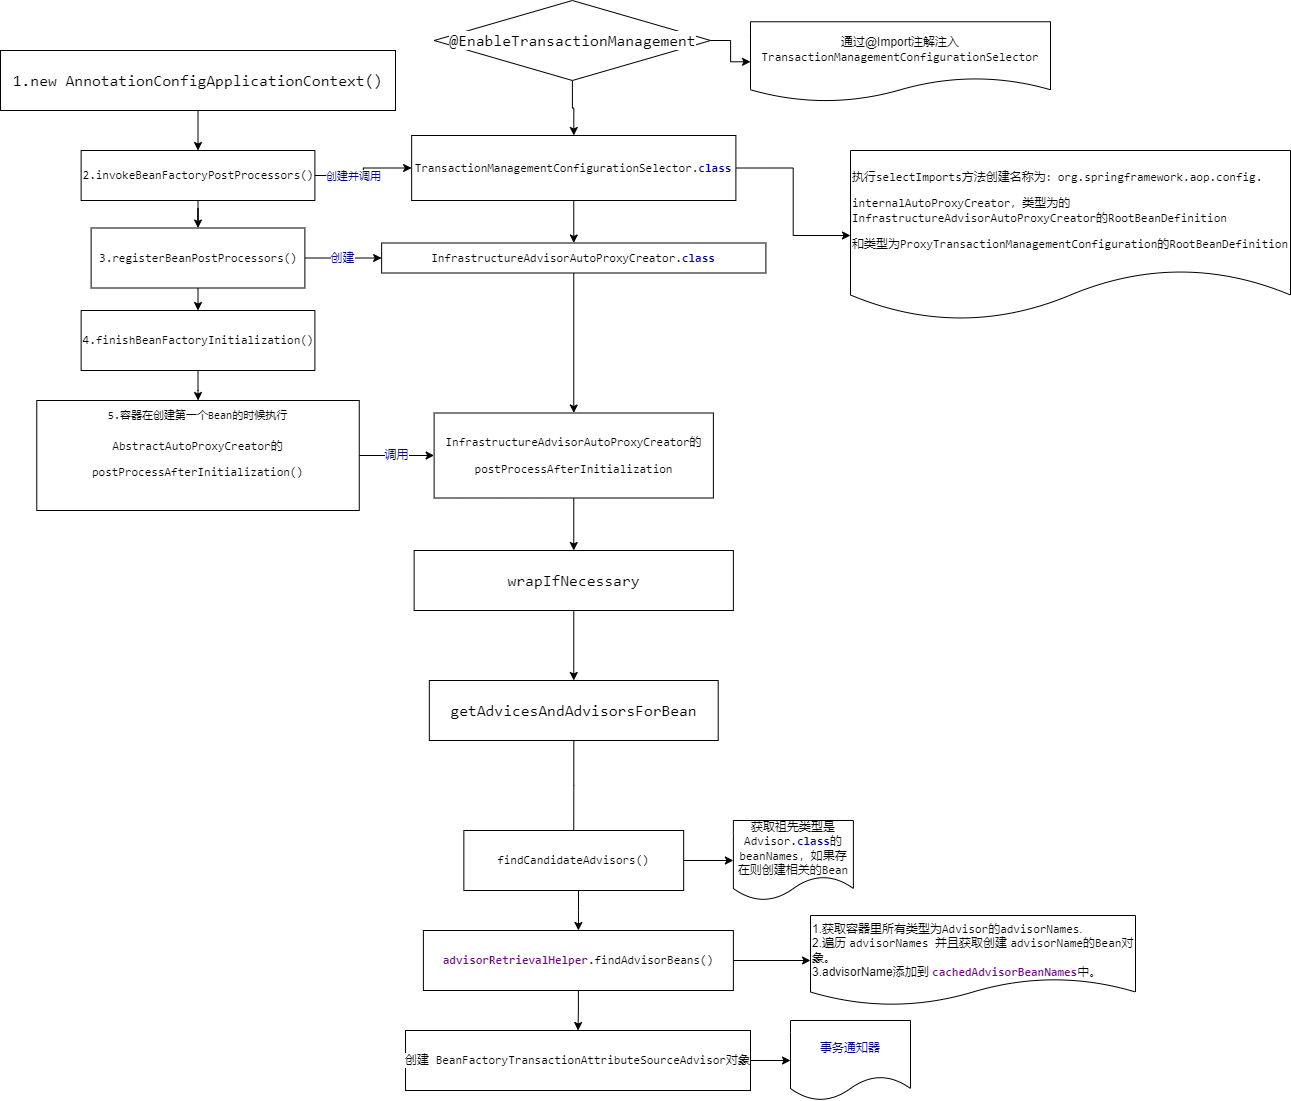
说明:
-
创建 AnnotationConfigApplicationContext() 容器。
-
在invokeBeanFactoryPostProcessors()中,会调用 ConfigurationClassPostProcessor 的 postProcessBeanDefinitionRegistry() 。在此方法中,会找到 @EnableTransactionManagement的 @Import 属性传入的 TransactionManagementConfigurationSelector.class 类。并且执行该类的selectImports() 方法,将类型为 InfrastructureAdvisorAutoProxyCreator、名称为org.springframework.aop.
config.internalAutoProxyCreator和类型为 ProxyTransactionManagementConfiguration的 RootBeanDefinition注册到BeanDefinitionRegistry中。 -
在 registerBeanPostProcessors() 中会根据上面一步生成的 RootBeanDefinition对象创建 InfrastructureAdvisorAutoProxyCreator的Bean实例。
-
在 finishBeanFactoryInitialization() 中第一次执行到 、AbstractAutowireCapableBeanFactory.initializeBean() 时,会执行一段这样的代码,如下
 if (mbd == null || !mbd.isSynthetic()) {
   wrappedBean = applyBeanPostProcessorsAfterInitialization(wrappedBean, beanName);
 }
  @Override
 public Object applyBeanPostProcessorsAfterInitialization(Object existingBean, String beanName)
 			throws BeansException {
   Object result = existingBean;
    for (BeanPostProcessor processor : getBeanPostProcessors()) {
	Object current = processor.postProcessAfterInitialization(result, beanName);
	if (current == null) {
	    return result;
	}
	result = current;
    }
    return result;
 }
以上代码会执行 InfrastructureAdvisorAutoProxyCreator 的 postProcessAfterInitialization() 方法。代码如下:
public Object postProcessAfterInitialization(@Nullable Object bean, String beanName) {
	   if (bean != null) {
		Object cacheKey = getCacheKey(bean.getClass(), beanName);
		if (this.earlyProxyReferences.remove(cacheKey) != bean) {
		    return wrapIfNecessary(bean, beanName, cacheKey);
		}
	   }
	   return bean;
}
在 wrapIfNecessary 的getAdvicesAndAdvisorsForBean会调用findEligibleAdvisors,代码如下:
protected List<Advisor> findEligibleAdvisors(Class<?> beanClass, String beanName) {
	List<Advisor> candidateAdvisors = findCandidateAdvisors();
 List<Advisor> eligibleAdvisors = findAdvisorsThatCanApply(candidateAdvisors, beanClass, beanName);
 extendAdvisors(eligibleAdvisors);
 if (!eligibleAdvisors.isEmpty()) {
 	eligibleAdvisors = sortAdvisors(eligibleAdvisors);
 }
 return eligibleAdvisors;
}
在findCandidateAdvisors方法中会生成所有的 Advisors,其中事务的Advisor 是 BeanFactoryTransactionAttributeSourceAdvisor 类。
protected List<Advisor> findCandidateAdvisors() {
	  Assert.state(this.advisorRetrievalHelper != null, "No BeanFactoryAdvisorRetrievalHelper available");
	  return this.advisorRetrievalHelper.findAdvisorBeans();
}
advisorRetrievalHelper.findAdvisorBeans()是关键。方法里面的逻辑如下:
1.先从cachedAdvisorBeanNames中获取beanNames
2.如果cachedAdvisorBeanNames为null,
  2.1 则获取所有类型为 Advisor的 beanNames,并且添加到cachedAdvisorBeanNames中
3. 遍历 beanNames ,根据beanName获取具体的Bean对象。添加到advisors中
4.最后返回 advisors。
advisorRetrievalHelper.findAdvisorBeans()方法会缓存所有类型为Advisor的BeanName,方法的最后返回 advisors。至此整个 Spring事务的初始化完成。
二、事务的创建
在创建Bean的生命周期的 initializeBean 方法中,会执行 InfrastructureAdvisorAutoProxyCreator的 postProcessAfterInitialization方法。该方法里会拿缓存中BeanFactoryTransactionAttributeSourceAdvisor的pointCut去匹配正在创建的实例Bean的所有方法。如果 BeanFactoryTransactionAttributeSourceAdvisor 和 Bean 的某一个方法能匹配上,则把该BeanFactoryTransactionAttributeSourceAdvisor 添加到 advisor的候选集合中。直到找出匹配Bean的所有Adsivors。最后根据Adsivor的候选集合和Bean类型创建动态代理对象ProxyFactory。
整体代码流程图如下:
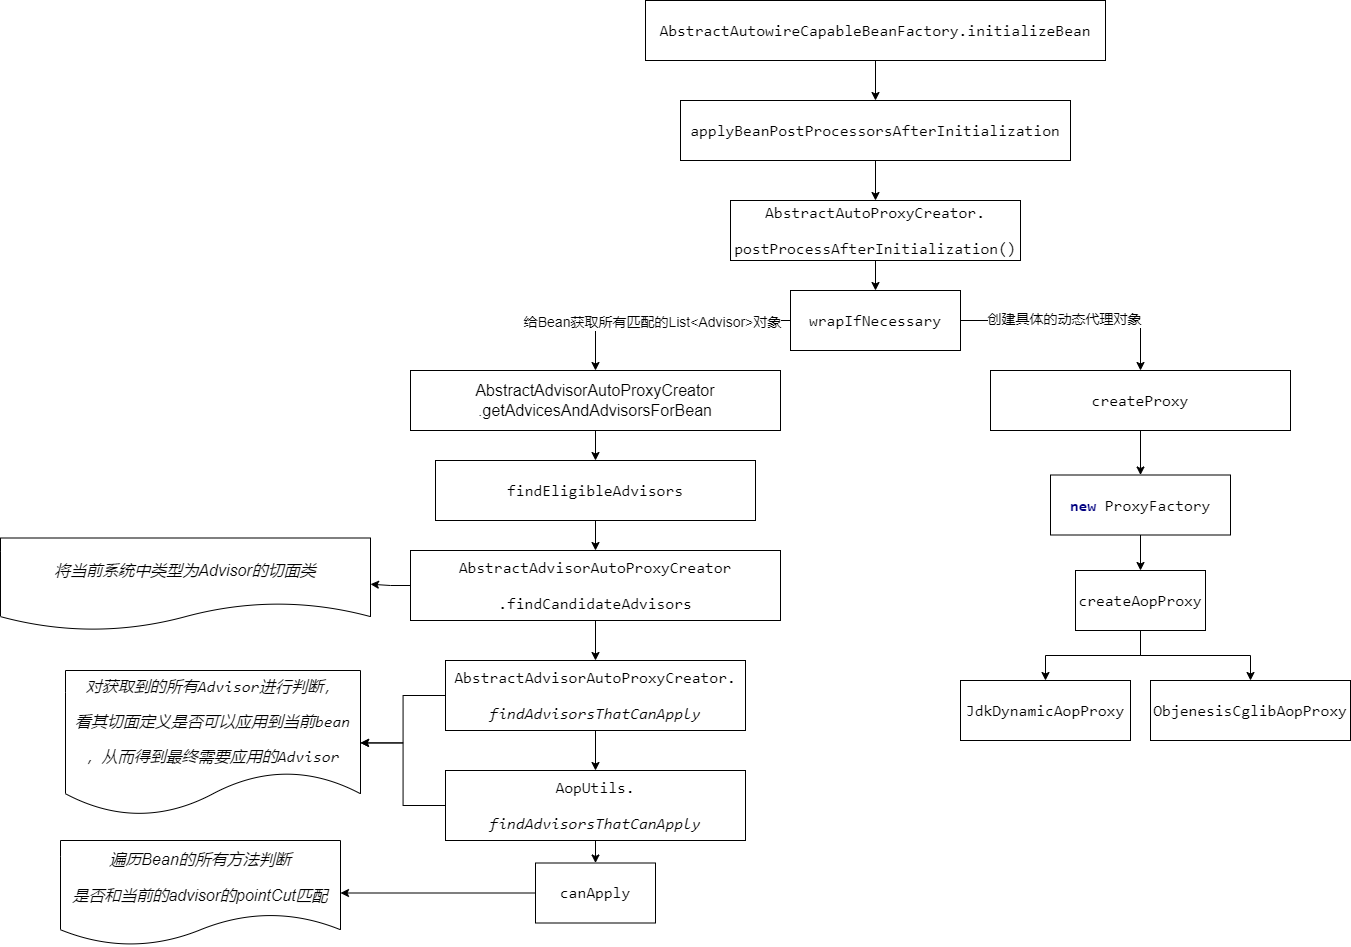
说明:
1.动态代理的创建
创建动态代理有两种方法,一种是 JDK ,一种是 CGLib 。
1.如果目标类有实现接口的话,则是使用JDK的方式生成代理对象。
2.配置了使用Cglib进行动态代理或者目标类没有实现接口,那么使用Cglib的方式创建代理对象。
区别:
创建:CGLIB由于创建多个.class 文件所以 效率肯定要慢于JDK动态代理
调用:CGLIB是要优于JDK的。因为JDK使用的反射,而CGLIB直接调用。
三、事务的调用过程
以上面的Main方法为示例,只分析两层事务,并且只分析事务提交成功的情况。在调用bean.checkout(1)方法的时候会直接调用 CglibAopProxy.intercept()方法,里面的大概逻辑如下:
-
获取被代理的实现类;
-
找出匹配该checkout 的 BeanFactoryTransactionAttributeSourceAdvisor,并且把 BeanFactoryTransactionAttributeSourceAdvisor 转成Interceptor类型,返回拦截器链。
-
创建 CglibMethodInvocation (该对象中包括了 代理对象、被代理对象、执行的方法、方法参数、被代理对象的类型、事务拦截器)它继承了 ReflectiveMethodInvocation 对象。执行CglibMethodInvocation 对象的proceed()方法,里面会调用 ReflectiveMethodInvocation 的 proceed方法 ,该方法中会进行事务拦截器的递归调用,具体调用流程如下图。ReflectiveMethodInvocation 对象在通知拦截器链调用中作用很关键,有衔接各个拦截器的作用。
代码流程如下图:

-
在ReflectiveMethodInvocation 的proceed方法中,会先判断当前拦截器链的索引,如果索引等于最后一个那么则执行被代理类的方法。
-
如果不是,那么先从拦截器链中获取拦截器(TransactionInterceptor)并且执行该拦截器的 proceed 方法(方法接受 ReflectiveMethodInvocation 对象实例)
-
TransactionInterceptor会调用 invokeWithinTransaction()方法,主要逻辑为
 1. 是否需要创建事务。
 2. 执行具体的方法。
 3. 回滚或者提交事务。
主要代码如下:
//创建必要的事务
TransactionInfo txInfo = createTransactionIfNecessary(ptm, txAttr, joinpointIdentification);
Object retVal;
try {
    // This is an around advice: Invoke the next interceptor in the chain.
    // This will normally result in a target object being invoked.
    // 执行具体方法
    retVal = invocation.proceedWithInvocation();
}
catch (Throwable ex) {
    // target invocation exception
    // 回滚
    completeTransactionAfterThrowing(txInfo, ex);
    throw ex;
}
finally {
    cleanupTransactionInfo(txInfo);
}
//事务提交
commitTransactionAfterReturning(txInfo);
- createTransactionIfNecessary 中会调用 getTransaction 方法。getTransaction 方法执行的关键代码有
7.1 doGetTransaction(),创建数据源事务对象,并设置 conHolder对象。此时conHolder为null。
// 创建一个数据源事务对象
DataSourceTransactionObject txObject = new DataSourceTransactionObject();
// 是否允许当前事务设置保持点
txObject.setSavepointAllowed(isNestedTransactionAllowed());
/**
* TransactionSynchronizationManager 事务同步管理器对象(该类中都是局部线程变量)
* 用来保存当前事务的信息,我们第一次从这里去线程变量中获取 事务连接持有器对象 通过数据源为key去获取
* 由于第一次进来开始事务 我们的事务同步管理器中没有被存放.所以此时获取出来的conHolder为null
*/
ConnectionHolder conHolder =
(ConnectionHolder) TransactionSynchronizationManager.getResource(obtainDataSource());
// 非新创建连接则写false
txObject.setConnectionHolder(conHolder, false);
// 返回事务对象
return txObject;
7.2 isExistingTransaction(transaction),判断依据为当前线程记录的连接不为空且连接中的transactionActive属性不为空。此时为不存在连接,所以该方法返回false。
DataSourceTransactionObject txObject = (DataSourceTransactionObject) transaction;
// 若第一次进来开始事务,txObject.hasConnectionHolder()返回的null那么表示不存在事务
return (txObject.hasConnectionHolder() && txObject.getConnectionHolder().isTransactionActive());
7.3 因为checkout()方法 的 事务属性为Propagation.REQUIRED,所以这里进入如下代码
else if (def.getPropagationBehavior() == TransactionDefinition.PROPAGATION_REQUIRED ||
				def.getPropagationBehavior() == TransactionDefinition.PROPAGATION_REQUIRES_NEW ||
				def.getPropagationBehavior() == TransactionDefinition.PROPAGATION_NESTED) {
    SuspendedResourcesHolder suspendedResources = suspend(null);
    if (debugEnabled) {
        logger.debug("Creating new transaction with name [" + def.getName() + "]: " + def);
    }
    try {
        return startTransaction(def, transaction, debugEnabled, suspendedResources);
    }
    catch (RuntimeException | Error ex) {
        resume(null, suspendedResources);
        throw ex;
    }
}
其中 suspend(null),表示没有当前事务。因为这个时候当前的线程变量中有没有激活的事物并且transaction 为null 所以这个方法返回 null,代码如下:
else {
     // Neither transaction nor synchronization active.
     return null;
}
7.4 startTransaction(),开启事务并返回事务状态。
// 是否需要新同步
boolean newSynchronization = (getTransactionSynchronization() != SYNCHRONIZATION_NEVER);
// 创建新的事务
DefaultTransactionStatus status = newTransactionStatus(
    definition, transaction, true, newSynchronization, debugEnabled, suspendedResources);
// 开启事务和连接
doBegin(transaction, definition);
// 同步事务的设置,如果线程状态是:NewSynchronization,则设置线程同步管理器的相关信息
prepareSynchronization(status, definition);
return status;
其中 doBegin(),创建连接,关闭自动提交,保存连接持有器到当前线程管理器中(确保嵌套中的事务属性对象可以访问到当前的事务连接器,即事务连接可传播,内层的事务可以访问外层的事务)。其中 doBegin方法中关键代码如下:
// 通过数据源获取一个数据库连接对象
Connection newCon = obtainDataSource().getConnection();

// 把我们的数据库连接包装成一个ConnectionHolder对象 然后设置到我们的txObject对象中去
txObject.setConnectionHolder(new ConnectionHolder(newCon), true);

// 关闭自动提交
con.setAutoCommit(false);

//如果是新事务连接持有器则保存连接持有器到线程管理器中
if (txObject.isNewConnectionHolder()) {
    TransactionSynchronizationManager.bindResource(this.obtainDataSource(), txObject.getConnectionHolder());
}
其中 prepareSynchronization,同步事务的设置,如果线程状态是:NewSynchronization,则设置线程同步管理器的相关信息。此时线程状态是NewSynchronization。代码如下:
if (status.isNewSynchronization()) {
    // 绑定事务激活
    TransactionSynchronizationManager.setActualTransactionActive(status.hasTransaction());
    // 当前事务的隔离级别
    TransactionSynchronizationManager.setCurrentTransactionIsolationLevel(
        definition.getIsolationLevel() != TransactionDefinition.ISOLATION_DEFAULT ?
        definition.getIsolationLevel() : null);
    // 是否为只读事务
    TransactionSynchronizationManager.setCurrentTransactionReadOnly(definition.isReadOnly());
    // 事务的名称
    TransactionSynchronizationManager.setCurrentTransactionName(definition.getName());
    TransactionSynchronizationManager.initSynchronization();
}
- createTransactionIfNecessary 中的prepareTransactionInfo(),创建一个TransactionInfo,然后设置该事务信息的新事务状态。代码如下:
//创建事务信息对象
TransactionInfo txInfo = new TransactionInfo(tm, txAttr, joinpointIdentification);
if (txAttr != null) {
   // We need a transaction for this method...
     if (logger.isTraceEnabled()) {
        logger.trace("Getting transaction for [" + txInfo.getJoinpointIdentification() + "]");
     }
     // The transaction manager will flag an error if an incompatible tx already exists.
     //设置事务状态
     txInfo.newTransactionStatus(status);
}
- invocation.proceedWithInvocation()执行具体的方法体,这里指checkout()的方法。当执行 bookDao.updateStock(id)的时候,因为bookDao也是代理类,这里会进入第内层代理类的调用,即调用CglibAopProxy.intercept()方法。
以下代码是 updateStock(id)方法的事务处理过程:
- 前面步骤和 checkout() 都差不多,直到createTransactionIfNecessary 的中getTransaction的代码:
1.1 doGetTransaction(),创建数据源事务对象,并设置conHolder对象。由于是第二次进来创建事务方法, 我们的事务同步管理器中有第一次事务保存的conHolder。所以此时获取出来的conHolder不为null。
// 创建一个数据源事务对象
DataSourceTransactionObject txObject = new DataSourceTransactionObject();
// 是否允许当前事务设置保持点
txObject.setSavepointAllowed(isNestedTransactionAllowed());
/**
* TransactionSynchronizationManager 事务同步管理器对象(该类中都是局部线程变量)
* 用来保存当前事务的信息,我们第一次从这里去线程变量中获取 事务连接持有器对象 通过数据源为key去获取
* 由于第二次进来开始事务 我们的事务同步管理器中有第一次事务保存的conHolder.所以此时获取出来的conHolder不为null
*/
ConnectionHolder conHolder =
(ConnectionHolder) TransactionSynchronizationManager.getResource(obtainDataSource());
// 非新创建连接则写false
txObject.setConnectionHolder(conHolder, false);
1.2 isExistingTransaction(transaction),判断依据为当前线程记录的连接不为空且连接中的transactionActive属性不为空,此时为存在,会执行if代码块里面的代码,执行handleExistingTransaction()方法。在此方法中执行的关键代码如下:
1.2.1 由于updateStock的事务属性为Propagation.REQUIRES_NEW。所以执行下面的代码:
if (definition.getPropagationBehavior() == TransactionDefinition.PROPAGATION_REQUIRES_NEW) {
    if (debugEnabled) {
        logger.debug("Suspending current transaction, creating new transaction with name [" +
                     definition.getName() + "]");
    }
    SuspendedResourcesHolder suspendedResources = suspend(transaction);
    try {
        return startTransaction(definition, transaction, debugEnabled, suspendedResources);
    }
    catch (RuntimeException | Error beginEx) {
        resumeAfterBeginException(transaction, suspendedResources, beginEx);
        throw beginEx;
    }
}
1.2.2 suspend方法中主要逻辑为:调用doSuspend 挂起连接持有器。然后先从事务管理器中获取当前事务(外层事务)的名称、只读属性、事务隔离级别、当前事务激活状态。然后清空事务状态。再把之前获取到的属性封装为一个挂起的事务属性SuspendedResourcesHolder返回出去,该事务属性用来记录当前事务的相关属性,以便内层事务后面用来恢复外层事务。代码如下:
// 判断当前的线程同步管理器变量中有没有激活的事物,有需要清空线程变量
if (TransactionSynchronizationManager.isSynchronizationActive()) {
	List<TransactionSynchronization> suspendedSynchronizations = doSuspendSynchronization();
    try {
        Object suspendedResources = null;
        if (transaction != null) {
            //挂起的资源,连接持有器,这里指挂起当前连接,后面备用,会传入挂起的资源管理器
            suspendedResources = doSuspend(transaction);
        }
        // 获取当前事务名称
        String name = TransactionSynchronizationManager.getCurrentTransactionName();
        // 清空线程变量
        TransactionSynchronizationManager.setCurrentTransactionName(null);
        // 获取出只读事务的名称
        boolean readOnly = TransactionSynchronizationManager.isCurrentTransactionReadOnly();
        // 清空线程变量
        TransactionSynchronizationManager.setCurrentTransactionReadOnly(false);
        // 获取已存在事务的隔离级别
        Integer isolationLevel = TransactionSynchronizationManager.getCurrentTransactionIsolationLevel();
        // 清空隔离级别
        TransactionSynchronizationManager.setCurrentTransactionIsolationLevel(null);
        // 判断当前事务激活状态
        boolean wasActive = TransactionSynchronizationManager.isActualTransactionActive();
        // 清空标记
        TransactionSynchronizationManager.setActualTransactionActive(false);
        // 把上诉从线程变量中获取出来的存在事务属性封装为挂起的事务属性返回出去
        return new SuspendedResourcesHolder(
            suspendedResources, suspendedSynchronizations, name, readOnly, isolationLevel, wasActive);
			}
			catch (RuntimeException | Error ex) {
				// doSuspend failed - original transaction is still active...
				doResumeSynchronization(suspendedSynchronizations);
				throw ex;
			}
}
其中 doSuspend ,主要是挂起外层的事务连接持有器并返回挂起的对象,代码逻辑如下
DataSourceTransactionObject txObject = (DataSourceTransactionObject) transaction;
// 清空连接持有器
txObject.setConnectionHolder(null);
// 解绑线程私有的资源,返回给上一层
return TransactionSynchronizationManager.unbindResource(obtainDataSource());
1.2.3 startTransaction 开启事务并返回事务状态。这里会存入上面返回的挂起的资源连接器,里面保存了外层事务状态的相关信息以及连接持有器。
// 是否需要新同步
boolean newSynchronization = (getTransactionSynchronization() != SYNCHRONIZATION_NEVER);
// 创建新的事务状态
DefaultTransactionStatus status = newTransactionStatus(
    definition, transaction, true, newSynchronization, debugEnabled, suspendedResources);
// 开启事务和连接
doBegin(transaction, definition);
// 同步事务的设置,如果线程状态是:新线程,则设置线程同步管理器的相关信息
prepareSynchronization(status, definition);
return status;
1.2.3.1 doBegin(),创建连接,关闭自动提交,保存连接持有器到当前线程管理器中(确保嵌套中的事务属性对象可以访问到当前的事务连接器,即事务连接可传播,内层的事务可以访问外层的事务)。和上面的doBegin作用一样。
1.2.3.2 prepareSynchronization(),同步事务的设置,如果线程状态是:NewSynchronization,则设置线程同步管理器的相关信息。此时线程状态是NewSynchronization。
- createTransactionIfNecessary 中 prepareTransactionInfo(),创建一个TransactionInfo,然后设置该事务信息的新事务状态。
- retVal = invocation.proceedWithInvocation();执行updateStock(id)方法体里面的内容。
- commitTransactionAfterReturning 提交具体的事务。由于此时TransactionInfo的TransactionStatus为true。会执行如下代码:
//当前状态是新事务
else if (status.isNewTransaction()) {
    if (status.isDebug()) {
   		 logger.debug("Initiating transaction commit");
	}
	unexpectedRollback = status.isGlobalRollbackOnly();
	// 如果是独立的事务则直接提交
	doCommit(status);
}
4.1 其中doCommitf方法中会获取连接对象,并且完成数据库事务的提交,代码如下:
DataSourceTransactionObject txObject = (DataSourceTransactionObject) status.getTransaction();
Connection con = txObject.getConnectionHolder().getConnection();
if (status.isDebug()) {
    logger.debug("Committing JDBC transaction on Connection [" + con + "]");
}
try {
    // JDBC连接提交
    con.commit();
}
catch (SQLException ex) {
    throw new TransactionSystemException("Could not commit JDBC transaction", ex);
}
- cleanupAfterCompletion,回滚后的处理工作,其中resume方法中会恢复之前挂起的事务。代码如下:
// 有挂起的事务要恢复
if (status.getSuspendedResources() != null) {
    if (status.isDebug()) {
        logger.debug("Resuming suspended transaction after completion of inner transaction");
    }
    Object transaction = (status.hasTransaction() ? status.getTransaction() : null);
    // 结束之前事务的挂起状态
    resume(transaction, (SuspendedResourcesHolder) status.getSuspendedResources());
}
- resume 中的 doResume 会拿到外层的事务即(checkout方法事务)的连接持有器放入事务同步管理器中。这样就确保了,在执行到 checkout方法体的时候拿到的连接对象是checkout当时生成的连接对象,以便checkout方法类其他嵌套事务调用。
protected void doResume(@Nullable Object transaction, Object suspendedResources) {
	TransactionSynchronizationManager.bindResource(this.obtainDataSource(), suspendedResources);
}
至此,updateStock() 方法执行基本完成,代码执行回到checkout()方法体中。
- checkout执行完毕之后,回到checkout过程中的invocation.proceedWithInvocation()。
- 如果成功,则commitTransactionAfterReturning 提交事务。由于此时TransactionInfo的TransactionStatus为true。会执行如下代码:
//当前状态是新事务
else if (status.isNewTransaction()) {
    if (status.isDebug()) {
   		 logger.debug("Initiating transaction commit");
	}
	unexpectedRollback = status.isGlobalRollbackOnly();
	// 如果是独立的事务则直接提交
	doCommit(status);
}
2.1 其中doCommitf方法中会获取连接对象,并且完成数据库事务的提交,代码如下:
DataSourceTransactionObject txObject = (DataSourceTransactionObject) status.getTransaction();
Connection con = txObject.getConnectionHolder().getConnection();
if (status.isDebug()) {
    logger.debug("Committing JDBC transaction on Connection [" + con + "]");
}
try {
    // JDBC连接提交
    con.commit();
}
catch (SQLException ex) {
    throw new TransactionSystemException("Could not commit JDBC transaction", ex);
}
至此,checkout() 方法执行大概完成。整个代码调用事务也基本完成了。
四、事务的传播行为总结
| 事务的传播行为 | 外部不存在事务 | 外部存在事务 |
|---|---|---|
| REQUIRED(默认) | 开启新事务 | 融合到外部事务中 |
| SUPPORTS | 不开启新事务 | 融合到外部事务中 |
| MANDATORY | 抛出异常 | 融合到外部事务中 |
| REQUIRES_NEW | 开启新事务 | 挂起外部事务,创建新事务 |
| NOT_SUPPORTED | 不开启新事务 | 挂起外部事务 |
| NEVER | 不开启新事务 | 抛出异常 |
| NESTED | 开启新的事务 | 融合到外部事务中,SavePoint机制,外层影响内层,内层不会影响外层 |
文章来源: 博客园
- 还没有人评论,欢迎说说您的想法!


 客服
客服


