
requests库官方使用手册地址:http://www.python-requests.org/en/master/;中文使用手册地址:http://cn.python-requests.org/zh_CN/latest/;
requests库作者Kenneth Reitz个人主页:https://www.kennethreitz.org/;
requests库github地址:https://github.com/requests/requests;
requests库下载方法:pip install requests
学习目的:Python+requests库实现接口自动化测试;
requests库作者Kenneth Reitz创建的server端:http://httpbin.org/;可以学习时使用。
python自带的接口测试的库urllib、urllib2、urllib3,这三个库不是进阶关系,是彼此独立的。requests库使用了urllib3(多次请求重复使用一个socket,消耗更少的资源)。
1.使用urllib、urllib2实现的一个小程序:
# -*- coding: utf-8 -*-
import urllib
import urllib2 #引入urllib、urllib2库
URL_IP = 'http://httpbin.org/ip'
URL_GET = 'http://httpbin.org/get'
def use_simple_urllib2():
response = urllib2.urlopen(URL_IP) #urlopen() 访问url的方法
print '>>>>Response Headers:'
print response.info() #info() 打印headers的方法
print '>>>>Response body:'
print ''.join([line for line in response.readlines()]) #join() 将response body中的元素以"连接生成一个新的字符串 str = "-"; seq = ("a", "b", "c"); print str.join( seq ); 结果:a-b-c
def use_params_urllib2():
#构建请求参数
params = urllib.urlencode({'param1': 'hello', 'param2': 'world'}) #urlencode() 将参数进行url编码
#发送请求
response = urllib2.urlopen('?'.join([URL_GET, '%s']) % params)
#处理响应
print '>>>>Response Headers:'
print response.info()
print '>>>>Status Code:'
print response.getcode() #getcode()获取status code的方法
print '>>>>Request body:'
print ''.join([line for line in response.readlines()])
if __name__ == '__main__':
print '>>>Use simple urllib2:'
use_simple_urllib2()
print ''
print '>>>Use params urllib2:'
use_params_urllib2()
服务器返回的数据:
C:Python27python.exe C:/Users/lxz/Desktop/study/AndroidAppshizhandaima/HttpApi/jiekouceshi.py
>>>Use simple urllib2:
>>>>Response Headers:
Connection: close #可以看到,一次请求后connection的状态是close,说明urllib库每次都要重新打开一个socket
Server: meinheld/0.6.1
Date: Fri, 18 Aug 2017 06:25:44 GMT
Content-Type: application/json
Access-Control-Allow-Origin: *
Access-Control-Allow-Credentials: true
X-Powered-By: Flask
X-Processed-Time: 0.000429153442383
Content-Length: 32
Via: 1.1 vegur
>>>>Response body:
{
"origin": "39.109.125.70"
}
>>>Use params urllib2:
>>>>Response Headers:
Connection: close
Server: meinheld/0.6.1
Date: Fri, 18 Aug 2017 06:25:44 GMT
Content-Type: application/json
Access-Control-Allow-Origin: *
Access-Control-Allow-Credentials: true
X-Powered-By: Flask
X-Processed-Time: 0.000815868377686
Content-Length: 309
Via: 1.1 vegur
>>>>Status Code:
200
>>>>Request body:
{
"args": {
"param1": "hello",
"param2": "world"
},
"headers": {
"Accept-Encoding": "identity",
"Connection": "close",
"Host": "httpbin.org",
"User-Agent": "Python-urllib/2.7"
},
"origin": "39.109.125.70",
"url": "http://httpbin.org/get?param2=world¶m1=hello"
}
2.使用requests实现的一个小程序:
#coding=utf-8
import requests #引入requests库
URL_IP = 'http://httpbin.org/ip'
URL_GET = 'http://httpbin.org/get'
def use_simple_requests():
response = requests.get(URL_IP) #以get方法访问url
print '>>>>Response Headers:'
print response.headers # .headers 获取headers
print '>>>>Response body:'
print response.text # .text 获取值
def use_params_requests():
params = {'param1': 'hello', 'param2': 'world'} #参数直接以字典的形式赋值,不需要编码
#发送请求
response = requests.get(URL_GET, params=params) #get方法会自动连接url和参数
#处理响应
print '>>>>Response Headers:'
print response.headers
print '>>>>Status Code:'
print response.status_code # .status_code 获取status_code方法
print '>>>>Reason:'
print response.reason # .reason 获取访问接口结果方法
print '>>>>Request body:'
print response.text # .text 获取值
if __name__ == '__main__':
print '>>>Use simple requests:'
use_simple_requests()
print ''
print '>>>Use params requests:'
use_params_requests()
服务器返回的数据:
>>>Use simple requests:
>>>>Response Headers:
{'Content-Length': '34', 'X-Processed-Time': '0.000436067581177', 'X-Powered-By': 'Flask', 'Server': 'meinheld/0.6.1', 'Connection': 'keep-alive', 'Via': '1.1 vegur', 'Access-Control-Allow-Credentials': 'true', 'Date': 'Sat, 19 Aug 2017 08:12:17 GMT', 'Access-Control-Allow-Origin': '*', 'Content-Type': 'application/json'}
>>>>Response body:
{
"origin": "111.204.108.132"
}
>>>Use params requests:
>>>>Response Headers:
{'Content-Length': '343', 'X-Processed-Time': '0.000698089599609', 'X-Powered-By': 'Flask', 'Server': 'meinheld/0.6.1', 'Connection': 'keep-alive', 'Via': '1.1 vegur', 'Access-Control-Allow-Credentials': 'true', 'Date': 'Sat, 19 Aug 2017 08:12:18 GMT', 'Access-Control-Allow-Origin': '*', 'Content-Type': 'application/json'}
#可以看到使用requests库,connection的状态是keep-alive,这就说明了多次请求重复使用一个socket,所以相比urllib库,requests库会消耗更少的资源
>>>>Status Code:
200
>>>>Reason:
OK
>>>>Request body:
{
"args": {
"param1": "hello",
"param2": "world"
},
"headers": {
"Accept": "*/*",
"Accept-Encoding": "gzip, deflate",
"Connection": "close",
"Host": "httpbin.org",
"User-Agent": "python-requests/2.18.3"
},
"origin": "111.204.108.132",
"url": "http://httpbin.org/get?param2=world¶m1=hello"
}
3.发送请求
请求方法:

使用requests库发送请求的方法:requests.[method](url)
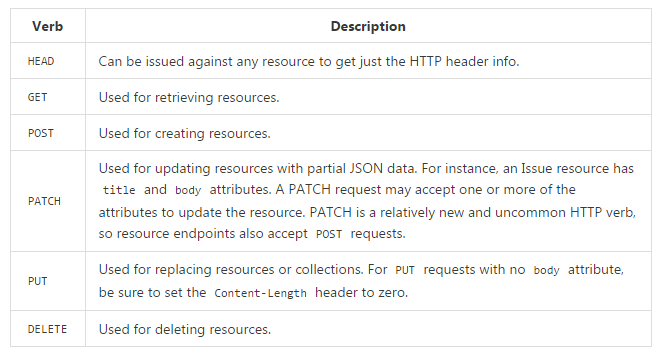
PATCH:更新资源;通过提交json数据的方式实现,相比较PUT,PATCH更轻量级。
github上公共API的使用方法地址:https://developer.github.com/v3/
使用时调用URL:https://api.github.com #可以用来日常学习使用
下面的演示用代码都会用到以上两个域名。
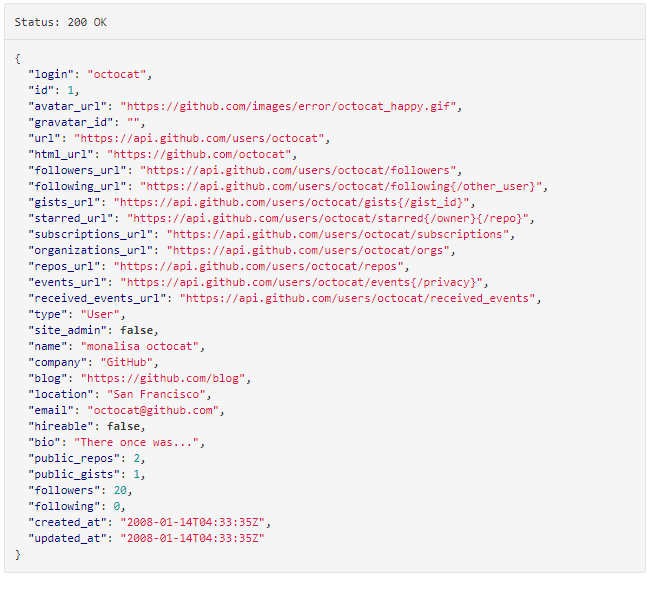
3.1,获取用户名方法 https://developer.github.com/v3/users

其中https://api.github.com是根域名,/users/username是endpoint。
github官网上返回数据的样例:
实现代码:
# -*- coding: utf-8 -*-
import json
import requests
URL = 'https://api.github.com'
def build_uri(endpoint):
return '/'.join([URL, endpoint])
def better_print(json_str):
return json.dumps(json.loads(json_str), indent=4)
def request_method():
response = requests.get(build_uri('users/caolanmiao'))
print better_print(response.text)
if __name__ == '__main__':
request_method()
返回的数据:
{
"public_repos": 0,
"site_admin": false,
"subscriptions_url": "https://api.github.com/users/caolanmiao/subscriptions",
"gravatar_id": "",
"hireable": null,
"id": 22490616,
"followers_url": "https://api.github.com/users/caolanmiao/followers",
"following_url": "https://api.github.com/users/caolanmiao/following{/other_user}",
"blog": "",
"followers": 0,
"location": "Pecking",
"type": "User",
"email": null,
"bio": "Software QA Engineer",
"gists_url": "https://api.github.com/users/caolanmiao/gists{/gist_id}",
"company": null,
"events_url": "https://api.github.com/users/caolanmiao/events{/privacy}",
"html_url": "https://github.com/caolanmiao",
"updated_at": "2017-08-19T09:27:39Z",
"received_events_url": "https://api.github.com/users/caolanmiao/received_events",
"starred_url": "https://api.github.com/users/caolanmiao/starred{/owner}{/repo}",
"public_gists": 0,
"name": "Yannan.Jia",
"organizations_url": "https://api.github.com/users/caolanmiao/orgs",
"url": "https://api.github.com/users/caolanmiao",
"created_at": "2016-09-28T06:00:27Z",
"avatar_url": "https://avatars0.githubusercontent.com/u/22490616?v=4",
"repos_url": "https://api.github.com/users/caolanmiao/repos",
"following": 1,
"login": "caolanmiao"
}
返回的数据信息中就是我自己的github账号,说明这次请求成功了。
注意:对于github而言,传入参数auth=('用户名','密码'),既可以完成认证。
访问user/emails API,修改上述代码的以下部分,增加auth参数,完成认证
response = requests.get(build_uri('user/emails'),auth=('caolanmiao','########'))
返回数据:
[{"email":"jia#####@outlook.com","primary":true,"verified":true,"visibility":"public"}]
[
{
"verified": true,
"email": "jia#####@outlook.com",
"visibility": "public",
"primary": true
}
]
符合API使用说明。
3.2,带参数的请求
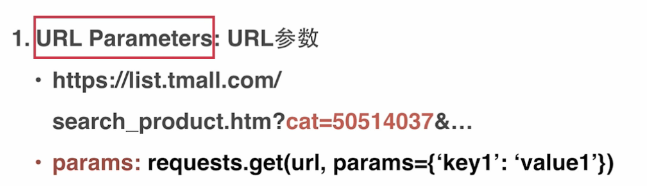
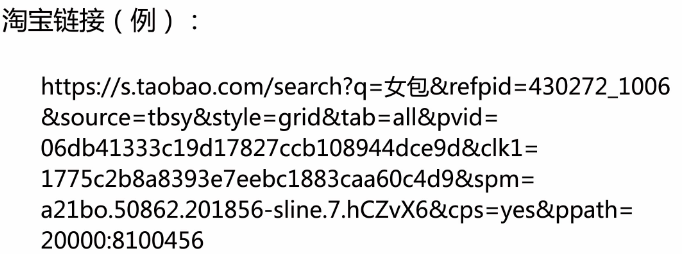
get方式:这种参数直接拼接在url后面的参数提交方式的优点是:信息传递/页面到页面的跳转方便;缺点:明文显示,安全性差、浏览器对url的长度有限制。
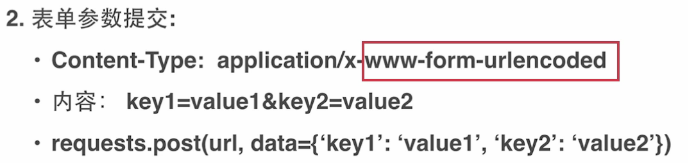
post方式:安全性强,可以传递大量参数。

1.get方式实现参数传递,测试用API地址:https://developer.github.com/v3/users

since参数会过滤掉在它之前的users(比如since为11,那么只显示11之后的users)
实现代码:
# -*- coding: utf-8 -*-
import json
import requests
from requests import exceptions
URL = 'https://api.github.com'
def build_uri(endpoint):
return '/'.join([URL, endpoint])
def better_print(json_str):
return json.dumps(json.loads(json_str), indent=4)
def params_request():
response = requests.get(build_uri('users'), params={'since': 11})
print better_print(response.text)
print response.request.headers
print response.url
if __name__ == '__main__':
params_request()
2.post、patch方式实现参数传递,测试用API地址:https://developer.github.com/v3/users/emails/
实现代码:
def json_request():
response = requests.patch(build_uri('user'), auth=('caolanmiao', '########'), json={'name': 'Yannan.Jia', 'email': 'helloworld1@ceshi.com'})
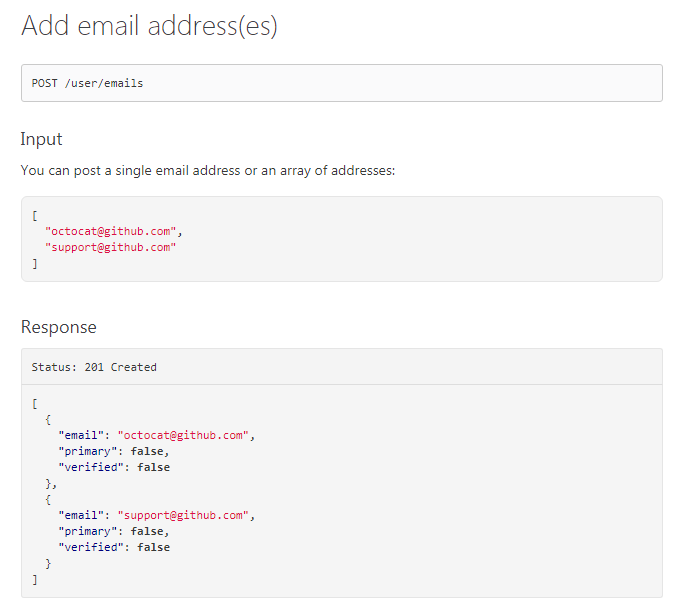
response = requests.post(build_uri('user/emails'), auth=('caolanmiao', '########'), json=['helloworld2@ceshi.com'])
print better_print(response.text)
print response.request.headers
print response.request.body
print response.status_code
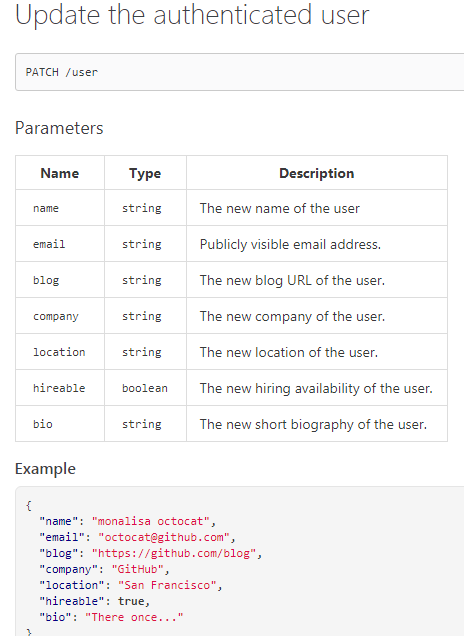
通过Patch方法,修改名称和邮箱;通过Post增加邮箱;
看到的同学也可以利用github上的api自己试试。
- 还没有人评论,欢迎说说您的想法!
 客服
客服


