
本人结合其他博客和自己查询的资料,一步一步实现整合了security安全框架,其中踩过不少的坑,也有遇到许多不懂的地方,为此做个记录。
开发工具:ide、数据库:mysql5.7、springboot版本:2.3.7
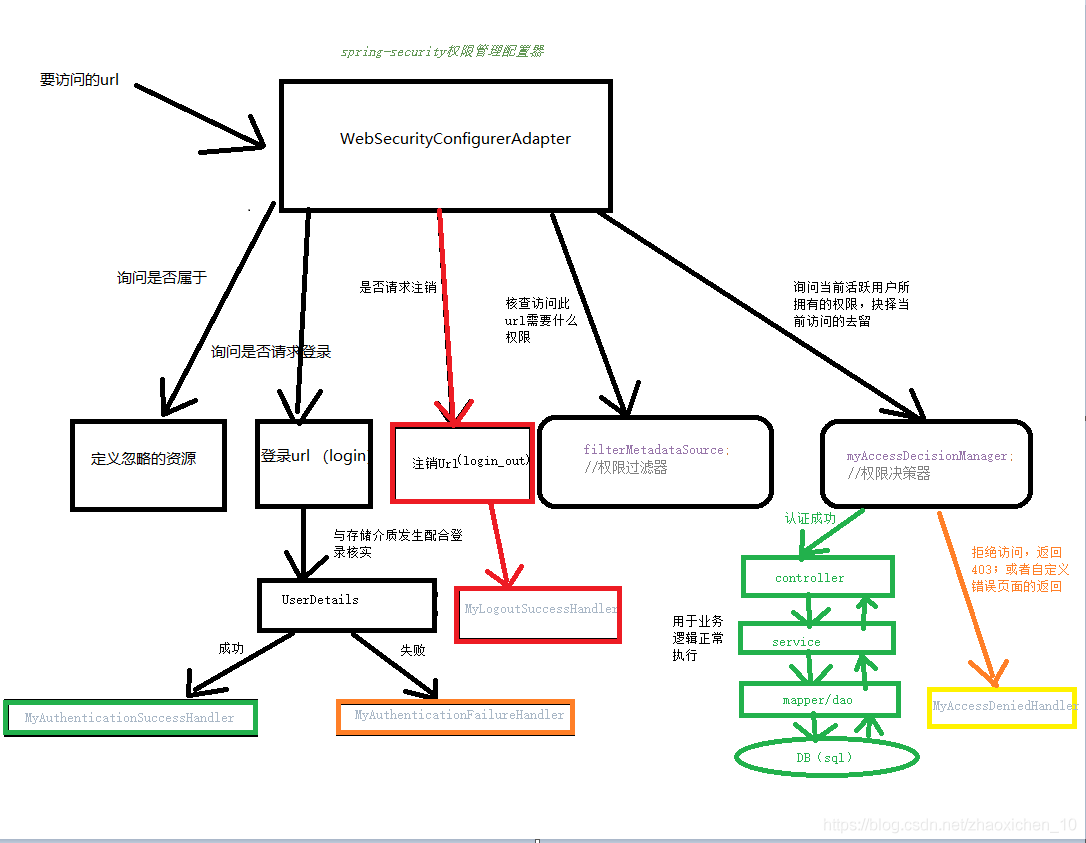
个人对Spring Security的执行过程大致理解(仅供参考)
使用Spring Security很简单,只要在pom.xml文件中,引入spring security的依赖就可以了
pom配置:
<dependency>
  <groupId>org.springframework.boot</groupId>
   <artifactId>spring-boot-starter-security</artifactId>
</dependency>
这个时候我们不在配置文件中做任何配置,随便写一个Controller
@RestController
public class TestController {
    @GetMapping("/hello")
    public String request() {
        return "hello";
    }
}
启动项目,我们会发现有这么一段日志

此时表示Security生效,默认对项目进行了保护,我们访问该Controller中的接口(http://localhost:8080/securitydemo/hello),会见到如下登录界面(此界面为security框架自带的默认登录界面,后期不用可以换成自定义登录界面)
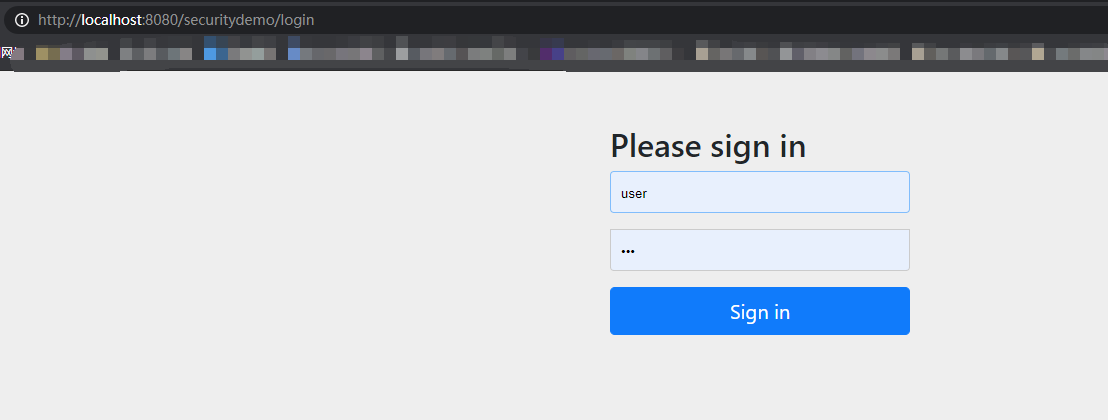
这里面的用户名和密码是什么呢?此时我们需要输入用户名:user,密码则为之前日志中的"19262f35-9ded-49c2-a8f6-5431536cc50c",输入之后,我们可以看到此时可以正常访问该接口

在老版本的Springboot中(比如说Springboot 1.x版本中),可以通过如下方式来关闭Spring Security的生效,但是现在Springboot 2中已经不再支持
security:
  basic:
    enabled: false
springboot2.x后可以在启动类中设置

1、配置基于内存的角色授权和认证信息
1.1目录
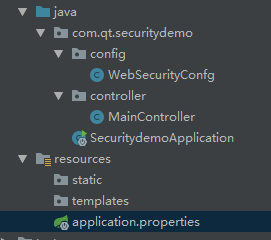
1.2 WebSecurityConfg配置类
Spring Security的核心配置类是 WebSecurityConfigurerAdapter抽象类,这是权限管理启动的入口,这里我们自定义一个实现类去它。
/**
 * @Author qt
 * @Date 2021/3/25
 * @Description SpringSecurity安全框架配置
 */
@Configuration
@EnableWebSecurity//开启Spring Security的功能
//prePostEnabled属性决定Spring Security在接口前注解是否可用@PreAuthorize,@PostAuthorize等注解,设置为true,会拦截加了这些注解的接口
@EnableGlobalMethodSecurity(prePostEnabled=true)
public class WebSecurityConfg extends WebSecurityConfigurerAdapter {
    @Override
    protected void configure(AuthenticationManagerBuilder auth) throws Exception {
        /**
        * 基于内存的方式,创建两个用户admin/123456,user/123456
        * */
        auth.inMemoryAuthentication()
                .withUser("admin")//用户名
                .password(passwordEncoder().encode("123456"))//密码
                .roles("ADMIN");//角色
        auth.inMemoryAuthentication()
                .withUser("user")//用户名
                .password(passwordEncoder().encode("123456"))//密码
                .roles("USER");//角色
    }

    /**
     * 指定加密方式
     */
    @Bean
    public PasswordEncoder passwordEncoder(){
        // 使用BCrypt加密密码
        return new BCryptPasswordEncoder();
    }
}
1.3 MainController控制器接口
/**
 * @Author qt
 * @Date 2021/3/25
 * @Description 主控制器
 */
@RestController
public class MainController {

    @GetMapping("/hello")
    public String printStr(){
        System.out.println("hello success");
        return "Hello success!";
    }

}
这样重新运行后我们就可以通过admin/123456、user/123456两个用户登录了。
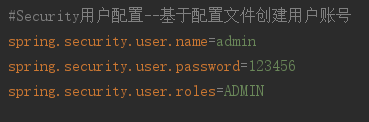
当然,你也可以基于配置文件创建用户账号,在pom.xml中添加:
2、配置基于数据库的认证信息和角色授权
2.1 目录
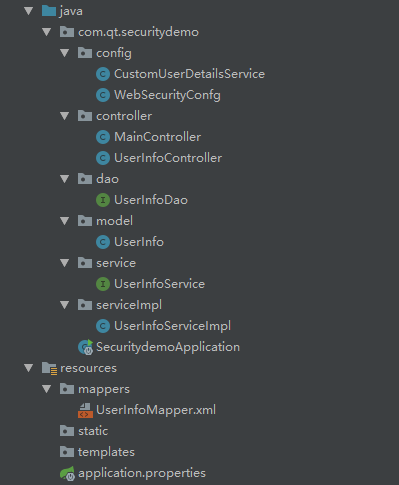
2.2 CustomUserDetailsService实现类
UserDetailsService是需要实现的登录用户查询的service接口,实现loadUserByUsername()方法,这里我们自定义CustomUserDetailsService实现类去实现UserDetailsService接口
/**
 * @Author qt
 * @Date 2021/3/25
 * @Description
 */

@Component
public class CustomUserDetailsService implements UserDetailsService {
    @Resource
    private UserInfoService userInfoService;
    @Resource
    private PasswordEncoder passwordEncoder;
    @Override
    public UserDetails loadUserByUsername(String userName) throws UsernameNotFoundException {
        /**
         * 1/通过userName 获取到userInfo信息
         * 2/通过User(UserDetails)返回details。
         */
        //通过userName获取用户信息
        UserInfo userInfo = userInfoService.getUserInfoByUsername(userName);
        if(userInfo == null) {
            throw new UsernameNotFoundException("not found");
        }
        //定义权限列表.
        List<GrantedAuthority> authorities = new ArrayList<>();
        // 用户可以访问的资源名称(或者说用户所拥有的权限) 注意:必须"ROLE_"开头
        authorities.add(new SimpleGrantedAuthority("ROLE_"+ userInfo.getRole()));
        User userDetails = new User(userInfo.getUserName(),passwordEncoder.encode(userInfo.getPassword()),authorities);
        return userDetails;
    }
}
WebSecurityConfg配置类:
/**
 * @Author qt
 * @Date 2021/3/25
 * @Description SpringSecurity安全框架配置
 */
@Configuration
@EnableWebSecurity//开启Spring Security的功能
//prePostEnabled属性决定Spring Security在接口前注解是否可用@PreAuthorize,@PostAuthorize等注解,设置为true,会拦截加了这些注解的接口
@EnableGlobalMethodSecurity(prePostEnabled=true)
public class WebSecurityConfg extends WebSecurityConfigurerAdapter {
    /**
     * 指定加密方式
     */
    @Bean
    public PasswordEncoder passwordEncoder(){
        // 使用BCrypt加密密码
        return new BCryptPasswordEncoder();
    }
}
对于通过userName获取用户信息的服务层,持久层和数据库语句就不介绍了,这里使用的是SSM框架,使用mybaits。
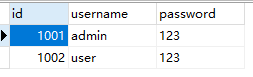
2.3 数据库设计
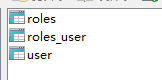
角色表 roles


用户表 user

用户角色关系表 roles_user


3、自定义表单认证登录
3.1 目录
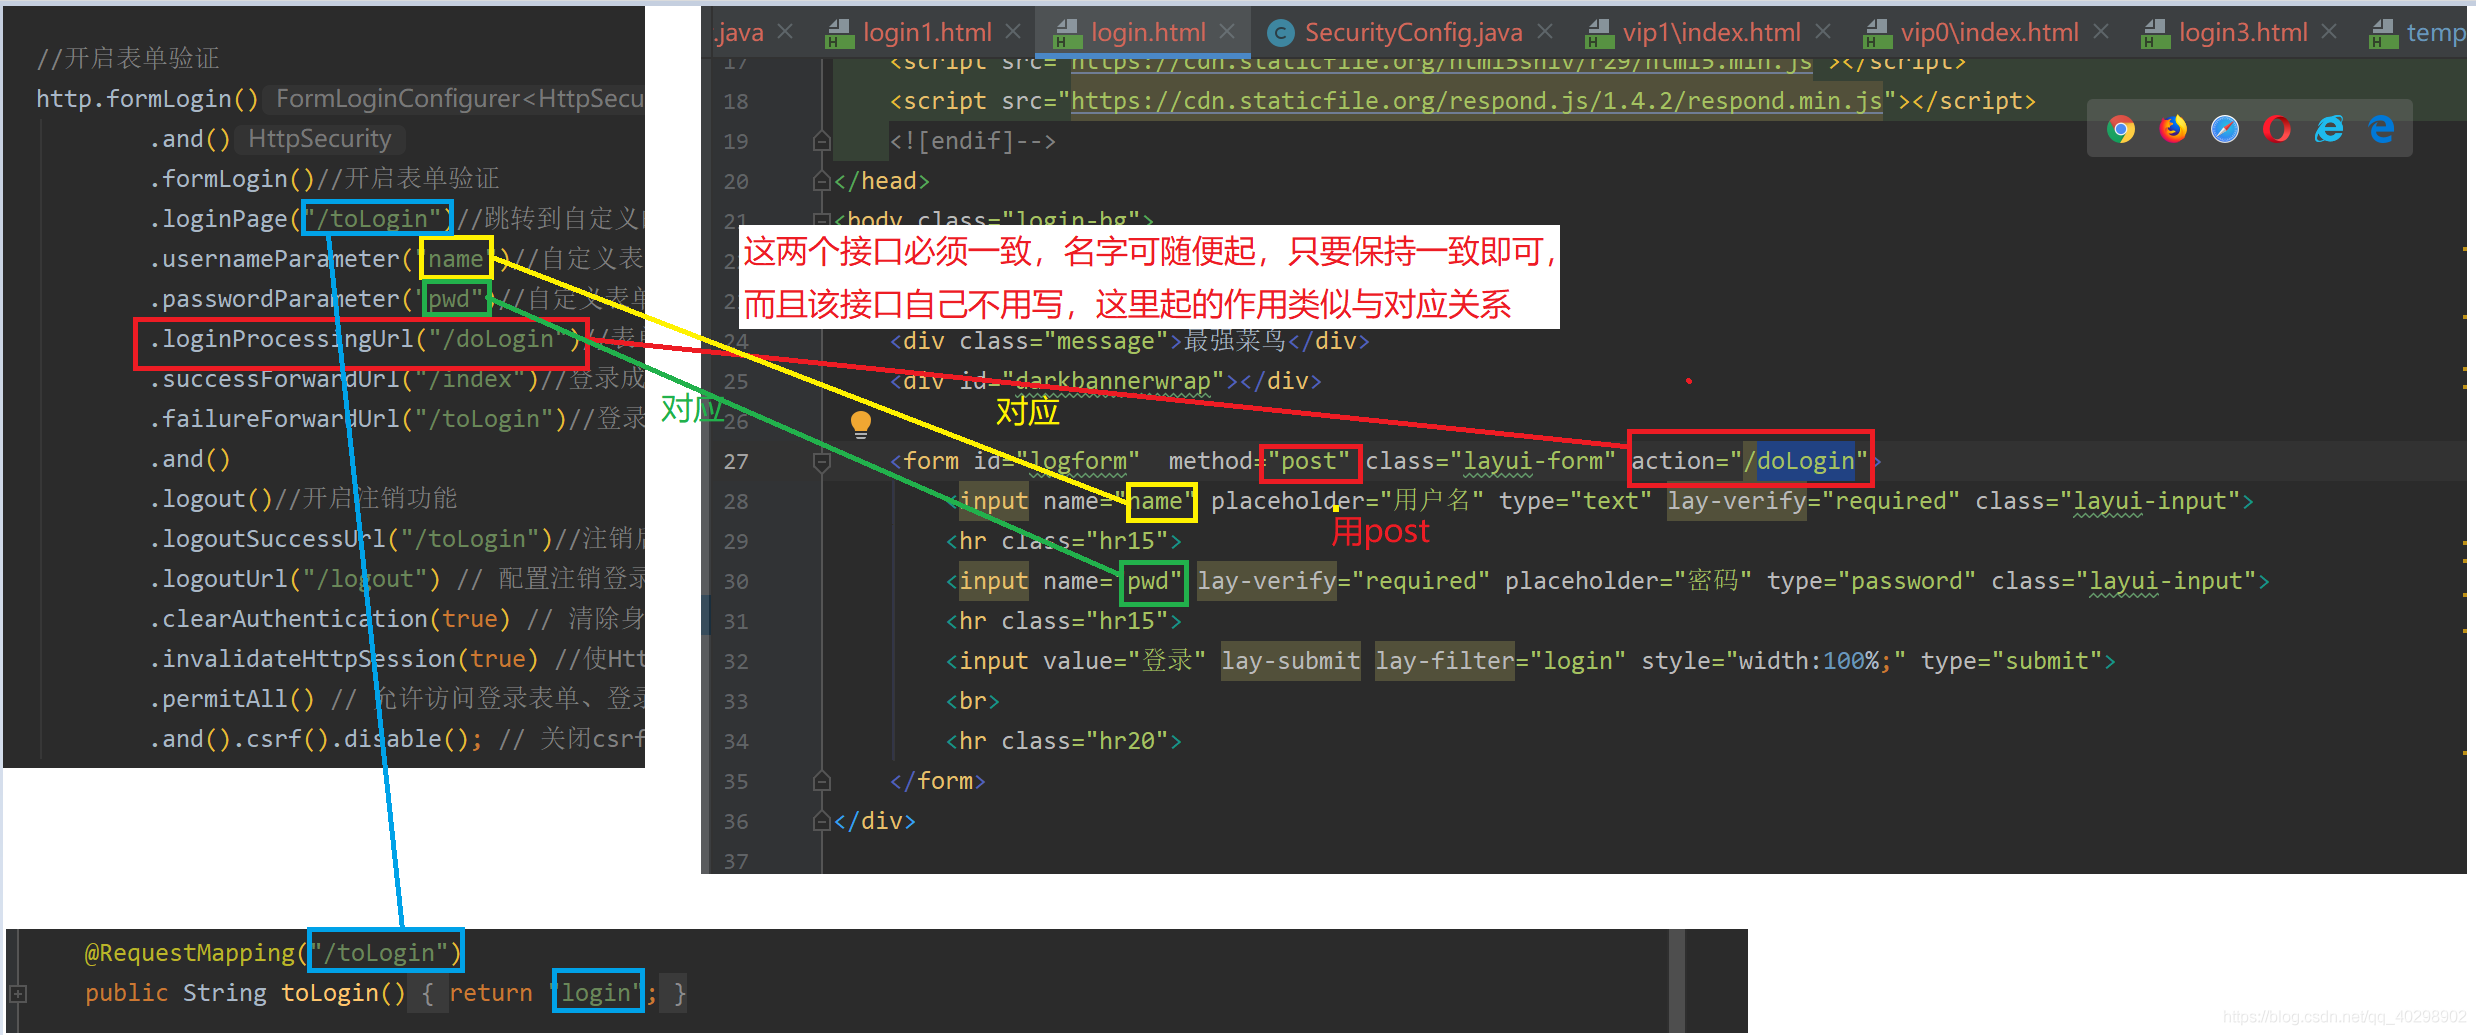
3.2 WebSecurityConfg核心配置类
/**
 * @Author qt
 * @Date 2021/3/25
 * @Description spring-security权限管理的核心配置
 */
@Configuration
@EnableWebSecurity//开启Spring Security的功能
//prePostEnabled属性决定Spring Security在接口前注解是否可用@PreAuthorize,@PostAuthorize等注解,设置为true,会拦截加了这些注解的接口
@EnableGlobalMethodSecurity(prePostEnabled=true)
public class WebSecurityConfg extends WebSecurityConfigurerAdapter {

    @Resource
    private AuthenticationSuccessHandler loginSuccessHandler; //认证成功结果处理器
    @Resource
    private AuthenticationFailureHandler loginFailureHandler; //认证失败结果处理器

    //http请求拦截配置
    @Override
    protected void configure(HttpSecurity http) throws Exception {
        http.headers().frameOptions().disable();//开启运行iframe嵌套页面

        http//1、配置权限认证
            .authorizeRequests()
                //配置不拦截路由
                .antMatchers("/500").permitAll()
                .antMatchers("/403").permitAll()
                .antMatchers("/404").permitAll()
                .antMatchers("/login").permitAll()
                .anyRequest() //任何其它请求
                .authenticated() //都需要身份认证
                .and()
             //2、登录配置表单认证方式
            .formLogin()
                .loginPage("/login")//自定义登录页面的url
                .usernameParameter("username")//设置登录账号参数,与表单参数一致
                .passwordParameter("password")//设置登录密码参数,与表单参数一致
                // 告诉Spring Security在发送指定路径时处理提交的凭证,默认情况下,将用户重定向回用户来自的页面。登录表单form中action的地址,也就是处理认证请求的路径,
                // 只要保持表单中action和HttpSecurity里配置的loginProcessingUrl一致就可以了,也不用自己去处理,它不会将请求传递给Spring MVC和您的控制器,所以我们就不需要自己再去写一个/user/login的控制器接口了
                .loginProcessingUrl("/user/login")//配置默认登录入口
                .defaultSuccessUrl("/index")//登录成功后默认的跳转页面路径
                .failureUrl("/login?error=true")
                .successHandler(loginSuccessHandler)//使用自定义的成功结果处理器
                .failureHandler(loginFailureHandler)//使用自定义失败的结果处理器
                .and()
            //3、注销
            .logout()
                .logoutUrl("/logout")
                .logoutSuccessHandler(new CustomLogoutSuccessHandler())
                .permitAll()
                .and()
            //4、session管理
            .sessionManagement()
                .invalidSessionUrl("/login") //失效后跳转到登陆页面
                //单用户登录,如果有一个登录了,同一个用户在其他地方登录将前一个剔除下线
                //.maximumSessions(1).expiredSessionStrategy(expiredSessionStrategy())
                //单用户登录,如果有一个登录了,同一个用户在其他地方不能登录
                //.maximumSessions(1).maxSessionsPreventsLogin(true) ;
                .and()
            //5、禁用跨站csrf攻击防御
            .csrf()
                .disable();
    }

    @Override
    public void configure(WebSecurity web) throws Exception {
        //配置静态文件不需要认证
        web.ignoring().antMatchers("/static/**");
    }

    /**
     * 指定加密方式
     */
    @Bean
    public PasswordEncoder passwordEncoder(){
        // 使用BCrypt加密密码
        return new BCryptPasswordEncoder();
    }
}
踩坑点1:登录页面接口/login和登录验证接口/user/login,这里是自己之前一直搞错的重点,这里就用网上的图片展示了
踩坑点2:springboot配置spring security 静态资源不能访问
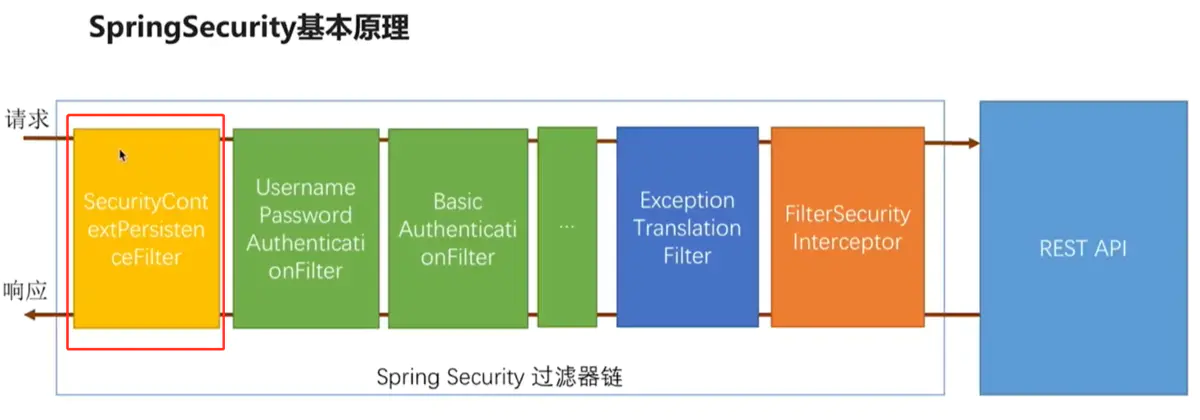
security的配置:在类WebSecurityConfig继承WebSecurityConfigurerAdapter,这个类是我们在配置security的时候,对我们请求的url及权限规则的一些认证配置。具体的不说了,这里主要是静态资源的问题。
在这个类中我们会重写一些方法,其中就有一个方法,可以为我们配置一下静态资源不需要认证。
@Override
    public void configure(WebSecurity web) throws Exception {
        //配置静态文件不需要认证
        web.ignoring().antMatchers("/static/**");
    }
页面的引用如下:
<link rel="stylesheet" th:href="@{static/layui/css/layui.css}">
之后我们启动项目:看到css并没有生效
这时候仅仅通过spring security配置是不够的,我们还需要去重写addResourceHandlers方法去映射下静态资源,这个方法应该很熟悉了,我们通过springboot添加拦截器的时候就会用到这个。
写一个类WebMvcConfig继承WebMvcConfigurationSupport,注意spring boot2版本和1版本是不一样的,spring boot1版本继承的WebMvcConfigurerAdapter在spring boot2版本中已经提示过时了
@Configuration
public class WebMvcConfig extends WebMvcConfigurationSupport {

    /**
     * 配置静态资源
     * @param registry
     */
    @Override
    protected void addResourceHandlers(ResourceHandlerRegistry registry) {
        registry.addResourceHandler("/static/**").addResourceLocations("classpath:/static/");
        super.addResourceHandlers(registry);
    }
}
现在重新启动项目:css文件已经引用成功。
3.3 ErrorPageConfig 配置错误页面
/**
 * @Author qt
 * @Date 2021/3/25
 * @Description 配置错误页面 403 404 500  适用于 SpringBoot 2.x
 */
@Configuration
public class ErrorPageConfig {

    @Bean
    public WebServerFactoryCustomizer<ConfigurableWebServerFactory> webServerFactoryCustomizer() {
        WebServerFactoryCustomizer<ConfigurableWebServerFactory> webCustomizer = new WebServerFactoryCustomizer<ConfigurableWebServerFactory>() {
            @Override
            public void customize(ConfigurableWebServerFactory factory) {
                ErrorPage[] errorPages = new ErrorPage[] {
                        new ErrorPage(HttpStatus.FORBIDDEN, "/403"),
                        new ErrorPage(HttpStatus.NOT_FOUND, "/404"),
                        new ErrorPage(HttpStatus.INTERNAL_SERVER_ERROR, "/500"),
                };
                factory.addErrorPages(errorPages);
            }
        };
        return webCustomizer;
    }
}
3.4 MainController 控制器
/**
 * @Author qt
 * @Date 2021/3/25
 * @Description 主控制器
 */
@Controller
public class MainController {
    private Logger logger = LoggerFactory.getLogger(getClass());

    @GetMapping("/login")
    public String loginPage(){
        System.out.println("login page");
        return "login";
    }
    @GetMapping("/index")
    @PreAuthorize("hasAnyRole('USER','ADMIN')")
    public String index(){
        System.out.println("index page");
        return "index";
    }


    @GetMapping("/admin")
    @PreAuthorize("hasAnyRole('ADMIN')")
    public String printAdmin(){
        System.out.println("hello admin");
        return "admin";
    }

    @GetMapping("/user")
    @PreAuthorize("hasAnyRole('USER','ADMIN')")
    public String printUser(){
        System.out.println("hello user");
        return "user";
    }

    /**
     * 找不到页面
     */
    @GetMapping("/404")
    public String notFoundPage() {
        return "/error/404";
    }
    /**
     * 未授权
     */
    @GetMapping("/403")
    public String accessError() {
        return "/error/403";
    }
    /**
     * 服务器错误
     */
    @GetMapping("/500")
    public String internalError() {
        return "/error/500";
    }
}
3.5 UserInfoController 用户控制器
/**
 * @Author qt
 * @Date 2021/3/25
 * @Description
 */
@Controller
@RequestMapping("/user")
public class UserInfoController {
    private Logger logger = LoggerFactory.getLogger(getClass());
    @Resource
    private UserInfoService userInfoService;

    @GetMapping("/getUserInfo")
    @ResponseBody
    public User getUserInfo(@RequestParam String username){
        return userInfoService.getUserInfoByUsername(username);
    }
}
SMM框架的其他部分就省略了,非这里重点。
3.6 CustomAccessDecisionManager 自定义权限决策管理器
/**
 * @Author qt
 * @Date 2021/3/31
 * @Description 自定义权限决策管理器
 */
@Component
public class CustomAccessDecisionManager implements AccessDecisionManager {

    /**
     * @Author: qt
     * @Description: 取当前用户的权限与这次请求的这个url需要的权限作对比,决定是否放行
     * auth 包含了当前的用户信息,包括拥有的权限,即之前UserDetailsService登录时候存储的用户对象
     * object 就是FilterInvocation对象,可以得到request等web资源。
     * configAttributes 是本次访问需要的权限。即上一步的 MyFilterInvocationSecurityMetadataSource 中查询核对得到的权限列表
     **/
    @Override
    public void decide(Authentication auth, Object o, Collection<ConfigAttribute> collection) throws AccessDeniedException, InsufficientAuthenticationException {
        Iterator<ConfigAttribute> iterator = collection.iterator();
        while (iterator.hasNext()) {
            if (auth == null) {
                throw new AccessDeniedException("当前访问没有权限");
            }
            ConfigAttribute ca = iterator.next();
            //当前请求需要的权限
            String needRole = ca.getAttribute();
            if ("ROLE_LOGIN".equals(needRole)) {
                if (auth instanceof AnonymousAuthenticationToken) {
                    throw new BadCredentialsException("未登录");
                } else
                    return;
            }
            //当前用户所具有的权限
            Collection<? extends GrantedAuthority> authorities = auth.getAuthorities();
            for (GrantedAuthority authority : authorities) {
                if (authority.getAuthority().equals(needRole)) {
                    return;
                }
            }
        }
        throw new AccessDeniedException("权限不足!");
    }

    @Override
    public boolean supports(ConfigAttribute configAttribute) {
        return true;
    }

    @Override
    public boolean supports(Class<?> aClass) {
        return true;
    }
}
3.7 CustomLogoutSuccessHandler 注销登录处理
/**
 * @Author qt
 * @Date 2021/3/31
 * @Description 注销登录处理
 */
public class CustomLogoutSuccessHandler implements LogoutSuccessHandler {
    private Logger logger = LoggerFactory.getLogger(getClass());

    @Override
    public void onLogoutSuccess(HttpServletRequest httpServletRequest, HttpServletResponse response, Authentication authentication) throws IOException, ServletException {
        System.out.println("注销成功!");
        //这里写你登录成功后的逻辑
        response.setStatus(HttpStatus.OK.value());
        response.setContentType("application/json;charset=UTF-8");
        response.getWriter().write("注销成功!");
    }
}
3.8 LoginFailureHandler 登录失败处理
/**
 * @Author qt
 * @Date 2021/3/24
 * @Description 登录失败处理
 */
@Component("loginFailureHandler")
public class LoginFailureHandler extends SimpleUrlAuthenticationFailureHandler {
    private Logger logger = LoggerFactory.getLogger(getClass());
    @Resource
    private ObjectMapper objectMapper;

    @Override
    public void onAuthenticationFailure(HttpServletRequest request, HttpServletResponse response, AuthenticationException exception) throws IOException, ServletException {
        logger.info("登录失败");
        this.saveException(request, exception);
        this.getRedirectStrategy().sendRedirect(request, response, "/login?error=true");
    }
}
3.9 LoginSuccessHandler 登录成功处理
/** @Author qt
 * @Date 2021/3/24
 * @Description 登录成功处理
 */
@Component("loginSuccessHandler")
public class LoginSuccessHandler extends SavedRequestAwareAuthenticationSuccessHandler {
    private Logger logger = LoggerFactory.getLogger(getClass());

    @Resource
    private ObjectMapper objectMapper;

    private RequestCache requestCache;

    @Override
    public void onAuthenticationSuccess(HttpServletRequest request, HttpServletResponse response, Authentication authentication) throws ServletException, IOException {
        // 获取前端传到后端的全部参数
          Enumeration enu = request.getParameterNames();
          while (enu.hasMoreElements()) {
              String paraName = (String) enu.nextElement(); System.out.println("参数- " + paraName + " : " + request.getParameter(paraName));
          }
        logger.info("登录认证成功");
        //这里写你登录成功后的逻辑,可以验证其他信息,如验证码等。

        response.setContentType("application/json;charset=UTF-8");
        JSONObject resultObj = new JSONObject();
        resultObj.put("code", HttpStatus.OK.value());
        resultObj.put("msg","登录成功");
        resultObj.put("authentication",objectMapper.writeValueAsString(authentication));
        response.getWriter().write(resultObj.toString());
        this.getRedirectStrategy().sendRedirect(request, response, "/index");//重定向
    }
}
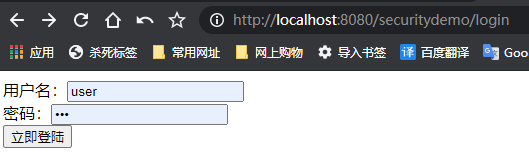
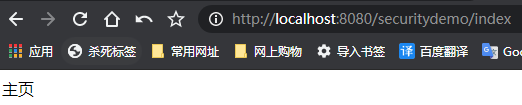
3.10 login.html 登录页面
<!DOCTYPE html>
<html lang="en" xmlns:th="http://www.thymeleaf.org">
<head>
    <meta charset="UTF-8">
    <title>登录</title>
    <link rel="stylesheet" type="text/css" th:href="@{static/layui/css/layui.css}">
</head>
<body>
<form method="POST" th:action="@{/user/login}">
    <div>
        用户名:<input type="text" name="username" id="username">
    </div>
    <div>
        密码:<input type="password" name="password" id="password">
    </div>
    <div>
         <button type="submit">立即登陆</button>
    </div>
    <!-- 以下为显示认证失败等提示信息(th:if=""一定要写 )-->
    <span style="color: red;" th:if="${param.error}" th:text="${session.SPRING_SECURITY_LAST_EXCEPTION.message}"></span>
</form>
</body>
</html>
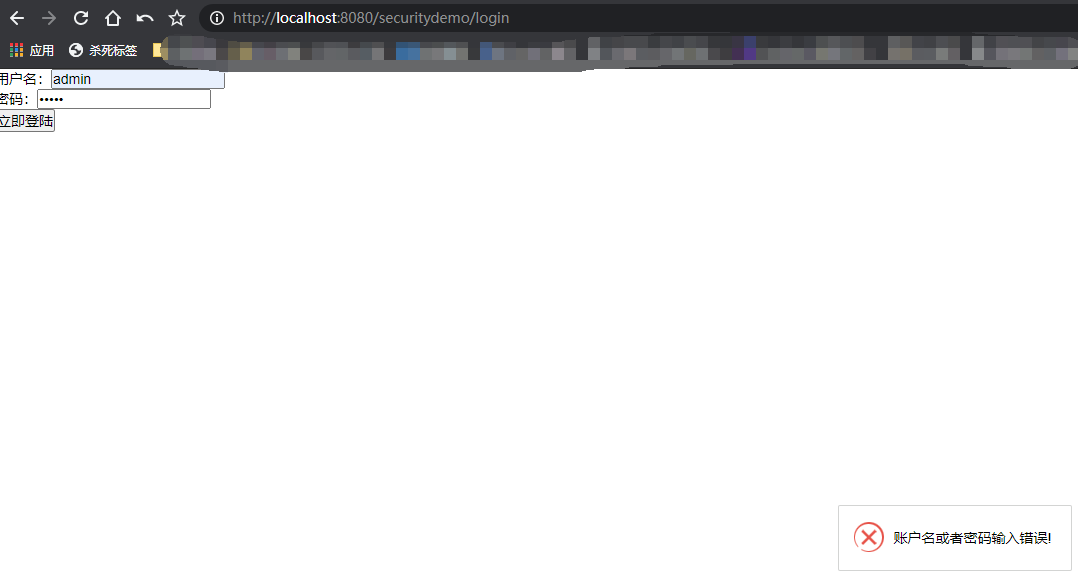
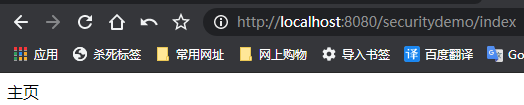
3.11 效果图片
登录失败

登录成功
4、自定义ajax请求认证登录
本人比较喜欢使用ajax的登录认证方式,这个比较灵活。
4.1 目录
4.2、较表单登录认证的改变
LoginFailureHandler 登录失败处理
/**
 * @Author qt
 * @Date 2021/3/24
 * @Description 登录失败处理
 */
@Component("loginFailureHandler")
public class LoginFailureHandler extends SimpleUrlAuthenticationFailureHandler {
    private Logger logger = LoggerFactory.getLogger(getClass());
    @Resource
    private ObjectMapper objectMapper;

    @Override
    public void onAuthenticationFailure(HttpServletRequest request, HttpServletResponse response, AuthenticationException exception) throws IOException, ServletException {
        logger.info("登录失败");
        response.setContentType("application/json;charset=UTF-8");
        //这里写你登录失败后的逻辑,可加验证码验证等
        String errorInfo = "";
        if (exception instanceof BadCredentialsException ||
                exception instanceof UsernameNotFoundException) {
            errorInfo = "账户名或者密码输入错误!";
        } else if (exception instanceof LockedException) {
            errorInfo = "账户被锁定,请联系管理员!";
        } else if (exception instanceof CredentialsExpiredException) {
            errorInfo = "密码过期,请联系管理员!";
        } else if (exception instanceof AccountExpiredException) {
            errorInfo = "账户过期,请联系管理员!";
        } else if (exception instanceof DisabledException) {
            errorInfo = "账户被禁用,请联系管理员!";
        } else {
            errorInfo = "登录失败!";
        }
        logger.info("登录失败原因:" + errorInfo);
        //ajax请求认证方式
        JSONObject resultObj = new JSONObject();
        resultObj.put("code", HttpStatus.UNAUTHORIZED.value());
        resultObj.put("msg",errorInfo);
        resultObj.put("exception",objectMapper.writeValueAsString(exception));
        response.getWriter().write(resultObj.toString());

        //表单认证方式
        //this.saveException(request, exception);
        //this.getRedirectStrategy().sendRedirect(request, response, "/login?error=true");
    }
}
LoginSuccessHandler 登录成功处理
/**
 * @Author qt
 * @Date 2021/3/24
 * @Description 登录成功处理
 */
@Component("loginSuccessHandler")
public class LoginSuccessHandler extends SavedRequestAwareAuthenticationSuccessHandler {
    private Logger logger = LoggerFactory.getLogger(getClass());

    @Resource
    private ObjectMapper objectMapper;

    @Override
    public void onAuthenticationSuccess(HttpServletRequest request, HttpServletResponse response, Authentication authentication) throws ServletException, IOException {
        response.setContentType("application/json;charset=UTF-8");
        // 获取前端传到后端的全部参数
          Enumeration enu = request.getParameterNames();
          while (enu.hasMoreElements()) {
              String paraName = (String) enu.nextElement(); System.out.println("参数- " + paraName + " : " + request.getParameter(paraName));
          }
        logger.info("登录认证成功");
        //这里写你登录成功后的逻辑,可加验证码验证等

        //ajax请求认证方式
        JSONObject resultObj = new JSONObject();
        resultObj.put("code", HttpStatus.OK.value());
        resultObj.put("msg","登录成功");
        resultObj.put("authentication",objectMapper.writeValueAsString(authentication));
        response.getWriter().write(resultObj.toString());

        //表单认证方式
        //this.getRedirectStrategy().sendRedirect(request, response, "/index");//重定向
    }
}
login.html 登录页面
<!DOCTYPE html>
<html lang="en" xmlns:th="http://www.thymeleaf.org">
<head>
    <meta charset="UTF-8">
    <title>登录</title>
    <link rel="stylesheet" type="text/css" th:href="@{static/layui/css/layui.css}">
</head>
<body>
<form method="POST" action="">
    <div>
        用户名:<input type="text" name="username" id="username">
    </div>
    <div>
        密码:<input type="password" name="password" id="password">
    </div>
    <div>
        <input type="button" name="login" id="login" th:value="立即登陆" onclick="mylogin()">
    </div>
</form>

<script type="text/javascript" charset="utf-8" th:src="@{static/jquery/jquery-3.5.1.min.js}"></script>
<script type="text/javascript" charset="utf-8" th:src="@{static/layui/layui.js}"></script>
<script th:inline="javascript" type="text/javascript">
    layui.use(['form','jquery','layedit', 'laydate'], function () {
        var $ = layui.jquery,
            form = layui.form,
            layer = layui.layer;
    });
    function mylogin() {
        var username = $("#username").val();
        var password = $("#password").val();
        console.log("username:" + username + "password:" + password);
        var index = layer.load(1);
        $.ajax({
            type: "POST",
            dataType: "json",
            url: "user/login",
            data: {
                "username": username,
                "password": password
                //可加验证码参数等,后台登陆处理LoginSuccessHandler中会传入这些参数
            },
            success: function (data) {
                layer.close(index);
                console.log("data===>:" + JSON.stringify(data));
                if (data.code == 200) { //登录成功
                    window.location.href = "index";
                } else {
                    layer.msg(data.msg, {
                        icon: 2,
                        time: 3000 //2秒关闭(如果不配置,默认是3秒)
                    });
                }
            },
            error: function () {
                layer.close(index);
                layer.msg("数据请求异常!", {
                    icon: 2,
                    time: 2000 //2秒关闭(如果不配置,默认是3秒)
                });
            }
        });
    }
</script>
</body>
</html>
4.3 演示图片
登录失败
登录成功
最后添加一个我写的一个小demo,里面也整合了security框架,使用springboot + ssm后端框架 + maven依赖包管理 + thmeleaf模板引擎 + pear-admin-layui前端框架等。
demo演示地址:http://www.qnto.top/springfashionsys/login
demo只对数据分析页面做了权限设置,只有admin才可访问。
转载需要加链接哦,整理不易。
总结:实践是检验真理的唯一标准,亲测可用。
参考链接:
https://blog.csdn.net/qq_40298902/article/details/106433192
https://www.e-learn.cn/topic/3143567
https://blog.csdn.net/qq_20108595/article/details/89647419
http://www.spring4all.com/article/428
https://blog.csdn.net/tanleijin/article/details/100698486
https://blog.csdn.net/zhaoxichen_10/article/details/88713799
https://blog.csdn.net/hanxiaotongtong/article/details/103095906
https://www.jb51.net/article/140429.htm
https://www.jianshu.com/p/29d10ad22531
https://blog.csdn.net/weixin_39588542/article/details/110507502
https://blog.csdn.net/sinat_33151213/article/details/89931819
文章来源: 博客园
- 还没有人评论,欢迎说说您的想法!


 客服
客服


