原文地址: https://blog.fanscore.cn/a/51/
背景
最近接到一个需求,开发中使用了redis georadius命令取附近给定距离内的点。完工后对服务进行压测后发现georadius的性能比预期要差,因此我分析了georadius的源码,并对原始的实现方案进行了优化,总结成了本文。
我们生产环境使用的redis版本为4.0.13,因此本文redis源码皆为4.0.13版本的源码
redis geo原理
往redis中添加坐标的命令是GEOADD key longitude latitude member [longitude latitude member ...],实际上redis会将经纬度转成一个52bit的整数作为zset的score,然后添加到zset中,所以实际上redis geo底层就是个zset,你甚至可以直接使用zset的命令来操作一个geo类型的key。
那么经纬度是如何转成52bit整数的呢?业内广泛使用的方法是首先对经纬度分别按照二分法编码,然后将各自的编码交叉组合成最后的编码。我们以116.505021, 39.950898这个坐标为例看下如何编码:
- 第一次二分操作,把经度分为两个区间:
[-180,0)和[0,180],116.505021落在右区间,因此用1表示第一次编码后的值 - 第二次二分操作,把
[0,180]分为两个区间[0,90)和[90,180],116.505021落在右区间,因此用1表示第二次编码后的值 - 第三次二分操作,把
[90,180]分为两个区间[90,135)和[135,180],116.505021落在左区间,因此用0表示第二次编码后的值 - 按照这种方法依次处理,做完5次后,得到经度值的5位编码值:
11010
| 分区次数 | 左区间 | 右区间 | 经度116.505021在区间 | 编码值 |
|---|---|---|---|---|
| 1 | [-180, 0) | [0, 180] | [0, 180] | 1 |
| 2 | [0, 90) | [90, 180] | [90, 180] | 1 |
| 3 | [90, 135) | [135, 180] | [90, 135]) | 0 |
| 4 | [90, 112.5) | [112.5, 135] | [112.5, 135] | 1 |
| 5 | [112.5, 123.75) | [123.75, 180] | [112.5, 123.75] | 0 |
- 按照同样的方法对纬度值进行编码,得到纬度值的5位编码值:
10111
| 分区次数 | 左区间 | 右区间 | 纬度39.950898在区间 | 编码值 |
|---|---|---|---|---|
| 1 | [-90, 0) | [0, 90] | [0, 90] | 1 |
| 2 | [0, 45) | [45, 90] | [0, 45] | 0 |
| 3 | [0, 22.5) | [22.5, 45] | [22.5, 45]) | 1 |
| 4 | [22.5, 33.75) | [33.75, 45] | [33.75, 45] | 1 |
| 5 | [33.75, 39.375) | [39.375, 45] | [39.375, 45] | 1 |
然后将经度编码11010和纬度编码值10111交叉得到最终geohash值1110011101

通常会使用base32将编码值转成字符串表示的hash值,与本文无关这里不多做介绍
根据如上的算法通常可以直观的写出如下的代码:
// 该代码来源于https://github.com/HDT3213/godis/blob/master/lib/geohash/geohash.go
func encode0(latitude, longitude float64, bitSize uint) ([]byte, [2][2]float64) {
	box := [2][2]float64{
		{-180, 180}, // lng
		{-90, 90},   // lat
	}
	pos := [2]float64{longitude, latitude}
	hash := &bytes.Buffer{}
	bit := 0
	var precision uint = 0
	code := uint8(0)
	for precision < bitSize {
		for direction, val := range pos {
			mid := (box[direction][0] + box[direction][1]) / 2
			if val < mid {
				box[direction][1] = mid
			} else {
				box[direction][0] = mid
				code |= bits[bit]
			}
			bit++
			if bit == 8 {
				hash.WriteByte(code)
				bit = 0
				code = 0
			}
			precision++
			if precision == bitSize {
				break
			}
		}
	}
	if code > 0 {
		hash.WriteByte(code)
	}
	return hash.Bytes(), box
}
可以看到基本就是上述算法的实际描述,但是redis源码中却是另外一种算法:
int geohashEncode(const GeoHashRange *long_range, const GeoHashRange *lat_range,
                  double longitude, double latitude, uint8_t step,
                  GeoHashBits *hash) {
    // 参数检查此处代码省略
    ...

    double lat_offset =
        (latitude - lat_range->min) / (lat_range->max - lat_range->min);
    double long_offset =
        (longitude - long_range->min) / (long_range->max - long_range->min);

    lat_offset *= (1 << step);
    long_offset *= (1 << step);
    // lat_offset与long_offset交叉
    hash->bits = interleave64(lat_offset, long_offset);
    return 1;
}
那么该如何理解redis的这种算法呢?我们假设经度用3位来编码
可以看到编码值从左到右实际就是从000到111依次加1递进的,给定的经度值在这条线的位置(偏移量)就是其编码值。假设给定经度值为50,那么它在这条线的偏移量就是(50 - -180) / (180 - -180) * 8 = 5即101
georadius原理
georadius命令格式为GEORADIUS key longitude latitude radius m|km|ft|mi [WITHCOORD] [WITHDIST] [WITHHASH] [COUNT count] [ASC|DESC] [STORE key] [STOREDIST key],以给定的经纬度为中心, 返回键包含的位置元素当中, 与中心的距离不超过给定最大距离的所有位置元素。

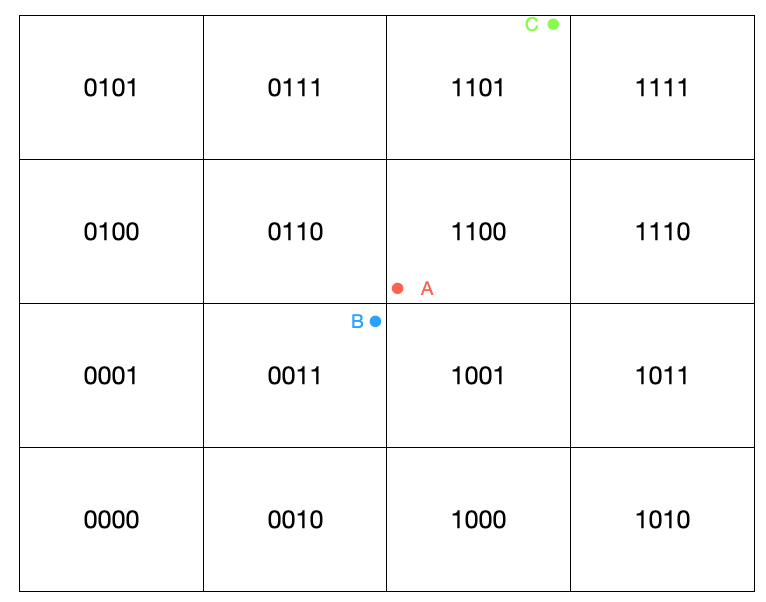
首先需要明确一点的是并非两个坐标点编码相近其距离越近,以上图为例,虽然A所在区块的编码与C所在区块编码较之B更相近,但实际B点距离A点更近。为了避免这种问题redis中会先计算出给定点东南西北以及东北、东南、西北、西南八个区块以及自己身所在的区块即九宫格区域内所有坐标点,然后计算与当前点的距离,再进一步筛选出符合距离条件的点。
假设要查附近100km的点,那么要保证矩形的边长要大于100km,才能保证能获取到所有符合条件的点,地球半径约6372.797km,第一次分割后可以得到四个东西长6372.797*π,南北长3186.319*π,继续切割:
| 分割次数 | 东西长(km) | 南北长(km) |
|---|---|---|
| 1 | 6372.797*π | 3186.319*π |
| 2 | 3186.319*π | 1593.160*π |
| 3 | 1593.160*π | 796.58*π |
| 4 | 796.58*π | 398.29*π |
| 5 | 398.29*π | 199.145*π |
| 6 | 199.145*π | 99.573*π |
| 7 | 99.573*π | 49.787*π |
分割到第七次时南北长49.787*π,如果再切分长度为24.894*π,长度小于100km,因此停止分割,所以如果要查附近100km的点,我们需要的精度为7
redis中根据给定的距离估算出需要的精度的代码如下
const double MERCATOR_MAX = 20037726.37;

uint8_t geohashEstimateStepsByRadius(double range_meters, double lat) {
    if (range_meters == 0) return 26;
    int step = 1;
    while (range_meters < MERCATOR_MAX) {
        range_meters *= 2;
        step++;
    }
    step -= 2;
    // 高纬度地区地球半径小因此适当降低精度
    if (lat > 66 || lat < -66) {
        step--;
        if (lat > 80 || lat < -80) step--;
    }

    if (step < 1) step = 1;
    if (step > 26) step = 26;
    return step;
}
调用encode0函数就能计算出给定点在step = geohashEstimateStepsByRadius()精度级别所在矩形区域的geohash值。接下来计算该矩形区域附近的八个区域。
...
// 调用encode0函数计算geohash
geohashEncode(&long_range,&lat_range,longitude,latitude,steps,&hash);
// 计算出附近八个区域
geohashNeighbors(&hash,&neighbors);
...
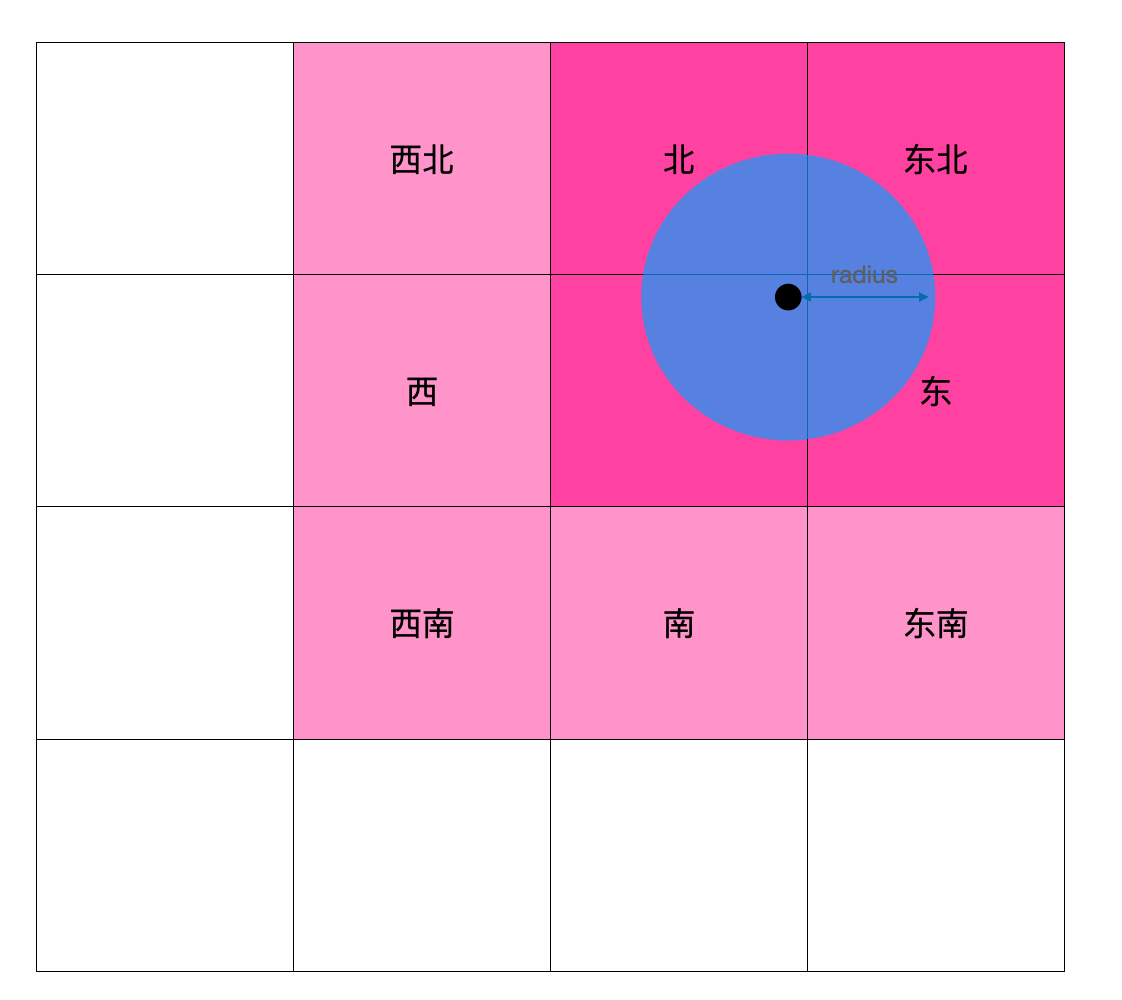
一个区域的东侧区域只要将经度的编码值+1即可,反之西侧区域只要将经度编码值-1即可,北侧区域只要将纬度的编码值+1即可,南侧区域只要将纬度的编码值-1即可。对应redis源码如下:
void geohashNeighbors(const GeoHashBits *hash, GeoHashNeighbors *neighbors) {
    neighbors->east = *hash;
    neighbors->west = *hash;
    neighbors->north = *hash;
    neighbors->south = *hash;
    neighbors->south_east = *hash;
    neighbors->south_west = *hash;
    neighbors->north_east = *hash;
    neighbors->north_west = *hash;
    // 纬度加1就是东侧区域
    geohash_move_x(&neighbors->east, 1);
    geohash_move_y(&neighbors->east, 0);
    // 纬度减1就是西侧区域
    geohash_move_x(&neighbors->west, -1);
    geohash_move_y(&neighbors->west, 0);
    // 精度减1就是南侧区域
    geohash_move_x(&neighbors->south, 0);
    geohash_move_y(&neighbors->south, -1);

    geohash_move_x(&neighbors->north, 0);
    geohash_move_y(&neighbors->north, 1);

    geohash_move_x(&neighbors->north_west, -1);
    geohash_move_y(&neighbors->north_west, 1);

    geohash_move_x(&neighbors->north_east, 1);
    geohash_move_y(&neighbors->north_east, 1);

    geohash_move_x(&neighbors->south_east, 1);
    geohash_move_y(&neighbors->south_east, -1);

    geohash_move_x(&neighbors->south_west, -1);
    geohash_move_y(&neighbors->south_west, -1);
}

如上图所示,当给定点在中心区域的东北侧时,西北、西、西南、南、东南五个方向的区域中的所有点距离给定点肯定超过了给定距离,所以可以过滤掉,redis代码如下所示:
if (steps >= 2) {
    if (area.latitude.min < min_lat) {
        GZERO(neighbors.south); // 南侧区域置零,过滤南侧区域
        GZERO(neighbors.south_west);
        GZERO(neighbors.south_east);
    }
    if (area.latitude.max > max_lat) {
        GZERO(neighbors.north);
        GZERO(neighbors.north_east);
        GZERO(neighbors.north_west);
    }
    if (area.longitude.min < min_lon) {
        GZERO(neighbors.west);
        GZERO(neighbors.south_west);
        GZERO(neighbors.north_west);
    }
    if (area.longitude.max > max_lon) {
        GZERO(neighbors.east);
        GZERO(neighbors.south_east);
        GZERO(neighbors.north_east);
    }
}
计算出区块后下一步就需要将九宫格区域中的所有坐标点拿出来,依次计算与给定点的距离,然后过滤出符合给定距离的点
// 遍历九宫格内所有点,依次计算与给定点的距离,然后过滤出符合给定距离的点添加到ga中
int membersOfAllNeighbors(robj *zobj, GeoHashRadius n, double lon, double lat, double radius, geoArray *ga) {
    GeoHashBits neighbors[9];
    unsigned int i, count = 0, last_processed = 0;
    int debugmsg = 1;

    neighbors[0] = n.hash;
    neighbors[1] = n.neighbors.north;
    neighbors[2] = n.neighbors.south;
    neighbors[3] = n.neighbors.east;
    neighbors[4] = n.neighbors.west;
    neighbors[5] = n.neighbors.north_east;
    neighbors[6] = n.neighbors.north_west;
    neighbors[7] = n.neighbors.south_east;
    neighbors[8] = n.neighbors.south_west;

    // 遍历九宫格
    for (i = 0; i < sizeof(neighbors) / sizeof(*neighbors); i++) {
        ...
        // 当给定距离过大时,区块可能会重复
        if (last_processed &&
            neighbors[i].bits == neighbors[last_processed].bits &&
            neighbors[i].step == neighbors[last_processed].step)
        {
            continue;
        }
        // 取出宫格内所有点,依次计算距离,符合条件后添加到ga中
        count += membersOfGeoHashBox(zobj, neighbors[i], ga, lon, lat, radius);
        last_processed = i;
    }
    return count;
}

int membersOfGeoHashBox(robj *zobj, GeoHashBits hash, geoArray *ga, double lon, double lat, double radius) {
    GeoHashFix52Bits min, max;
    // 根据区块的geohash值计算出对应的zset的score的上下限[min,max]
    scoresOfGeoHashBox(hash,&min,&max);
    // 取出底层的zset中的[min,max]范围内的元素,依次计算距离,符合条件后添加到ga中
    return geoGetPointsInRange(zobj, min, max, lon, lat, radius, ga);
}
georadius优化
从上一节中可以看到,给定距离范围越大,则九宫格区域越大,九宫格区域内的点就越多,而每个点都需要计算与中间点的距离,距离计算又涉及到大量的三角函数计算,所以这部分计算是十分消耗CPU的。又因为redis工作线程是单线程的,因此无法充分利用多核,无法通过增加redis server的CPU核数来提升性能,只能添加从库。
距离计算算法及优化可以看下美团的这篇文章: https://tech.meituan.com/2014/09/05/lucene-distance.html
对于这个问题,我们可以将九宫格以及距离计算部分提升到我们的应用程序即redis客户端来进行,步骤如下:
- 在客户端计算出九宫格区域,然后转为zset score的范围
- 使用zrangebyscore命令从redis取出score范围内的所有点
- 遍历所有点依次计算与给定点的距离,筛选出符合距离条件的点
陌陌好像也是使用了这种方案:https://mp.weixin.qq.com/s/DL2P49y4R1AE2MIdkxkZtQ
由于我们使用golang进行开发,因此我将redis中的georadius部分代码转为了golang代码,并整理成一个库开源在了github:https://github.com/Orlion/go-georadius
原本的写法是:
client.GeoRadius(key, longitude, latitude, &redis.GeoRadiusQuery{
	Radius:    1000,
	Unit:      "m", // 距离单位
	Count:     1,          // 返回1条
	WithCoord: true,       // 将位置元素的经纬度一并返回
	WithDist:  true,       // 一并返回距离
})
改造后:
ga := make([]redis.Z, 0)
ranges := geo.NeighborRanges(longitude, latitude, 1000)
for _, v := range ranges {
    zs, _ := client.ZRangeByScoreWithScores(key, redis.ZRangeBy{
		Min: strconv.Itoa(int(v[0])),
		Max: strconv.Itoa(int(v[1])),
	}).Result()
	for _, z := range zs {
	    dist := geox.GetDistanceByScore(longitude, latitude, uint64(z.Score))
		if dist < 1000 {
		    ga = append(ga, z)
		}
	}
}
压测结果对比
43w坐标点,取附近50km(九宫格内有14774点,符合条件的点约6000个)
50km优化前
Concurrency Level:      5
Time taken for tests:   89.770 seconds
Complete requests:      5000
Failed requests:        0
Write errors:           0
Total transferred:      720000 bytes
HTML transferred:       0 bytes
Requests per second:    55.70 [#/sec] (mean)
Time per request:       89.770 [ms] (mean)
Time per request:       17.954 [ms] (mean, across all concurrent requests)
Transfer rate:          7.83 [Kbytes/sec] received

Connection Times (ms)
              min  mean[+/-sd] median   max
Connect:        0    0   0.0      0       0
Processing:    23   90  10.7     90     159
Waiting:       23   89  10.7     89     159
Total:         23   90  10.7     90     159

Percentage of the requests served within a certain time (ms)
  50%     90
  66%     93
  75%     96
  80%     97
  90%    102
  95%    107
  98%    111
  99%    116
 100%    159 (longest request)
50km优化后
Concurrency Level:      5
Time taken for tests:   75.447 seconds
Complete requests:      5000
Failed requests:        0
Write errors:           0
Total transferred:      720000 bytes
HTML transferred:       0 bytes
Requests per second:    66.27 [#/sec] (mean)
Time per request:       75.447 [ms] (mean)
Time per request:       15.089 [ms] (mean, across all concurrent requests)
Transfer rate:          9.32 [Kbytes/sec] received

Connection Times (ms)
              min  mean[+/-sd] median   max
Connect:        0    0   0.0      0       0
Processing:    21   75  14.2     75     159
Waiting:       21   75  14.1     75     159
Total:         21   75  14.2     75     159

Percentage of the requests served within a certain time (ms)
  50%     75
  66%     80
  75%     84
  80%     86
  90%     92
  95%     98
  98%    104
  99%    111
 100%    159 (longest request)
可以看到性能并没有巨大的提升,我们减小距离范围到5km(符合条件的点有130个)再看下压测结果
5km优化前
Concurrency Level:      5
Time taken for tests:   14.006 seconds
Complete requests:      5000
Failed requests:        0
Write errors:           0
Total transferred:      720000 bytes
HTML transferred:       0 bytes
Requests per second:    356.99 [#/sec] (mean)
Time per request:       14.006 [ms] (mean)
Time per request:       2.801 [ms] (mean, across all concurrent requests)
Transfer rate:          50.20 [Kbytes/sec] received

Connection Times (ms)
              min  mean[+/-sd] median   max
Connect:        0    0   0.0      0       0
Processing:     2   14   5.5     12      33
Waiting:        2   14   5.5     12      33
Total:          2   14   5.5     12      34

Percentage of the requests served within a certain time (ms)
  50%     12
  66%     16
  75%     19
  80%     20
  90%     22
  95%     23
  98%     27
  99%     28
 100%     34 (longest request)
5km优化后
Concurrency Level:      5
Time taken for tests:   16.661 seconds
Complete requests:      5000
Failed requests:        0
Write errors:           0
Total transferred:      720000 bytes
HTML transferred:       0 bytes
Requests per second:    300.11 [#/sec] (mean)
Time per request:       16.661 [ms] (mean)
Time per request:       3.332 [ms] (mean, across all concurrent requests)
Transfer rate:          42.20 [Kbytes/sec] received

Connection Times (ms)
              min  mean[+/-sd] median   max
Connect:        0    0   0.0      0       0
Processing:     3   17   5.8     16      66
Waiting:        3   16   5.8     16      66
Total:          3   17   5.8     16      66

Percentage of the requests served within a certain time (ms)
  50%     16
  66%     20
  75%     21
  80%     22
  90%     24
  95%     26
  98%     28
  99%     30
 100%     66 (longest request)
可以看到当优化后性能更差了

猜测造成这个结果的原因应该是附近5km九宫格内的点比较少,所以优化后实际没减少多少距离计算,但多了n(n<=9)倍的请求数,多了额外的命令解析与响应内容的消耗,因此这种优化方案仅仅适用于附近点特别多的情况。
参考资料
文章来源: 博客园
- 还没有人评论,欢迎说说您的想法!


 客服
客服


